Read More button or widget is one of the most popular and important design of blog or website. Actually this trick is important because it increase your loading speed. Because when you add Auto Read More button in your blog then the posts of your blog will be shown in the homepage with Small Summary, Thumbnail Image and a Read More link. In this post I'm gonna show how to add Read More button with Thumbnail to Blogger. See the below demo image.
Adding Read Mere Button to Blogger:
If you are blogging on Blogger platform then you can easily add Auto Read More button in your blog by adding some simple in your blog. There several codes available by which add Read More button in your Blog. But the code that I am sharing, here you can customize the Post Summary Size, Thumbnail Size as you want. This Automatic Read More button with Thumbnail will be shown in Homepage, Category Page and Archive Page. Lets see how to add this Read More Button in Blogger.
Warning: Before doing any kind of customization on your site's HTML page, I will recommend you to backup your site Template. To know more about Template backup Read This Post.
Adding Read Mere Button to Blogger:
- First Sign into your Blogger Account and go to Dashboard.
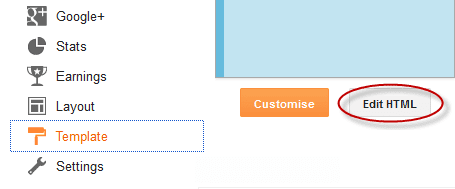
- Then click on Template and then click on Edit HTML button. You will land on the HTML page.
- Here in the HTML page find this code <data:post.body/>
Note: You will find this code more than once but you need to stop at the third one.
- Then Replace above code with the Following code.
<b:if cond='data:blog.pageType != "static_page"'> <b:if cond='data:blog.pageType != "item"'> <div expr:id='"summary" + data:post.id'><data:post.body/></div> <script type='text/javascript'>createSummaryAndThumb("summary<data:post.id/>","<data:post.url/>","<data:post.title/>");</script> <span class='readmore' style='float:right;'><a expr:href='data:post.url'>Read More »</a></span></b:if></b:if> <b:if cond='data:blog.pageType == "item"'><data:post.body/></b:if> <b:if cond='data:blog.pageType == "static_page"'><data:post.body/></b:if>
Note: If you don't see any changes after completing all the steps, Please try to Replace the second <data:post.body/> also.
- Now again find </head> and Paste the below code just Above it.
<script type='text/javascript'> posts_no_thumb_sum = 490; posts_thumb_sum = 400; img_thumb_height = 160; img_thumb_width = 180; </script> <script type='text/javascript'> //<![CDATA[ function removeHtmlTag(strx,chop){ if(strx.indexOf("<")!=-1) { var s = strx.split("<"); for(var i=0;i<s.length;i++){ if(s[i].indexOf(">")!=-1){ s[i] = s[i].substring(s[i].indexOf(">")+1,s[i].length); } } strx = s.join(""); } chop = (chop < strx.length-1) ? chop : strx.length-2; while(strx.charAt(chop-1)!=' ' && strx.indexOf(' ',chop)!=-1) chop++; strx = strx.substring(0,chop-1); return strx+'...'; } function createSummaryAndThumb(pID, pURL, pTITLE){ var div = document.getElementById(pID); var imgtag = ""; var img = div.getElementsByTagName("img"); var summ = posts_no_thumb_sum; if(img.length>=1) { imgtag = '<span class="posts-thumb" style="float:left; margin-right: 10px;"><a href="'+ pURL +'" title="'+ pTITLE+'"><img src="'+img[0].src+'" width="'+img_thumb_width+'px" height="'+img_thumb_height+'px" /></a></span>'; summ = posts_thumb_sum; } var summary = imgtag + '<div>' + removeHtmlTag(div.innerHTML,summ) + '</div>'; div.innerHTML = summary; } //]]> </script> <b:if cond='data:blog.pageType != "static_page"'> <b:if cond='data:blog.pageType != "item"'> <style type='text/css'> .post-footer {display: none;} .post {margin-bottom: 10px; border-bottom: 1px dotted #E6E6E6; padding-bottom: 20px;} .readmore a {text-decoration: none; } </style> </b:if> </b:if>
Customization:
- Modify the 490 value to change the number of characters shown when there is no thumbnail.
- Modify the 400 value to change the number of characters shown when the post has a thumbnail.
- To change the thumbnail size, modify height = 160 and width = 180 value.
- Finally click on Save Template button to apply the change.
That's it, Now view your blog and you will see that the posts are shown with Small Summary, Thumbnail Image and a Read More link.
Stay with www.iTTimesbd.com for more IT related post


No comments:
Post a Comment