Showing posts with label Blogger. Show all posts

Wednesday, June 22, 2016

How to Fix Mixed Content Errors in Blogger Blogs !!!

Mixed Content Errors in Blogger
Few days ago I had published a post on Enabling HTTPS on Blogspot Domains. Beside bringing some advantage, Enabling HTTPS is also brings a problem named Mixed Content Error. But in the immediate update Blogger shows how to fix the Mixed Content Errors. If you haven't enabled HTTPS on your blog yet the first enable it, and then follow the rest of the post to fix the mixed content errors in your blog.


What are Mixed Content Errors?

When a web page becomes secured by SSL, but it contains both secure HTTPS and also the non-secure HTTP which is usually links, scripts, style sheets, video, and images. These browser errors will degrade both HTTPS security and the user experience of your blog. This means that source codes such as template, layout gadget, and post and paste may be causing the issues in the HTML side of the equation.


How to Find Mixed Contents:

Requirement: This method will only work on Google Chrome Browser. Use the latest version of Chrome.

  • Visit your Blog using HTTPS. fro example: https://livetechnologybd.blogspot.com
  • Then at the Right Top click on Chrome Menu and go to More Tools > Developer Tools > click on Console.
  • Or just press CTRL + SHIFT + J
  • Now look in the Console for mixed content errors which will look like show in the image below.
Find Blogger Mixed Content Errors

  • The types of Mixed Content Errors are also Include the following
  • Insecure Script Request
  • Insecure Image Request 
  • Insecure URL Request 
  • Make a list of all unsecured URLs and visit the other pages on your blog to check for other mixed content errors.

Fixing Mixed Content Errors in Posts/Pages:
  • First Sign into your Blogger Account and go to Dashboard.
  • Then click on Edit of the Posts/Pages that you Listed earlier
  • Once the Post/Page Editor opens, click on HTML tab.
Mixed Content Errors Blogger Post

  • Now press CTRL+F and Search for http:// inside the HTML tab.
  • Then Replace all http:// to https://
  • Verify all the URL after adding https:// to it by opening it in a new browser window. If the HTTP and HTTPS link give the same result, then everything is OK.
  • Finally click Update to save the post or page.


Fixing Mixed Content Errors in Template: This means that the Mixed Content Errors are may be found in the Template. Follow the steps below to fix them...
  • On your blog’s dashboard, click Template.
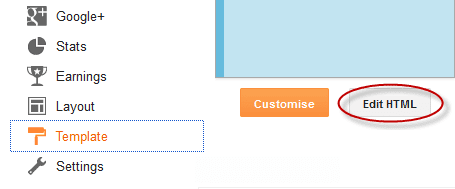
  • Then click one the Edit HTML to open the HTML Editor.
  • Now click inside the HTML Editor and Press CTRL+F to Search for htt://
  • Then Replace all http:// to https://
  • Verify all the URL after adding https:// to it by opening it in a new browser window. If the HTTP and HTTPS link give the same result, then everything is OK.
Mixed Content Errors Blogger Template

  • Finally click on Save Template button.

Fixing Mixed Content Errors in Layout:
  • From your Blog Dashboard click Layout and click Edit on All HTML/JavaScript
  • Find and Replace htt:// with https:// and save them.


Avoid Mixed Content Errors in Post/Page Editor:

To find and fix the mixed content errors automatically, blogger introduced a warning tool to alert about the possible mixed content inside the post. Let's see how to use this tool.
  • Open the Post/Page Editor by clicking Edit link.
  • Then click on HTML tab
  • Now click on the Publish/Update or Save button 
If the content has any errors, you’ll see them at the top of the editor along with the link to Fix or Dismiss them. 
  • Fix: This will fix the errors identified by the editor and save the post.
  • Dismiss: Dismiss will ignore the errors for this session.
  • Click on the Dismiss link to Fix the Errors and Update/Publish it .

Blogger Mixed Content Errors Fix


That's it, hope it will help you to fix the Mixed Content Errors of your Blog. However fixing this errors will help you to improve the performance of your blog, particularly when it come to pages which may have issue with mixed content generating errors.


Please Share This Post 
Stay with techie-asif.blogspot.com for more IT related post

Thursday, June 16, 2016

How to Enable HTTPS on ALL Blogspot Domain !!!

Recently when I had logged into my Blogger account I got a notification about the Turning on the HTTPS supports for the Blogger's all blogspot domain. I think most of you have also noticed that notification like me. Like most of you there are several question that had come across in my mind after seeing that notification, such as...
  • What is HTTPS ?
  • What are the benefits of enabling HTTPS ?

In this post I'm gonna try to share some information that will give us the answer of these question and also gonna show the procedure to enable HTTPS support.


HTTPS Notification:

Before start for searching for answer, first see actually what was in that HTTPS notification. In that notification Blogger.com notified the Blog admin that the visitors would be able to view their domain through encrypted connection, while having all the links and bookmarks working. But the HTTPS availability supports will be disappeared. Have a look at the Notification image below...

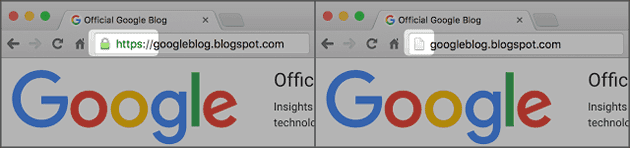
HTTPS Blogspot


Currently this HTTPS support is only available for the Blogspot domain. And custom domain user like me will have to wait for a while to have HTTPS support. Because till this post is published the HTTPS supports is not available for the Custom Domian users on Blogger platform.


What is HTTPS:

Hyper Text Transfer Protocol Secure (HTTPS) is the a secure version of HTTP. That means the data that transferred between the user and server is now encrypted and protected from access or hacking from unwanted third parties.


Benefits of Enabling HTTPS: There are three main benefits to using HTTPS instead of HTTP to access your blog:

  • It helps check that your visitors open the correct website and aren’t being redirected to a malicious site.
  • It helps detect if an attacker tries to change any data sent from Blogger to the visitor.
  • It adds security measures that make it harder for other people to listen to your visitors’ conversations, track their activities, or steal their information.
  • And most interesting thing is, you are getting this HTTPS support without any cost, it is completely FREE!!

HTTPS is fundamental to internet security; it protects the integrity and confidentiality of data sent between websites and visitors' browsers. HTTPS enabled blog will get free SSL certificate which means that the site that you are visiting is secured. Beside that it will leave positive impact on search engine optimization (SEO). Google always gives higher importance on HTTPS than HTTP. So it ensure the higher ratting for your site.

HTTPS Blogspot


Warning: Please be aware that mixed content may cause some of your blog's functionality not to work in the HTTPS version. Mixed content is often caused by incompatible templates, gadgets, or post content. While Blogger proactively fixing most of these errors, some of them can only be fixed by the blog authors.


How to Enable HTTPS on Blogger:
  • First Login to Your Blogger Account.
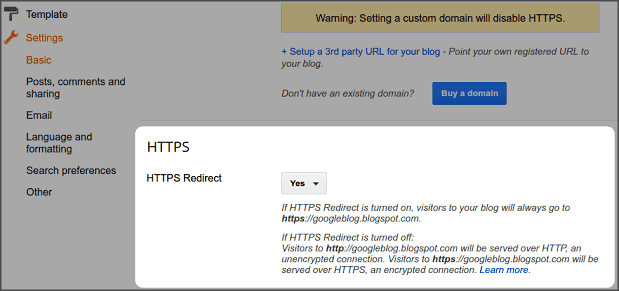
  • Then go to Settings > Basics > HTTPS Redirects 
  • Now from the HTTPS Redirects Dropdown, select Yes
  • Finally Save the settings.

HTTPS Blogspot


Later if you disable HTTPS redirect, visitors have two options for viewing your blog:
  • View the unencrypted version of your blog at http://techie-asif.blogspot.com
  • View the encrypted version of your blog at https://techie-asif.blogspot.com

Please Share This Post 
Stay with techie-asif.blogspot.com for more IT related post

Friday, March 25, 2016

Blogger's Official Featured Post Gadget [LATEST]

blogger featured post widget
Featured Post Gadgets is one of the most essential gadget for any website or blog. Unfortunately for a long there was no such Gadget in the Blogger.com platform. That's why we have to use third party templates or HTML/JavaScript code to display a featured post. But the good news is finally Blogger introduced their official Featured Post Gadget.


Featured Post Gadget:

I think most of you are very much familiar with the Featured Post Gadget. But there are many beginners who may be don't know about this gadget, that's why I want to writ about it briefly...

Featured Post gadget is a simple way to show off the content that matters most. This gadget is to help make it easier to showcase the posts you want your readers to see. With Featured Post Gadget, you can choose posts you’ve shared on your blog and highlight them wherever you’d like.


How to Add Featured Post Gadget:

After Signing into your Blogger account follow the steps below to add the Featured Post Gadget...
  • Now from the Blogger Dashboard click on Layout.
  • Then click on Add a Gadget link where you wanna place the gadget.
  • Then from the Popup Gadget list click on Feature Post.
blogger featured post widget

  • Now on the Configure Featured Post window First Select the Post that you want to Feature. You can Search the post by Labels or Post Title. After selecting the Post, configure the following points...
  • Gadget Title: You can set the Title as you wish or you can keep the default one.
  • Post Snippet: Here you will have the following option to Mark.
  • Show Post Title
  • Show Text Snippet
  • Show Image
  • Check the Preview available in this window to make sure that the gadget is OK according to your expectation.
blogger featured post widget

  • Finally click on the Save button.

That's it after saving the Gadget, just View your blog to see the added Featured Post Gadget on your blog. If you’d like to highlight something new, you can change the post you feature at any time. Happy blogging!


Please Share This Post 
Stay with techie-asif.blogspot.com for more IT related post

Wednesday, July 29, 2015

6 Stylish Custom Search Box for Website/Blogger

Hello Blogger, Its been a long time last I had published any post on Blogger and Blogging section. Actually by this time I was working with other popular section of this site, like Gaming, Software and Android Apps. And I had published many Exciting Full Version Games for Free. However although I had taken too long, but finally from today I'm gonna start writing on Blogger and Website Widgets.


In today's post I'm gonna share 6 different stylish Search Box Widget for Website and Blogger. Search Box is an essential and necessary part of any Site for the convenience of the visitors to find the content from it. But sometime you may not find the right Search Box widget, which suite best with the design of your site. Or sometime the default search box may not attractive and efficient enough to bring effective result.


You can choose the Search Box for your site from the 6 search box I'm sharing today. These Search Box are very stylish and attractive. The code that I'm sharing will work on any HTML site. In this post will only show how you can add these Search box to your Blogger blog. Let's start...


How to Add Custom Search Box to Blogger:


  • First Log into your Blogger Account and go to Dashboard.
  • Then click on Layout Option.
  • Here click on Add a Gadget link where you want to place the search box.
  • The from the gadget list select HTML/JavaScript.
Blogger Gadget
  • Now inside the popup window Paste the any Search Box code from given below.
  • Finally click on Save Button 


Style > 1:
Search Box - 1

  <style>  
 #searchbox {  
   background: #d8d8d8;  
   border: 4px solid #e8e8e8;  
   padding: 20px 10px;  
   width: 250px;  
 }  
 input:focus::-webkit-input-placeholder {  
   color: transparent;  
 }  
 input:focus:-moz-placeholder {  
   color: transparent;  
 }  
 input:focus::-moz-placeholder {  
   color: transparent;  
 }  
 #searchbox input {  
   outline: none;  
 }  
 #searchbox input[type="text"] {  
   background: url(https://blogger.googleusercontent.com/img/b/R29vZ2xl/AVvXsEgVVmOdvTplHoSTx2oVGQU_xpc7O8R2mMCcUaaWNHdJ3TKXD45ZO647HkpqvqNQOuFP2TH8j69vQk_hFiOodxwBhAhBVCHKJ0roAbZyStxOCQynSBxJNIBuwyzvBwBttT_7CXQ6wq0PMWrM/s1600/search-dark.png) no-repeat 10px 6px #fff;  
   border-width: 1px;  
   border-style: solid;  
   border-color: #fff;  
   font: bold 12px Arial,Helvetica,Sans-serif;  
   color: #bebebe;  
   width: 55%;  
   padding: 8px 15px 8px 30px;  
 }  
 #button-submit {  
   background: #6A6F75;  
   border-width: 0px;  
   padding: 9px 0px;  
   width: 23%;  
   cursor: pointer;  
   font: bold 12px Arial, Helvetica;  
   color: #fff;  
   text-shadow: 0 1px 0 #555;  
 }  
 #button-submit:hover {  
   background: #4f5356;  
 }  
 #button-submit:active {  
   background: #5b5d60;  
   outline: none;  
 }  
 #button-submit::-moz-focus-inner {  
   border: 0;  
 }  
 </style>  
 <form id="searchbox" method="get" action="/search">  
 <input name="q" type="text" size="15" placeholder="Type here..." />  
 <input id="button-submit" type="submit" value="Search" />  
 </form>  


Style > 2:
Search Box - 2

 <style>  
 #searchbox {  
 width: 240px;  
 }  
 #searchbox input {  
   outline: none;  
 }  
 input:focus::-webkit-input-placeholder {  
   color: transparent;  
 }  
 input:focus:-moz-placeholder {  
   color: transparent;  
 }  
 input:focus::-moz-placeholder {  
   color: transparent;  
 }  
 #searchbox input[type="text"] {  
   background: url(https://blogger.googleusercontent.com/img/b/R29vZ2xl/AVvXsEgVVmOdvTplHoSTx2oVGQU_xpc7O8R2mMCcUaaWNHdJ3TKXD45ZO647HkpqvqNQOuFP2TH8j69vQk_hFiOodxwBhAhBVCHKJ0roAbZyStxOCQynSBxJNIBuwyzvBwBttT_7CXQ6wq0PMWrM/s1600/search-dark.png) no-repeat 10px 13px #f2f2f2;  
 border: 2px solid #f2f2f2;  
   font: bold 12px Arial,Helvetica,Sans-serif;  
   color: #6A6F75;  
   width: 160px;  
   padding: 14px 17px 12px 30px;  
   -webkit-border-radius: 5px 0px 0px 5px;  
   -moz-border-radius: 5px 0px 0px 5px;  
   border-radius: 5px 0px 0px 5px;  
   text-shadow: 0 2px 3px #fff;  
   -webkit-transition: all 0.7s ease 0s;  
   -moz-transition: all 0.7s ease 0s;  
   -o-transition: all 0.7s ease 0s;  
   transition: all 0.7s ease 0s;  
 }  
 #searchbox input[type="text"]:focus {  
 background: #f7f7f7;  
 border: 2px solid #f7f7f7;  
 width: 200px;  
 padding-left: 10px;  
 }  
 #button-submit{  
 background: url(https://blogger.googleusercontent.com/img/b/R29vZ2xl/AVvXsEhDy4jsVm_DKnbeL60Bc-bEogAsE_u-OJG-vR57cSn1dLOdWv-SKDA_5IcgMGxbRsFEtqB3DIIRkJ7AJX49ruM_-rRiLOnewJaeNaOQxUJwfKZhniM4FyOX2CZA7mdGLeRXA2mu-AECACfh/s1600/slider-arrow-right.png) no-repeat;  
 margin-left: -40px;  
 border-width: 0px;  
 width: 43px;  
 height: 45px;  
 }  
 </style>  
 <form id="searchbox" method="get" action="/search" autocomplete="off">  
 <input name="q" type="text" size="15" placeholder="Enter keywords here..." />  
 <input id="button-submit" type="submit" value=" "/>  
 </form>  


Style > 3:
Search Box - 3

  <style>  
 #searchbox {  
   background: url(https://blogger.googleusercontent.com/img/b/R29vZ2xl/AVvXsEigCvOquxTLfSB6ELjkD5b1MEpdE5il6ed7lYXhF7C0_rmjyXJ9EN7EKWlkjO6HGX5XbZz4XF4EIUjx5ub7u6Y7HLyfM1feFxenW_GRl_QM3Kt7XR68xbmyY7o1oAoZbkGoH9nkssiQLLm4/s1600/searchbar.png) no-repeat;  
   width: 208px;  
   height: 29px;  
 }  
 input:focus::-webkit-input-placeholder {  
   color: transparent;  
 }  
 input:focus:-moz-placeholder {  
   color: transparent;  
 }  
 input:focus::-moz-placeholder {  
   color: transparent;  
 }  
 #searchbox input {  
   outline: none;  
 }  
 #searchbox input[type="text"] {  
   background: transparent;  
   margin: 3px 0px 0px 20px;  
   padding: 5px 0px 5px 0px;  
   border-width: 0px;  
   font-family: "Arial Narrow", Arial, sans-serif;  
   font-size: 12px;  
   color: #828282;  
   width: 70%;  
   display: inline-table;  
   vertical-align: top;  
 }  
 #button-submit {  
   background: url(https://blogger.googleusercontent.com/img/b/R29vZ2xl/AVvXsEgDkqGaQV9tSLd5Eywuj59vnhKGAzl1YqUcO-NuzrDwQQ3qypP_CkNyxGOzRvjUMFm0Hbse_j_TbAYnm0QA0i-RNrlfAzBUugEX5Vr3BFunmjfMpDvdQRUNFFVYM2wH3q4wMhMQ2d4PqHbM/s1600/magnifier.png) no-repeat;  
   border-width: 0px;  
   cursor: pointer;  
   margin-left: 10px;  
   margin-top: 4px;  
   width: 21px;  
   height: 22px;  
 }  
 #button-submit:hover {  
   background: url(https://blogger.googleusercontent.com/img/b/R29vZ2xl/AVvXsEgTIiAh7qYH4vqVSm8Go7OjKS9SrdPkWRvEdoDcPmaueaIFc2CL32aRR_yvfxx1CIO6KtnVBr0vQfZy2bksolT9keFDsAKCZCMh-mfUHtha1r-Gh9EWsCQucReQJm1MkQeLpVicTb7ZUIQo/s1600/magnifier-hover.png) no-repeat;  
 }  
 #button-submit:active {  
   background: url(https://blogger.googleusercontent.com/img/b/R29vZ2xl/AVvXsEgTIiAh7qYH4vqVSm8Go7OjKS9SrdPkWRvEdoDcPmaueaIFc2CL32aRR_yvfxx1CIO6KtnVBr0vQfZy2bksolT9keFDsAKCZCMh-mfUHtha1r-Gh9EWsCQucReQJm1MkQeLpVicTb7ZUIQo/s1600/magnifier-hover.png) no-repeat;  
   outline: none;  
 }  
 #button-submit::-moz-focus-inner {  
   border: 0;  
 }  
 </style>  
 <form id="searchbox" method="get" action="/search" autocomplete="off">  
   <input name="q" type="text" size="15" placeholder="search..." />  
   <input id="button-submit" type="submit" value="" />  
 </form>  


Style > 4:
Search Box - 4

 <style>  
 #searchbox {  
   background: url(https://blogger.googleusercontent.com/img/b/R29vZ2xl/AVvXsEh0QgE8JiXe_zRjGnzRbD1sB_-eY78G7DgPcSnOb_d1xrcCl3mLgHyq5K30QudKNbenFgcKzFkq2EV258ZVuGB1OTs_Ei73HLLd0L8sHcyVSmGyjoAr1DglPB6oiwjB4_A0vRFxy_gKJfrr/s1600/search-box.png) no-repeat;  
   height: 27px;  
   width: 202px;  
 }  
 input:focus::-webkit-input-placeholder {  
   color: transparent;  
 }  
 input:focus:-moz-placeholder {  
   color: transparent;  
 }  
 input:focus::-moz-placeholder {  
   color: transparent;  
 }  
 #searchbox input {  
   outline: none;  
 }  
 #searchbox input[type="text"] {  
   background: transparent;  
   margin: 0px 0px 0px 12px;  
   padding: 5px 0px 5px 0px;  
   border-width: 0px;  
   font-family: "Arial Narrow", Arial, sans-serif;  
   font-size: 12px;  
   font-style: italic;  
   width: 77%;  
   color: #828282;  
   display: inline-table;  
   vertical-align: top;  
 }  
 #button-submit {  
   background: url(https://blogger.googleusercontent.com/img/b/R29vZ2xl/AVvXsEhOwhr_w6VouPju9-i2yhIqccdsOriiHWCR_N1Wx2OV2AJhbm0h0KRu7-A07jeV901nznVr9jBv3ELvEuoPVVm2OL5ZyRadYztzfG6W7z1i4IMTOT0YBYthZpvhi9J612G2QnZNAxZD2gcc/s1600/search-button.png) no-repeat;  
   border-width: 0px;  
   cursor: pointer;  
   width: 30px;  
   height: 25px;  
 }  
 #button-submit:hover {  
   background: url(https://blogger.googleusercontent.com/img/b/R29vZ2xl/AVvXsEiPRZps2uA9en5fqtfkaO-Ui4j86cRCTzsZ1XxzmhVuK8s57_eT_-dWgaq9thp013vEfZi1UtU6GxtEk8rR-D55-ZPpvHfIR_WRd_fyz4ymesXosrsU0ac2nmnUiSDejvhMUnH3webN69m7/s1600/search-button-hover.png) no-repeat;  
 }  
 #button-submit::-moz-focus-inner {  
   border: 0;  
 }  
 </style>  
 <form id="searchbox" method="get" action="/search" autocomplete="off">  
 <input name="q" type="text" size="15" placeholder="search..." />  
 <input id="button-submit" type="submit" value="" />  
 </form>  


Style > 5:
Search Box - 5

 <style>  
 #searchbox {  
   background: url(https://blogger.googleusercontent.com/img/b/R29vZ2xl/AVvXsEgiu7QhBPoeYNId_IRyT75BjuvlChpsaJqIvOs_mJVhrbWp_zahfnM5wKW6TrXKejx0QA_E50z2ClP6yiKW72VBX-A66t1cW7CVjKzM_wTHWquoqfw_oCO8aRcKiOD9Ala5SsUCJXAtrTIt/s1600/search-box1.png) no-repeat;  
   width: 250px;  
   height: 65px;  
 }  
 input:focus::-webkit-input-placeholder {  
 color: transparent;  
 }  
 input:focus:-moz-placeholder {  
 color: transparent;  
 }  
 input:focus::-moz-placeholder {  
 color: transparent;  
 }  
 #searchbox input {  
   outline: none;  
 }  
 #searchbox input[type="text"] {  
   background: transparent;  
   padding: 5px 0px 5px 20px;  
   margin: 10px 15px 0px 0px;  
   border-width: 0px;  
   font-family: "Brush Script MT", cursive;  
   font-size: 12px;  
   color: #595959;  
   width: 65%;  
   font-weight: bold;  
   display: inline-table;  
   vertical-align: top;  
 }  
 #button-submit {  
   background: url(https://blogger.googleusercontent.com/img/b/R29vZ2xl/AVvXsEh0K3Ld56ZoX7KdiQJBfQofl5Cq6WQz-mzkwzk25Pi6_dqQSpZznSOtutr_JduIxk-O5oFK47rYh7vS5ILOI34XtnWKequwbzjng239n33_BuVzXCiQpQPj1jUuqMcdtjDpiYR7P4nsOOcm/s1600/magnifier.png) no-repeat;  
   border-width: 0px;  
   cursor: pointer;  
   margin-top: 10px;  
   width: 19px;  
   height: 25px;  
 }  
 #button-submit:hover {  
   background: url(https://blogger.googleusercontent.com/img/b/R29vZ2xl/AVvXsEilS6XeBuPtHferKWhTeD8ZFK99Sgi3UnbVX0SRfZdBliE3b1CnEsu6cY5hmJL-gOwXKozkPKNExV21WIT1U3GZqGBeHP6Z2tMhyphenhyphen_MIHElpYZItFQmnIp79SBADdD28TKI63b8KvDZo6Zm4/s1600/magnifier-hover.png) no-repeat;  
 }  
 #button-submit:active {  
   background: url(https://blogger.googleusercontent.com/img/b/R29vZ2xl/AVvXsEilS6XeBuPtHferKWhTeD8ZFK99Sgi3UnbVX0SRfZdBliE3b1CnEsu6cY5hmJL-gOwXKozkPKNExV21WIT1U3GZqGBeHP6Z2tMhyphenhyphen_MIHElpYZItFQmnIp79SBADdD28TKI63b8KvDZo6Zm4/s1600/magnifier-hover.png) no-repeat;  
   outline: none;  
 }  
 #button-submit::-moz-focus-inner {  
   border: 0;  
 }  
 </style>  
 <form id="searchbox" method="get" action="/search" autocomplete="off">  
   <input class="textarea" name="q" type="text" size="15" placeholder="Search here..." />  
   <input id="button-submit" type="submit" value="" />  
 </form>  


Style > 6:
Search Box - 6

  <style>  
 #searchbox {  
 width: 280px;  
 background: url(https://blogger.googleusercontent.com/img/b/R29vZ2xl/AVvXsEiS_WfZA1JukoXPbJS_hQv2KVyiq-GH_CWBiMODo0bi0fMuqioQfMmnc2i6yyqG-495D8NqaXBD-IOMJ0tYlGis3vjLjE8_0tQyGxoGIqxTt8JzrTD2YFTvN_t9O5h7tApDcygMO1Mrs1nr/s1600/search-box.png) no-repeat;  
 }  
 #searchbox input {  
   outline: none;  
 }  
 input:focus::-webkit-input-placeholder {  
   color: transparent;  
 }  
 input:focus:-moz-placeholder {  
   color: transparent;  
 }  
 input:focus::-moz-placeholder {  
   color: transparent;  
 }  
 #searchbox input[type="text"] {  
 background: transparent;  
 border: 0px;  
 font-family: "Avant Garde", Avantgarde, "Century Gothic", CenturyGothic, "AppleGothic", sans-serif;  
 font-size: 14px;  
   color: #f2f2f2 !important;  
   padding: 10px 35px 10px 20px;  
   width: 220px;  
 }  
 #searchbox input[type="text"]:focus {  
 color: #fff;  
 }  
 #button-submit{  
 background: url(https://blogger.googleusercontent.com/img/b/R29vZ2xl/AVvXsEjadSx4PrjnxNU32xw5PeknevtSAyWmhg_eeTYp9_1Xr4HcDOOg-fEiqBQIXBbP41LceyeTxDEeL9rGOMUXFxNA8kL_keiUvLlRAgW8bgDuYVoeMb33b2wdGnyDrwkUo_IhOQnA2ie9Qbl1/s1600/search-icon.png) no-repeat;  
 margin-left: -40px;  
 border-width: 0px;  
 width: 40px;  
 height: 50px;  
 }  
 #button-submit:hover {  
 background: url(https://blogger.googleusercontent.com/img/b/R29vZ2xl/AVvXsEjI4Culo9UL19En-TBYQX9ockEXWznOzN5safyJ0pi4Sb5Z6LsMAKVVhugIETbUUVGoEpuQ9EFuuMgNbSq__X4-iXBGvSHnhkTvz2rOKAfYMbZ23MhQ1MtqgFxUFl1nnmRg0V204A21t2lT/s1600/search-icon-hover.png);  
 }  
 </style>  
 <form id="searchbox" method="get" action="/search" autocomplete="off">  
 <input name="q" type="text" size="15" placeholder="Enter keywords here..." />  
 <input id="button-submit" type="submit" value=" "/>  
 </form>  


That's it. After completing the addition of the new search box to your blog, now view you blog to check the Search Box. If everything is correct you will see that you blog has a new Search Box.


Please Share This Post
Stay with TecHieASiF for more IT related post

Tuesday, February 3, 2015

How to Customize Blogger Image Lightbox!

If you are blogging on Blogger platform then you can show your blog's images in light-box. There is an option in Blogger settings to showcase it's images in light-box. As a result of the image light-box, when you click any image on your blog that images will open in an overlay on top of your blog. If your post has multiple images, they will appear as thumbnails along the bottom.But sometimes you may have wanted to change the default design of blogger image light-box. If so, then you are in the wright post. In this post I am gonna show how to customize blogger image light box.

Blogger Image

Above image is the example of the default Blogger Image Light-box. If you don't like this design then you can customize it on your own taste. The CSS code that I am sharing, by adding it to your blog you will be able to change the entire look of the modal window: Background Color, Border of the Image, The Bar showing the thumbnail, Text within it, Close button and the transparency. All you have to do is to overwrite the default design and change it with yours. Lets see how to do the trick.

Warning: Before doing any kind of customization on your site's HTML page, I will recommend you to backup your site Template. To know more about Template backup Read This Post.

Customizing  Blogger Image Lightbox:
  • First Sign into your Blogger Account and go to Dashboard.
  • Then click on Template and then click on Edit HTML button. You will land on the HTML page.
  • Here in the HTML page find </head> tag and Paste the following code just Above it.
  <style>  
 /* Background Color */  
 .CSS_LIGHTBOX_BG_MASK {  
 background-color: #ffffff !important;  
 background-image: url(image-url-address) !important;  
 opacity: 0.8 !important;  
 filter: alpha(opacity=90) !important;  
 }  
 /* Images Border */  
 .CSS_LIGHTBOX_SCALED_IMAGE_IMG {  
 outline: 0px solid #fff !important;  
 -webkit-border-radius: 10px;  
 -moz-border-radius: 10px;  
 border-radius: 10px;  
 -webkit-box-shadow: 0px 0px 5px #000000;  
 -moz-box-shadow: 0px 0px 5px #000000;  
 box-shadow: 0px 0px 5px #000000;  
 }  
 /* Close Button */  
 .CSS_LIGHTBOX_BTN_CLOSE {  
 background: url(image-url-address) no-repeat !important;  
 width: 24px !important;  
 height: 24px !important;  
 }  
 /* Thumbnails Bar Color */  
 .CSS_LIGHTBOX_FILMSTRIP {  
 background-color: #eaeaea !important;  
 }  
 /* Text Color */  
 .CSS_LIGHTBOX_ATTRIBUTION_INFO, .CSS_LIGHTBOX_ATTRIBUTION_LINK {  
 color: #000 !important;  
 }  
 /* Index Info (number of images) */  
 .CSS_LIGHTBOX_INDEX_INFO {  
 color: #555555 !important;  
 }  
 </style>  

Customization: The blue Text explains to which Part the code belongs to. And you can modify the area of the lightbox from that part.
  • * Background Color * - You can change the Background color of the Lightbox and also can replace the background color with an image from here. To replace the background color with an image just Replace this line image-url-address with your Image URL. Below that if you decrease the opacity: 0.8 value the background will become more transparent.
  • * Close Button * - To change the icon for Close Button just Replace this line image-url-address with your icon Image URL.
  • * Index Info (number of images) * - To change the text color of image, just change the #555555 value.

  • Finally click on Save Template button to apply the design.

That's after customizing the image light-box, now view your blog and click on any image and see the result.


Stay with www.iTTimesbd.com for more IT related post

How to Add a Widget Below First Post in Blogger!

Earlier I had shared two post important post on displaying Blogger Post on homepage - Show Blogger Posts in Gird Style and Adding Read More button to Blogger post. Now the question is why I am mentioning these posts. Actually the trick that I'm going to share in today's post very much goes with these two posts. If you are showing your Blog's posts in Gird Style or Automatic Summary then you will have to add a widget below first post to show any element like Adsense Ads. In this post I am gonna  show how to add a widget below first blogger post.


Normally you can add gadgets in your blog from the layout option, but you only can add the gadgets in that place where the design section allows you. So, if you want to add any widgets below the first blogger post then you need to add a gadget section in your Blogger Layout. By the way you can apply this gadget in any design, the above mentioned two design is not a requirement. And you can add such widget by using a simple HTML code that I'm sharing.
Blogger Widgets Placement
When you will add a gadgets section and show any widget below your first post then it will be look like the above image. If you are blogging on blogger platform then you can easily add a widget in your blog as show in that image. OK let's see how to do the trick.

Warning: Before doing any kind of customization on your site's HTML page, I will recommend you to backup your site Template. To know more about Template backup Read This Post.

Adding Widget Below First Blogger Post:
  • First Sign into your Blogger Account and go to Dashboard.
  • Then click on Template and then click on Edit HTML button. You will land on the HTML page.
edit blogger template
  • Here in the HTML page find this line  <b:include data='post' name='post'/> and Just below it Paste the Following code.
  <b:if cond='data:post.isFirstPost'>  
 <div align="center" style="margin:10px auto;">  
 Here goes the code of the element you want to show  
 </div>  
 </b:if>  

  • Note: The Bold text indicates that where you will have to paste the code of the element. (eg. Adsense Ad Code)
  • Customization: The Red line in the above code is for Margin-Top and Margin-Bottom, this is in case if you want the element to move towards or away from the entire. You can also add any style like Background Color, Border etc.

  • Finally click on Save Template Button to apply it. (Preview to make sure Everything is OK)

That's it, Now view your blog and you will see that the added widget is appearing below the first post of your blog.


Stay with www.iTTimesbd.com for more IT related post

Monday, February 2, 2015

Show Blogger Post in Gird View with Thumbnail!

Recently I had shared a post on Adding Read More button with Thumbnails. And to day I am gonna show how you can Display your Blogger Blog post in Gird View Style with Thumbnail. Actually both of these Post displaying technique on Blog homepage are almost same. But the the design and the code that you will have to use for this Gird view style is different. When you apply the Gird View style in your blog the posts of your Blog will shown like the below example. Have a look at the Demo below.

Gird View Style with Thumbnail

If you are blogging on Blogger platform then you can apply this design on your Blog. As the result of the application of this Gird View style on your blog all the posts will be display as a thumbnail gird of image in homepage and archive pages. In the normal view style you can only afford to display a few posts on homepage. But in Gird view style you can display many post in a gallery with thumbnail and post title. If your blogging on Wallpaper or Photo then this style can give the maximum result. Let's see how to add this Gird view style on Blogger.


Warning: Before doing any kind of customization on your site's HTML page, I will recommend you to backup your site Template. To know more about Template backup Read This Post.

Adding Gird View Style to Blogger:
  • First Sign into your Blogger Account and go to Dashboard.
  • Then click on Template and then click on Edit HTML button. You will land on the HTML page.
edit blogger template
  • Here in the HTML page find </head> tag and Paste the following code just Above it.
 <script src="http://code.jquery.com/jquery-1.9.1.js"></script>  
 <script src="http://code.jquery.com/jquery-migrate-1.1.0.js"></script>  
 <b:if cond='data:blog.pageType == &quot;index&quot;'>  
 <script type='text/javascript'>//<![CDATA[  
 $(document).ready(function() {  
   var width = 200;  
   var height = 170;  
   var placeholder = 'https://blogger.googleusercontent.com/img/b/R29vZ2xl/AVvXsEiLtYbtwt3ER4nyweaoCEQO8yCaO02IZeH__KQeR5c9nAVH5LGodMLObauF2TZ_QFGGdfdtHXIb5z2e67nUCB_M5n8ArcTGx_Szhkj0kV4ogdqw2S3VzTIdbo5eoIYtCfeyu_-jsN-6hwY/s1600/no-thumb.png';  
   var margins = "0px 0px 10px 10px";  
   var fitThumb = 1;  
   var titleTopPadding = 5;  
   var titleBottomPadding = 8;  
   var titleLeftRightPadding = 5;  
   var titlePadding = titleTopPadding + 'px ' + titleLeftRightPadding + 'px ' + titleBottomPadding + 'px ' + titleLeftRightPadding + 'px';  
   $('.post-body').each(function(n, wrapper) {  
     var wrapper = $(wrapper);  
     var image = $(wrapper).find('img').first();  
     var link = wrapper.parent().find('h3 a');  
     var linkURL = link.attr('href');  
     var linkTitle = link.text();  
     $(link).remove();  
     wrapper.empty();  
     if (image.attr('src')) {  
       var thumbHeight = image.attr('height');  
       var thumbWidth = image.attr('width');  
       var thumbParent = $(image).parent();  
       wrapper.append(thumbParent);  
       if (fitThumb) {  
         image.attr({  
           src: image.attr('src').replace(/s\B\d{3,4}/, 's' + width + '-c')  
           });  
         image.attr('width', width).attr('height', height);  
       } else {  
         image.attr({  
           src: image.attr('src').replace(/s\B\d{3,4}/, 's' + width)  
           });  
         image.attr('width', width);  
         var changeHeight = (thumbHeight / thumbWidth * width).toFixed(0);  
         image.attr('height', changeHeight);  
       }  
     } else {  
       var image = $('<img>').attr('src', placeholder).attr('height', height).attr('width', width);  
       var thumbParent = $('<a>').append(image).appendTo(wrapper);  
     }  
     thumbParent.attr('href', linkURL).css('clear', 'none').css('margin-left', '0').css('margin-right', '0').addClass('postThumbnail');  
     var thumbTitle = $('<div>').prepend(linkTitle).css('padding', titlePadding).css('opacity', '0.9').css('filter', 'alpha(opacity=0.9)').css('width', width).appendTo(thumbParent);  
     var ptitleHeight = thumbTitle.height();  
     var summary = parseInt(ptitleHeight) + parseInt(titleTopPadding) + parseInt(titleBottomPadding);  
     thumbTitle.css('margin-top', '-' + summary + 'px');  
     wrapper.css('float', 'left').css('height', height).css('width', width).css('margin', margins).css('overflow', 'hidden');  
   });  
   $('#blog-pager').css('clear', 'both');  
 });  
 function hideLightbox() {  
   var images = document.getElementsByTagName('img');  
   for (var i = 0; i < images.length;++i) {  
     images[i].onmouseover = function() {  
       var html = this.parentNode.innerHTML;  
       this.parentNode.innerHTML = html;  
       this.onmouseover = null;  
     };  
   }  
 }  
 if (window.addEventListener) {  
   window.addEventListener('load', hideLightbox, undefined);  
 } else {  
   window.attachEvent('onload', hideLightbox);  
 }  
 //]]>  
 </script>  
 <style>  
 .post {  
   border-bottom: 0 dotted #E6E6E6;  
   margin-bottom: 0;  
   padding-bottom: 0;  
 }  
 h2,.post-footer {  
   display: none;  
 }  
 a.postThumbnail div {  
   text-decoration: none;  
   color: #fff;  
   font-size: 12px;  
   font-weight: bold;  
   text-transform: capitalize;  
   background: rgb(125,126,125);  
  /* Old browsers */  
   background: -moz-linear-gradient(top, rgba(125,126,125,1) 0%, rgba(14,14,14,1) 100%);  
   background: -webkit-gradient(linear, left top, left bottom, color-stop(0%,rgba(125,126,125,1)), color-stop(100%,rgba(14,14,14,1)));  
  /* Chrome,Safari4+ */  
   background: -webkit-linear-gradient(top, rgba(125,126,125,1) 0%,rgba(14,14,14,1) 100%);  
   background: -o-linear-gradient(top, rgba(125,126,125,1) 0%,rgba(14,14,14,1) 100%);  
   background: -ms-linear-gradient(top, rgba(125,126,125,1) 0%,rgba(14,14,14,1) 100%);  
   background: linear-gradient(to bottom, rgba(125,126,125,1) 0%,rgba(14,14,14,1) 100%);  
   filter: progid:DXImageTransform.Microsoft.gradient( startColorstr=&#39;  
   #7d7e7d&#39;, endColorstr=&#39;#0e0e0e&#39;,GradientType=0 );  
 }  
 a.postThumbnail:hover div {  
   display: block;  
 }  
 .post-body img {  
   background-color: transparent;  
   border: 1px solid transparent;  
   padding: 0px;  
   -webkit-border-radius: 12px;  
   -moz-border-radius: 12px;  
   border-radius: 12px;  
   opacity: 1;  
   transition: opacity .25s ease-in-out;  
   -moz-transition: opacity .25s ease-in-out;  
   -webkit-transition: opacity .25s ease-in-out;  
 }  
 .post-body img:hover {  
   -ms-filter: &quot;  
   progid: DXImageTransform.Microsoft.Alpha(Opacity=70)&quot;  
   ;  
 filter: alpha(opacity=70);  
   -moz-opacity: 0.7;  
   -khtml-opacity: 0.7;  
   opacity: 0.7;  
 }  
 </style>  
 </b:if>  

Customization:
  • To modify the Thumbnail size, change width = 200 and height = 170 value.
  •  Replace the image URL in Red with your own, to change the default thumbnail when there are no image.

  • Finally click on Save Template button to apply the Gird view style.

That's it, Now view your blog and you will see that your blog's posts are showing in nice Gird View style.


Stay with www.iTTimesbd.com for more IT related post

Sunday, February 1, 2015

Making a Gadget Visible only to the Blog Admin!

Blogger Tips and Tricks
There are several post I had shared related to Blogger tips and tricks earlier in this site. And today I'm gonna share another important post on Blogger. You may have already get the idea about this post content from the title of this post. Actually this post is very much exclusive as because the trick that I am share in this post is mostly used by the Professional and high profile website. So, lets know something more about Making a Gadget Visible only to the Blog Administrator.

A Website or Blog Admin use several gadgets on his site. But sometime you may want to make any one of your site's gadgets only visible to you and not to your visitor. Basically when the admin set any kinds of Survey or Countdown gadgets on his site he don't want anyone else to see that gadgets until the final result is ready. As the best example of this trick I can take the name of Online Voting gadgets used Online News site.


Actually the procedure of hiding a gadget on Blogger is very simple. You just have to add two lines to the gadget that you want to hide. And you will have to add the code inside your Blogger Template. OK lets see how to do the trick.

Warning: Before doing any kind of customization on your site's HTML page, I will recommend you to backup your site Template. To know more about Template backup Read This Post

  • First Sign into your Blogger Account and go to Dashboard.
  • Then click on Template and then click on Edit HTML button. You will land on the HTML page.
  • Here in this HTML page Search for the Gadget code that you want to hide.
Example: A HTML/JavaScript code will be like the following one.
 <b:widget id='HTML1' locked='false' title='' type='HTML'>  
 <b:includable id='main'>  
 <span class='item-control blog-admin'>  
 <!-- only display title if it's non-empty -->  
 <b:if cond='data:title != &quot;&quot;'>  
 <h2 class='title'><data:title/></h2>  
 </b:if>  
 <div class='widget-content'>  
 <data:content/>  
 </div>  
 <b:include name='quickedit'/>  
 </span>  
 </b:includable>  
 </b:widget> 

Note: So, all you have to add the Red line the gadget as shown in the above. Now all the gadget have the same structure like the above example, but it will be easier to guide you, just place the first code in Red just after <b:includable id='main'> and second Red code just before </b:includable>. To look look inside the widget's code, click on the sideways arrow next to the widget's id. 

  • Finally click on Save Template button to apply the change.


As the application of this change when you view your Blog without signing in that gadget will not be visible to you, but as soon as you sign in you will see that it is visible to you.


Stay with www.iTTimesbd.com for more IT related post

Wednesday, January 28, 2015

Add Auto Read More Button with Thumbnail to Blogger!

Read More button or widget is one of the most popular and important design of blog or website. Actually this trick is important because it increase your loading speed. Because when you add Auto Read More button in your blog then the posts of your blog will be shown in the homepage with Small Summary, Thumbnail Image and a Read More link. In this post I'm gonna show how to add Read More button with Thumbnail to Blogger. See the below demo image.
Read More Button With Thumbnail 
If you are blogging on Blogger platform then you can easily add Auto Read More button in your blog by adding some simple in your blog. There several codes available by which add Read More button in your Blog. But the code that I am sharing, here you can customize the Post Summary Size, Thumbnail Size as you want. This Automatic Read More button with Thumbnail will be shown in Homepage, Category Page and Archive Page. Lets see how to add this Read More Button in Blogger.

Warning: Before doing any kind of customization on your site's HTML page, I will recommend you to backup your site Template. To know more about Template backup Read This Post.

Adding Read Mere Button to Blogger:
  • First Sign into your Blogger Account and go to Dashboard.
  • Then click on Template and then click on Edit HTML button. You will land on the HTML page.
edit blogger template
  • Here in the HTML page find this code <data:post.body/>
Note: You will find this code more than once but you need to stop at the third one.
  • Then Replace above code with the Following code.
 <b:if cond='data:blog.pageType != &quot;static_page&quot;'>  
 <b:if cond='data:blog.pageType != &quot;item&quot;'>  
 <div expr:id='&quot;summary&quot; + data:post.id'><data:post.body/></div>  
 <script type='text/javascript'>createSummaryAndThumb(&quot;summary<data:post.id/>&quot;,&quot;<data:post.url/>&quot;,&quot;<data:post.title/>&quot;);</script>  
  <span class='readmore' style='float:right;'><a expr:href='data:post.url'>Read More &#187;</a></span></b:if></b:if>  
 <b:if cond='data:blog.pageType == &quot;item&quot;'><data:post.body/></b:if>  
 <b:if cond='data:blog.pageType == &quot;static_page&quot;'><data:post.body/></b:if>  
Note: If you don't see any changes after completing all the steps, Please try to Replace the second <data:post.body/> also.
  • Now again find </head> and Paste the below code just Above it.
 <script type='text/javascript'>  
 posts_no_thumb_sum = 490;  
 posts_thumb_sum = 400;  
 img_thumb_height = 160;  
 img_thumb_width = 180;  
 </script>  
 <script type='text/javascript'>  
 //<![CDATA[  
 function removeHtmlTag(strx,chop){  
 if(strx.indexOf("<")!=-1)  
 {  
 var s = strx.split("<");  
 for(var i=0;i<s.length;i++){  
 if(s[i].indexOf(">")!=-1){  
 s[i] = s[i].substring(s[i].indexOf(">")+1,s[i].length);  
 }  
 }  
 strx = s.join("");  
 }  
 chop = (chop < strx.length-1) ? chop : strx.length-2;  
 while(strx.charAt(chop-1)!=' ' && strx.indexOf(' ',chop)!=-1) chop++;  
 strx = strx.substring(0,chop-1);  
 return strx+'...';  
 }  
 function createSummaryAndThumb(pID, pURL, pTITLE){  
 var div = document.getElementById(pID);  
 var imgtag = "";  
 var img = div.getElementsByTagName("img");  
 var summ = posts_no_thumb_sum;  
 if(img.length>=1) {  
 imgtag = '<span class="posts-thumb" style="float:left; margin-right: 10px;"><a href="'+ pURL +'" title="'+ pTITLE+'"><img src="'+img[0].src+'" width="'+img_thumb_width+'px" height="'+img_thumb_height+'px" /></a></span>';  
 summ = posts_thumb_sum;  
 }  
 var summary = imgtag + '<div>' + removeHtmlTag(div.innerHTML,summ) + '</div>';  
 div.innerHTML = summary;  
 }  
 //]]>  
 </script>  
 <b:if cond='data:blog.pageType != &quot;static_page&quot;'>  
 <b:if cond='data:blog.pageType != &quot;item&quot;'>  
 <style type='text/css'>  
 .post-footer {display: none;}  
 .post {margin-bottom: 10px; border-bottom: 1px dotted #E6E6E6; padding-bottom: 20px;}  
  .readmore a {text-decoration: none; }  
 </style>  
 </b:if>  
 </b:if>  

Customization: 
  •  Modify the 490 value to change the number of characters shown when there is no thumbnail. 
  • Modify the 400 value to change the number of characters shown when the post has a thumbnail.
  • To change the thumbnail size, modify height = 160 and width = 180 value. 
  • Finally click on Save Template button to apply the change.

That's it, Now view your blog and you will see that the posts are shown with Small Summary, Thumbnail Image and a Read More link.


Stay with www.iTTimesbd.com for more IT related post

Friday, November 21, 2014

How to Numbered All Comments in Blogger!

In the previous post I had shown How to add number in Blogger comments. But unfortunately that trick worked only for those blog in which threaded comment option is disabled. That means if your the threaded comment option is enabled in your blog then earlier trick will not work on your blog. If you want to enable threaded comment and number the comments as well then this post is dedicated to you. In this post I am gonna show how to number all numbered all comment in blogger.

To do this trick I am gonna use a simple CSS code. By adding this CSS code to you blog it will do following trick for your...
  • When the a general section of comment is initiating, A comment counter will be activated and the comment will start with an initial value of 1.
  • Then each time the code flow goes through a review of any level, either the original comment or a threaded comment. And it will bring in front of the comment's body the number that is the counter.
  • And finally, this is incremented in the counter.
    Adding Number to All Comments Blogger

Warning: Before doing any kind of customization on your site's HTML page, I will recommend you to backup your site Template. To know more about Template backup Read This Post.


Adding Number to All Comments in Blogger:
  • First Sign into your Blogger account and go to Dashboard.
  • Then click on Template and then click on Edit HTML button. You will land on the HTML page.
    edit blogger template
  • Here in the HTML page find ]]></b:skin> and Paste the following code just above it.
  •   .comment-thread ol {  
     counter-reset: countcomments;  
     }  
     .comment-thread li:before {  
     content: counter(countcomments,decimal);  
     counter-increment: countcomments;  
     float: right;  
     z-index: 2;  
     position:relative;  
     font-size: 22px;  
     color: #555555;  
     padding-left:10px;   
     padding-top:3px;   
     background: url(https://blogger.googleusercontent.com/img/b/R29vZ2xl/AVvXsEhmnBrf_TM2nehYrfXwawgBENSf-93kNSYyJnj0I0QWnHMDIwWCAtUz7b3vtKd1PEhV6i1Rqck3fIdHHV8plflWkWegIS0sMDawG4DzNnJfe762rYnPlTWHcaBeQh-G7gMtUtgDWAl2p1iU/s1600/comment+bubble2.png) no-repeat;  
     margin-top:7px;   
     margin-left:10px;   
     width: 50px; /*image-width size*/  
     height: 48px; /*image-height size*/   
     }  
     .comment-thread ol ol {  
     counter-reset: contrebasse;  
     }  
     .comment-thread li li:before {  
     content: counter(countcomments,decimal) "." counter(contrebasse,lower-latin);  
     counter-increment: contrebasse;  
     float: right;  
     font-size: 18px;  
     color: #666666;  
     }  
    
  • And finally click on Save Template button to apply the code.

Customization:
  • If you don't want to have bubble icon, then Red part of the above code including the image URL shown in blue color.
  • To change the comment bubble, Replace the image URL of the above code shown in blue color with your own image URL. Or you can try the image URL I had shared in the Previous Post.
  • To change the comment count position, Increase/Decrease the values (10px & 3px) of padding-left and padding-top.
  • To change the comment bubble/icon position, Increase/Decrease the values (7px & 10px) of margin-top and margin-left.


Stay with www.iTTimesbd.com for more IT related Post

How to Add Number to Blogger Comments!

Commenting is one of the best way to increase the visitors engagement with a site. Blogger has a default comment option. But it is very simple. As I always said that an attractive can attract more visitors. Beside customizing other thing you can customize blogger comments option as well. Earlier I had shared Several Post on Blogger Comment. In this post I am gonna share a trick by which you can add number on blogger comments.


DEMO:
adding number in blogger comments


This cools Blogger trick will add a comment count inside a speech bubble. As a result you and you'r readers can use the numbers to mention or point to a particular comment on any of your blog's posts. Beside that adding numbers to the comment can make your site more attractive.

Note: To apply this trick on your blog, First you need to remove the Blogger Threaded comments. See Here---> How to Disable Blogger Threaded Comments!

Warning: Before doing any kind of customization on your site's HTML page, I will recommend you to backup your site Template. To know more about Template backup Read This Post.


Adding Number to Comments in Blogger:
  • First Sign into your Blogger account and go to Dashboard.
  • Then click on Template and then click on Edit HTML button. You will land on the HTML page.
    edit blogger template
  • Here in the HTML page find the following code.
  •  <b:loop values='data:post.comments' var='comment'>  
    
  • Then Paste the following code just before/above the above code.
  •  <script type='text/javascript'>var CommentsCounter=0;</script>  
    
  • Then find this code <data:commentPostedByMsg/> and paste the following code just below/after it.
  •  <!--comments-count-starts-->  
     <span class='comments-number'>  
     <a expr:href='data:comment.url' title='Comment Link'>  
     <script type='text/javascript'>  
     CommentsCounter=CommentsCounter+1;  
     document.write(CommentsCounter)  
     </script>  
     </a>  
     </span>  
     <!--comments-count-stops-->  
    
  • Now find </head> tag and Paste the following code just above it.
  •  <style type="text/css">  
     .comments-number a:link, .comments-number a:visited {  
     color: black !important;  
     text-decoration: none !important;  
     background: url(https://blogger.googleusercontent.com/img/b/R29vZ2xl/AVvXsEi2TFbutu59NpuqAaD9moBxSAs9c86xAqeyfawArTN6855DBIbHBTtZgU52c7JrRTwtnGZt6YKZyZJuF7lTAOhWM6BSqatt6FjJg7DNpqWrDhd0aYmnH5APyE0-sZihfC5DWY3HcIAf9u39/s1600/comment+bubble+1.png) no-repeat;  
     width: 50px; /*image-width size*/  
     height: 48px; /*image-height size*/  
     float: right;  
     display: block;  
     margin-right: 5px;  
     margin-top: -15px; /*comments-counter position*/  
     text-align: center;  
     font-family: 'Century Gothic','Lucida Grande',Arial,Helvetica,Sans-Serif;  
     font-size: 15px;  
     font-weight: normal;  
     }  
     .comments-number a:hover, .comments-number a:active {  
     color: #1BA0E1 !important;  
     text-decoration: none !important;  
     }  
     </style>  
    
  • Finally click on Save Template button to apply the trick.

Customization: 
  • To change the comment bubble, Replace the URL of above code show in the Red text. You can use following image URL or use your own.

  •                


  • To change the color of the number, Replace the Text in Blue of the above code with Hex value of your color. To get your desire colored code use this Color Code Generator.

That's it. Now view the post of your blog that has comment and you will see the comments are numbered.


Stay with www.iTTimesbd.com for more IT related Post