Showing posts with label Custom Domain For Blogger. Show all posts

Thursday, June 16, 2016

How to Enable HTTPS on ALL Blogspot Domain !!!

Recently when I had logged into my Blogger account I got a notification about the Turning on the HTTPS supports for the Blogger's all blogspot domain. I think most of you have also noticed that notification like me. Like most of you there are several question that had come across in my mind after seeing that notification, such as...
  • What is HTTPS ?
  • What are the benefits of enabling HTTPS ?

In this post I'm gonna try to share some information that will give us the answer of these question and also gonna show the procedure to enable HTTPS support.


HTTPS Notification:

Before start for searching for answer, first see actually what was in that HTTPS notification. In that notification Blogger.com notified the Blog admin that the visitors would be able to view their domain through encrypted connection, while having all the links and bookmarks working. But the HTTPS availability supports will be disappeared. Have a look at the Notification image below...

HTTPS Blogspot


Currently this HTTPS support is only available for the Blogspot domain. And custom domain user like me will have to wait for a while to have HTTPS support. Because till this post is published the HTTPS supports is not available for the Custom Domian users on Blogger platform.


What is HTTPS:

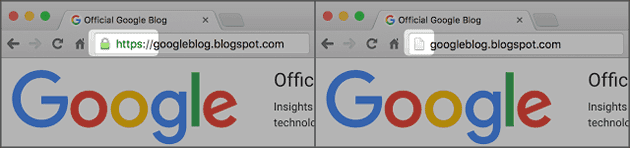
Hyper Text Transfer Protocol Secure (HTTPS) is the a secure version of HTTP. That means the data that transferred between the user and server is now encrypted and protected from access or hacking from unwanted third parties.


Benefits of Enabling HTTPS: There are three main benefits to using HTTPS instead of HTTP to access your blog:

  • It helps check that your visitors open the correct website and aren’t being redirected to a malicious site.
  • It helps detect if an attacker tries to change any data sent from Blogger to the visitor.
  • It adds security measures that make it harder for other people to listen to your visitors’ conversations, track their activities, or steal their information.
  • And most interesting thing is, you are getting this HTTPS support without any cost, it is completely FREE!!

HTTPS is fundamental to internet security; it protects the integrity and confidentiality of data sent between websites and visitors' browsers. HTTPS enabled blog will get free SSL certificate which means that the site that you are visiting is secured. Beside that it will leave positive impact on search engine optimization (SEO). Google always gives higher importance on HTTPS than HTTP. So it ensure the higher ratting for your site.
HTTPS Blogspot


Warning: Please be aware that mixed content may cause some of your blog's functionality not to work in the HTTPS version. Mixed content is often caused by incompatible templates, gadgets, or post content. While Blogger proactively fixing most of these errors, some of them can only be fixed by the blog authors.


How to Enable HTTPS on Blogger:
  • First Login to Your Blogger Account.
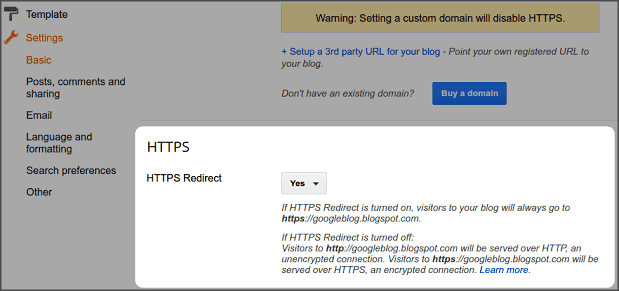
  • Then go to Settings > Basics > HTTPS Redirects 
  • Now from the HTTPS Redirects Dropdown, select Yes
  • Finally Save the settings.

HTTPS Blogspot


Later if you disable HTTPS redirect, visitors have two options for viewing your blog:
  • View the unencrypted version of your blog at http://techie-asif.blogspot.com
  • View the encrypted version of your blog at https://techie-asif.blogspot.com

Please Share This Post 
Stay with techie-asif.blogspot.com for more IT related post

Sunday, April 12, 2015

How to Setup Free Domain in Blogger [Exclusive]

Free domain for blogger
If you are regular reader of this site then you might have read the post that I had published after Adding Custom Domain in This Site. Actually adding custom domain is very important in a site/blog hosted on free platform like Blogger and WordPress. Earlier I had shown  how to add custom domain in Blogger from Godaddy. But today's post is something special, because in this post I am gonna show how you can add a Free domain to your Blogger blog.


The domain that I'm talking about is Dot TK domain. This domain is powered by FreeNom and it is completely free of cost for 1 to 12 months. Beside Dot TK domain FreeNom provide a few more free domain name. But Dot TK is most popular one. Below I'm presenting the list of free domain provided by FreeNom...
  • .TK
  • .ML
  • .GA
  • .CF
  • .GQ

It is always better to use a top level domain for a site. But as you all know to have a domain like .COM , .NET or .ORG you will have to pay yearly charge. I pay 16$ for the domain of this site - www.iTTimesbd.com yearly . So, if you want to add custom domain without spending money then why don't you try Free Domain. As using custom domain is very important - So, this Free Domain is like Something is Better then Nothing.


By the way don't worry about the domain quality. The domain provided by FreeNom is very good in quality like any other top level domain. Recently I have tested .TK domain on one of my Blog - FileBunker.Blogspot.com. And I have found this domain very convincing. 

Now Let's see how to Register a Free domain on FreeNom and Add it to Blogger Blog.

Note: The Registration and Setup procedure might be changed time to time. If you face any problem then don't hesitate to let me know.

Register A Free Domain:
  • Then Enter your desire name in the box and click on Check Availability.
  • Then click Get it now! on the domain you want to get and click on Checkout.
free domain Check Availability
  • Then in the next page at Period select 12 Months @ FREE
  • Then in the next page Enter your mail address and click on Verify My Email Address.
  • A verification like will be send to your mail address. Click on that link a new page will open.
  • Now in this page Enter the required information and click on Complete Order button by checking the Terms and Condition box.

That's it you will get your Order Confirmation Message. Now your Domain registration is completed - Let's see how you can add it to your Blogger blog.


Setup Custom Free Domain in Blogger:
  • Now Sign into your Blogger Account and go to Settings.
  • Here in Publishing >> Blog Address click on Set up a third-party URL for your blog.
blogger blog address
  • Then enter your Registered domain with www - like www.filebunker.tk
save free tk domain
  • Now click on Save button, you will get an Error and you will get two CNAMEs as shown in the image below. Keep these two CNAMEs, these will be required to verify the authority of your register domain.
free tk domain
  • Then from DOMAINS drop down click on My Domains.
my tk domain
  • Now in this page click on Manage Domain button of the domain which you are going to add to your blog.
  • Then in the next page click on Manage Freenom DNS and it will take you to the DNS MANAGEMENT page.
  • Here in the DNS MANAGEMENT page you will get one Record box. But as you have two CNAMEs So, click on More Records button to another record box.
  • Then Select CNAME in the both type, Then Enter both CNAME and Target Code you got on your Blog publishing section in the Name and Target box . Leave both TTL 14440. (Have a look at the image below , The codes shown in the below image will not work for you, because only your code will work for you)
  • Now gain click on More Records to add Four (4) more Record box and This time these four records type will A  and TTL will be 300. Now enter the following four IP address in the target box as it is shown in the image below.
tk domain setup in blogger
  • Then click on Save Changes button.

That's it the job is almost done. Now wait Wait around 5 to 10 minutes and then go to your Blogger Settings and try to save the domain as you have tried in the step above. This time the domain will be saved. Now view you blog and enjoy you Free Domain.


Stay with www.iTTimesbd.com for more IT related post

Saturday, October 11, 2014

How to Fix Blogger "Don't track your own Pageviews"

Fixing Don't track your own Pageviews
When visitors visits your blog pages it called pageviews. If you are blogging on Blogger platform then you can find information about your blog's page views from Blogger Dashboard>>Stats. By default Blogger counts every single pageviews and Admin's pageviews too.. As a result you can't get specific idea about your blog's pageviews. Blogger has an option by which you can stop Blogger from tracking your own pageviews. But sometimes this option may not work. Today I am gonna show how to fix the problem.


Why "Don't track your own Pageviews" Work:

I have search a lot about why this blogger option does not work. And I din't find any specific reason. But lots blogger facing this problem after Using Custom Domain in Blogger as I'm facing so. But it may happens sometimes because of some technical issue. And it only can be solved by Google.


A few months ago I had added custom domain to my blog. An recently I had found that Blogger is counting my own pageviews too. Then I had tried to stop it but I found that this blogger option is not working. And I found that may Blogger have reported this issue to Google. Lets check that your Blogger  "Don't track your own Pageviews" option is working or not...

  • First Log into your Blogger Account and go to Dashboard.
  • Then click on Stats >> Overview.
  • Then click on Don't track your own Pageviews link.
  • If this option is not working properly then you will get the following Error Message.
pageviews tracking error message

If you find that this option is not working then follow the below steps to fix the problem.

  • You must be Logged in your Blogger Account on that Browser on which you want to stop tracking your own pageviews.
  • Then Copy and Paste following text in the Address Bar.

  • www.Your-Domain.com/b/statsBlockingCookie?action=SET&callback=__gwt_jsonp__.P2.onSuccess

  • Replace Your-Domain with you own domain name. (i.e. iTTimesbd)
  • Now press Enter and you will get the following message.

    // API callback
    __gwt_jsonp__.P2.onSuccess({"status":"yes"});

That's it, Now view your Blog and check you Blog Stats. You will find that your own pageviews are not counting anymore.


Important Note:
  • As a result of this method the Don't track your own Pageviews link will not work again, but it will stop counting your own pageviews.
  • You need to do it on every browser on which you want not to count your own pageviews.
  • If your blog has multiple authors, then they have to do the same.

Stay with www.iTTimesbd.com for more IT related Post

Sunday, August 3, 2014

How To Add Custom Domain in Blogger

It is almost two years I have been blogging on blogger platform. A few months ago I had added custom domain www.iTTimesbd.com in my blog. I had also published a post after adding www.iTTimesbd.com domain. In that I had discussed about the importance of custom domain for Blogger blog. Today I am gonna show how to add custom domain in blogger.

Add Custom Domain in Blogger

Blogger is very dynamic and flexible platform for blogging. Using custom domain on Blogger is one of the example of flexibility. By default Blogger offer you to host your site on Blogspot.com. Beside that you can also host your site on your own custom domain like www.iTTimesbd.com. You can change your publishing option anytime without hampering your site.

Before We Start: To add custom domain on your Blogger blog you will have to have a registered domain. There are many companies and websites from whom you can buy domain. Here I am presenting some website name from where you can buy your desired domain name.
  • EasyDNS.com
  • GoDaddy.com
  • Yahoo! Small Business
  • ix web hosting
  • 1and1
From the above list my personal choice is GoDaddy.com and this blog's domain www.iTTimesbd.com is also registered on GoDaddy.com. And here in this post I am showing the method of adding custom domain in blogger registered from GoDaddy.com. Lets see how to do it.


Adding Custom Domain in Blogger:
  1. First log into your Blogger account and go to Dashboard.
  2. Then click on Settings and choose Basic .
  3. Then in the Publishing section click on +Add a Custom Domain link.
    blogger settings basic

  4. Then under Third-party domain settings type the domain name that your have purchased. Remember the domain name must be begin with www.
    blogger publishing option

  5. Now click View settings instructions to go to blogger official instruction page. Here in this page choose On top-level domain (www.example.com) option.
    google domain adding page

  6. Then in the step 9 of the instruction page you will get 4 IP addresses. Copy and Save all 4 of them.
  7. Now go back to your Blogger settings and click Save button. But it will not be saved. You will get an Error 32 message as shown in the below image.
  8. Then under the Error 32 message you will see two fields Name, Label and Hosts Field and Destination, Target or Points To Field. Copy the Data of the both rows from these fields.
    blogger domain error 32

  9. Now Log into your GoDaddy.com account and click on My Account then Select Manage my Domain.
    GoDaddy my account

  10. Here you see your purchased domain name. Click on your Domain name.
    GoDaddy purchased list

  11. Then click on the DNS Zone File tab and choose Use classic DNS Manager.
    DNS Zone File

  12. Then click on Edit button to edit the DNS Zone File.
    Edit DNS Zone File

  13. Then under Cname (Alias) menu click on Quick Add button. (Look at 1st part of the below image)
  14. Then in the Edit box enter www in the first box and ghs.google.com in the second box.
    Cname (Alias)  menu

  15. Now click on Quick Add button again and Enter details from second row of the data you saved in steps 8.
  16. Then under A (Host) menu again click on Quick Add button. (See below image)
  17. Here Host will be @ and the Point to value should be one IP address provided by Google that you saved in step 6. And these IP address should be like below.

  18. 216.239.32.21
    216.239.34.21
    216.239.36.21

    216.239.38.21
     

  19. Add all 4 IPs one by one and Delete the old host as you won't need it anymore.
    Google IP in GoDaddy
  20. Then at the top of the page click on Save Zone File button to save your settings.
  21. Now again go back to your Blogger settings and in the publishing section click Save button to save the custom domain. But still you may get Error message because the registration process takes 24-48 hours. So don't worry come again letter to Blogger after 24-48 hours and repeat Step 2 to 4. And click Save button.
  22. After your domain start working click Edit link next to domain name on the Blogger settings page.
  23. Then Check the Redirect...to... check box below your site address to ensure that the visitors can visit your site without www. And click Save button.
    Blogger redirect option

That's it. Now visit your site with the new address. If you face any problem then don't forget to leave your valuable comment.


Stay with www.iTTimesbd.com for more IT related Post

Thursday, July 17, 2014

How to Disable Blogger Local Domain Redirection

Almost every country of the world have their own local domain name extension on Internet. Such as .bd for Bangladesh, .in for India, and .us for United States of America. Currently 15-20 countries have their own Blogger domain. You may have noticed that sometimes your site is redirected to different countries local domain.

Disable Blogger Local Domain Redirection


Example: Lets consider my own domain, Though now I am using custom domain. My blogger blog address is http://livetechnologybd.blogspot.com

But when you will visit my site from...
  • Italy then the URL will redirect to http://livetechnologybd.blogspot.it
  • Canada  then the URL will redirect to http://livetechnologybd.blogspot.ca
  • India  then the URL will redirect to http://livetechnologybd.blogspot.in
blogger worldwide local url

Disadvantages: Now the question is, Is there any disadvantage of this Blogger local domain redirection. The answer is Yes. There are many disadvantages. Such as...
  • If your site redirect to local domain continuously then the social stats of your site may fall dramatically.
  • Your site can not be visited from a country if that country baan Blogger with the help of their local domain.
  • Because of the variety of your site URL from country to country the search ranking of your site might be affected.
So, considering the above three case you should stop Blogger from redirecting your site to local domain. And you can do it by using a simple code.

Stop Blogger Local Domain Redirection:
  • First Log Into your Blogger Account and go to Dashboard.
  • Now click on Template and then click Edit HTML button.
  • Here in this HTML page Find <head> tag and then Copy the below code and Paste it just below the <head> tag.


  • Then click on Save Template button to apply it.
That's it. From now Blogger will not redirect your site to any local domain. Your visitor will only be able to your site via .com domain.

In Case Of Custom Domain:

As I mentioned that above currently I am using custom domain www.ittimesbd.com on my blogger and I don't need to stop blogger local domain redirection. That means If you use custom domain on your blogger blog then you don't have to think about the blogger local domain redirection. In this case visitor only be able to visit your site using your registered domain from anywhere of the world.


Stay with www.iTTimesbd.com for more IT related Post