Showing posts with label How To. Show all posts

Tuesday, August 3, 2021

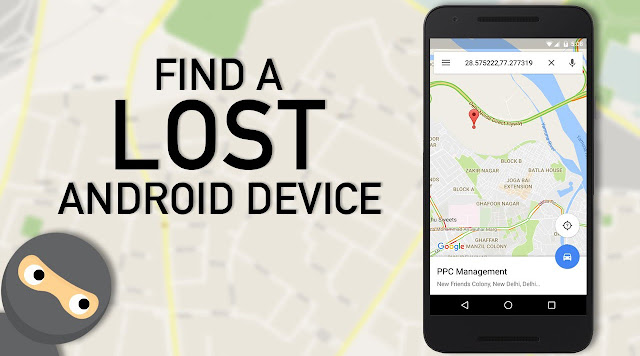
How to Find a Lost Android Phone with Google

How to Find a Lost Android Phone

In the current digital world mobile is the most used gadget in the daily life. But it become the matter of personal insecurity and the breach of privacy, when you lost or your phone is stolen. As your phone contains your personal information and data and you don’t want it falling into the wrong hands. It is not easy to track or find your lost or stolen smartphone, but if your phone is an android device than, with Google your can find your lost or stolen android smartphone. 

Google has an app and website that called Google Find My Device, though this google service you can find your lost/stolen android device, secure it, and erase all data. The most common situation happens to the smartphone users is, we sometimes forget our phone where we left, in such case if the phone is muted then it become difficult to find it out. This this post you will also learn to find your muted/silent phone with Google Find My Device.

To Find Your Lost/Stolen Android Phone, That Phone Must: 

  • Be turned ON 
  • Be signed in to a Google Account 
  • Be connected to mobile data or Wi-Fi 
  • Be visible on Google Play 
  • Have Location turned ON
  • Have Find My Device turned ON

Now Lets Find the Lost/Stolen Android Phone: 
  1. Go to Android.com/find and sign in to your Google Account, which you are using with your lost or stolen smartphone. 

    #Google’s Find My Device service is available as an Android app and as a standalone web page; both work the same way. 

  2. If you’re already signed into your Google account, you should see a map with your registered devices automatically displayed.
  3. On the Map your see the GPS location of your lost/stolen phone.

Google's Find My Device


Now If you have forgot phone where you have kept it and the phone is in silent mode, then...
  • Click on Play Sound  and it will Rings your phone at full volume for 5 minutes, even if it's set to silent or vibrate.

Try to follow the sound to see if it leads you to your device. When done, tap the Stop Sound button.
find android phone find my android google find my device find my phone google find my phone android find my device android lost android track my phone for free online find my phone huawei how to find a lost phone google find phone find my mobile google google locate my phone find my phone google account google dashboard find my device google imei tracker google phone locator track my phone google phone tracker google locate android phone where's my phone google find my phone with gmail
Stay with TecHie-ASiF for more IT related post

Friday, October 14, 2016

Most Trusted PTC Site to Earn Real Money [PROOF]

Best PPC Site
"How to Earn Money Online" is one of the most searched term on internet. It will be very hard to find a person who didn't searched earn from online. I also did. There are many way that you can earn from internet. Among them, earn by Clicking/Watching ads is the easiest one. As there are lot of scam site available on internet, So it is also very hard to find a Trusted one.

The site that I trust and user personally is - Clixsense. With Clixsense you can get paid for your web browsing, up to $0.02 for every website visited. The following reason for what I trust Clixsense, have look...


Why to Trust Clixsense:
  • The first and foremost reason for what I Trust Clixsense is, I have been using this site since 2011. In this time period I faced no inconvenience with this site. 
  • Second reason is I have already get paid several time from this site. And withdrawal I found no issue with them and payment was as smooth as it is promised by them. Have a look on my payment proof image below.
  • Screenshot from Clixsense Account:
Clixsense Payment Proof
  • Screenshot From My Paytoo Account:
Clixsense Payment Recite
  • Reasonable Earning Rate is the another criteria by what you can determine the trustfulness of a PTC/PPC site. There are many site, there they placed some unrealistic Rate of viewing ads. Just think for a while before wasting your time on those site.


How to Start Earning on Clixsense: To start earning, you need to register on Clixsense, and it is completely free. And you can begin earning money immediately after Registration. So, first complete the registration by following the steps below.

Warning: Don't Try to Open Mutiple Account from a single Computer or Internet Connection. Otherwise you'r account will be banned without any notice.

  • Note: Don't change the Registration link.
  • Then Complete the Signup form with Required information 
  • Then click on Signup Now button.
Clixsense Signup Form
  • An Email Validation link will be send to your mail address.
  • From your Mail Account click on the Email Validation link. You will land on Clixsense Sign In page.
  • Sign In with your Username and Password.
  • Then in the next page enter your Personal and Payment details, and click on Update Account.

That's it, your account will be fully activated. Now you are ready to start earning.
  • Just click on the View Ads tab on the top.
  • Then click the ads one by one.
  • On the Ads window click one the Cat Picture and wait till the timer is Zero.
Clixsense Viewing Ads

That's it, Everyday you will get a certain amount of ads, view all of them to earn. You can also upgrade your account to Premium Account to increase your daily earning. Other than viewing ads there are several other ways, that you can earn from Clixsense.

Ways of Earning from Clixsense:
  • Paid Surveys
  • Free Offers
  • Micro Tasks
  • Playing ClixGrid
  • Contests and many more.

Cashout Options and Conditions:
MethodMinimum CashoutFeeWhen
PremiumStandard
PayPal (United States)$6.00$8.002% up to $1.002 to 5 business days
PayPal (Rest of the World)$6.00$8.002% up to $202 to 5 business days
PayToo$6.00$8.00Free2 to 5 business days
Neteller$6.00$8.002% up to $30.00
minimum $1.00
2 to 5 business days
Tango Card$6.00$8.00Free2 to 5 business days
Payza$6.00$8.002.5% + $0.25 up to $4.002 to 5 business days
Check
United States, Canada
$10.00$1.00 (First time is Free)Monthly on or before the 10th
* PayPal will not charge you more fees for receiving our payments. We pay their fees.
* Your bank may charge you fees to deposit our Checks. Please consult with your bank.

Hope this post will help you to earn a little from online. If you have any question then, don't hesitate to leave your quires in the comment section below. And also share this post as much as you can. Thank you all.


Please Share This Post
Stay with https://techie-asif.blogspot.com for more IT related post

Monday, July 18, 2016

Easiest Way to Access Blocked Websites [100% FREE]

Access Blocked Websites
In the recent past Bangladesh Govt. Blocked Facebook. At that time like many other Bangladeshi I tried to find an easy and safe way to access blocked website. I found several method, but using Extension/Plugins to the Browser seems to me the easiest and safest way to access blocked website. And In this Post I'm gonna show how you can access blocked website by adding Extension to your Browser.

There are several Browser extension available throughout the internet that allow the users to access blocked website from PC's browser. Among all of them I found Browsec, the most convenience, safest and easiest one. Let's know more about the Browsec and see how to use it to access Blocked Website.


Browsec VPN at a Glance:
  • Name: Browsec VPN
  • Supported Browser: Google Chrome, Mozilla Firefox, Opera browser

Features of Browsec VPN:
  • Access to Any Content: Reach content regardless of geographical restrictions.
  • High Connection Speed: Enjoy market leading speeds of up to 100 M bit/s.
  • Virtual Location: Mask your Geo-location by using a virtual one.
  • It's Free: You can use Browsec completely free. No hidden fees.
  • Easy Installation: Everything you need is installed in just one click.

Install Browsec > Get Access to Blocked Sites:

  • First Download and Install the Extension/Ad-On according to your Browser from the following links.
  • After completing the Installation, Restart the Browser and you will see a new button added at the top of your Browser. It is Browsec Extension/Ad-On button.
  • Just click on the Browsec button and click on Protect Me to Turn it ON.
Access Blocked Websites


Currently there are Four Free Servers available in Browsec - Netherlands, Singapore, United Kingdom and United Stats.
  • To Change your Location, just click on Change
  • And choose your Location by clicking on it.
Access Blocked Websites


That's it, Now visit the Blocked site from your browser and will get the access. If you have any quires then leave your question in the comment section below, I will try to answer your. 


Please Share This Post 
Stay with techie-asif.blogspot.com for more IT related post

Wednesday, June 22, 2016

How to Fix Mixed Content Errors in Blogger Blogs !!!

Mixed Content Errors in Blogger
Few days ago I had published a post on Enabling HTTPS on Blogspot Domains. Beside bringing some advantage, Enabling HTTPS is also brings a problem named Mixed Content Error. But in the immediate update Blogger shows how to fix the Mixed Content Errors. If you haven't enabled HTTPS on your blog yet the first enable it, and then follow the rest of the post to fix the mixed content errors in your blog.


What are Mixed Content Errors?

When a web page becomes secured by SSL, but it contains both secure HTTPS and also the non-secure HTTP which is usually links, scripts, style sheets, video, and images. These browser errors will degrade both HTTPS security and the user experience of your blog. This means that source codes such as template, layout gadget, and post and paste may be causing the issues in the HTML side of the equation.


How to Find Mixed Contents:

Requirement: This method will only work on Google Chrome Browser. Use the latest version of Chrome.

  • Visit your Blog using HTTPS. fro example: https://livetechnologybd.blogspot.com
  • Then at the Right Top click on Chrome Menu and go to More Tools > Developer Tools > click on Console.
  • Or just press CTRL + SHIFT + J
  • Now look in the Console for mixed content errors which will look like show in the image below.
Find Blogger Mixed Content Errors

  • The types of Mixed Content Errors are also Include the following
  • Insecure Script Request
  • Insecure Image Request 
  • Insecure URL Request 
  • Make a list of all unsecured URLs and visit the other pages on your blog to check for other mixed content errors.

Fixing Mixed Content Errors in Posts/Pages:
  • First Sign into your Blogger Account and go to Dashboard.
  • Then click on Edit of the Posts/Pages that you Listed earlier
  • Once the Post/Page Editor opens, click on HTML tab.
Mixed Content Errors Blogger Post

  • Now press CTRL+F and Search for http:// inside the HTML tab.
  • Then Replace all http:// to https://
  • Verify all the URL after adding https:// to it by opening it in a new browser window. If the HTTP and HTTPS link give the same result, then everything is OK.
  • Finally click Update to save the post or page.


Fixing Mixed Content Errors in Template: This means that the Mixed Content Errors are may be found in the Template. Follow the steps below to fix them...
  • On your blog’s dashboard, click Template.
  • Then click one the Edit HTML to open the HTML Editor.
  • Now click inside the HTML Editor and Press CTRL+F to Search for htt://
  • Then Replace all http:// to https://
  • Verify all the URL after adding https:// to it by opening it in a new browser window. If the HTTP and HTTPS link give the same result, then everything is OK.
Mixed Content Errors Blogger Template

  • Finally click on Save Template button.

Fixing Mixed Content Errors in Layout:
  • From your Blog Dashboard click Layout and click Edit on All HTML/JavaScript
  • Find and Replace htt:// with https:// and save them.


Avoid Mixed Content Errors in Post/Page Editor:

To find and fix the mixed content errors automatically, blogger introduced a warning tool to alert about the possible mixed content inside the post. Let's see how to use this tool.
  • Open the Post/Page Editor by clicking Edit link.
  • Then click on HTML tab
  • Now click on the Publish/Update or Save button 
If the content has any errors, you’ll see them at the top of the editor along with the link to Fix or Dismiss them. 
  • Fix: This will fix the errors identified by the editor and save the post.
  • Dismiss: Dismiss will ignore the errors for this session.
  • Click on the Dismiss link to Fix the Errors and Update/Publish it .

Blogger Mixed Content Errors Fix


That's it, hope it will help you to fix the Mixed Content Errors of your Blog. However fixing this errors will help you to improve the performance of your blog, particularly when it come to pages which may have issue with mixed content generating errors.


Please Share This Post 
Stay with techie-asif.blogspot.com for more IT related post

Sunday, June 5, 2016

Installing Google Play Store on Xiaomi Phone [FIXED]

Install Google Play Store on Xiaomi Phone
Hi guys Today I'm gonna discuss something different. Here in this post I'm gonna show you how to Install Google Play Store on Xiaomi Phones with MiUi 7. I have been using Redmi Note 2 for the last one year and recently I had sold the phone and reset it. As a result of that the Google Play Store was removed. But when I tried to install it by Google Installer, I failed :(

May be because of MiUi 7 update the previously used methods of installing Google Play Store are no more Working. And I searched on goggle and found on YouTube an update method for that. By which method I reinstalled Google Play Store on my sold Redmi Note 2. Lets have look at the Updated method of Installing Google Play Store on Xiaomi Phones with MiUi 7.


Installing Google Play Store on Xiaomi Phone:
  • Download the Zipped File from the Download Link given below.
  • *This Zipped File contains Four (4) files.
  • After completing the Download, Extract the Zipped File. You will get Four (4) files.
  • Then Transfer the Four (4) files to your Xiaomi Phone.
  • Now go to your Phone's File Explorer and find the location where you've transferred the Four (4) files.

    Install Google Play Store on MIUI 7

  • Then Install all the four (4) files one by one.
  • *Don't open anyone of this app, once they are installed. Wait all four to be installed before you open anything.
Install Google Play Store on Xiaomi

  • Once you have installed all four files (apps), Then Reboot your Xiaomi Phone.

After the Reboot is completed, Just open the Play Store on your Phone and Sign into it by using your Gmail Address. That's it, the Google Play Store will ready to download apps from play service on your Xiaomi Phone.


Download Links:

Please Share This Post 
Stay with techie-asif.blogspot.com for more IT related post

Friday, April 8, 2016

WhatIsMyIP: Single Click to Find Your IP Address!!!

What Is My IP
When your computer is connected to a internet network, it holds an address on that internet network and that is called IP Address. The IP (Internet Protocol) address is the identification of your computer on a internet network.

Often Internet users have to find their IP address. There are several ways by which you can find your PC's address, but the easiest one is to find it online. And there are many site available throughout web which can help you to find your IP Address, among them WhatIsMyIP is one of the popular one. You can find your PC's IP Address by only one click in this site - WhatIsMyIP.

Features of WhatIsMyIP:
  • Internet Speed Test
  • IP Address Lookup
  • IP WHOIS Lookup
  • IP Address Hostname Lookup
  • Server Headers Check
  • Email Header Analyzer
  • Blacklist Check
  • Traceroute
  • User Agent Info
  • DNS Lookup
  • Reverse DNS Lookup
  • Proxy Check

Single Step to Find Your IP Address:

That's it, now in this page you will find your PC/Computer IP Address along with the following brief information as shown in the image below...
  • City Name
  • State Name
  • Country Name
  • Internet Service Provider (ISP) Name

what is my ip


Please Share This Post 
Stay with techie-asif.blogspot.com for more IT related post

Saturday, September 5, 2015

How to Bring Photo Viewer Back in Windows 10!

Get Back Windows Photo Viewer
Recently while opening a Photo on my newly installed Windows 10 PC, I found that Photos are opening with newly added Windows Photo Application. Though this Photo App is very good, But to be honest I was very much used to with Windows Photo Viewer. And that is why I tried to find the Photo Viewer in Windows 10, but I didn't find it. But by Googling found a very easy solution. And today's post I'm gonna show you, how you can bring Windows Photo Viewer Back in Windows 10.

Related Post:


Actually Microsoft hasn't removed the Windows Photo Viewer from Windows 10, Microsoft only Disable the feature to forced the users to use the Photo App :(. But enabling the Windows Photo Viewer is very easy, All you need just to Download and Apply a very small Registry file on your PC. And most interestingly the Registry file is only 60 KB in size. So let's start the procedure...


Enabling Windows Photo Viewer:

  • First Download the Registry File from the link given below.
  • Then Extract the file in a Folder.
  • Now Double click on WPV.reg file and then Yes > Yes > OK

That's it, All Done :) Windows Photo Viewer will be enabled on you Windows 10 PC once the above steps are completed. Now Follow the steps below to open your Photos with Windows Photo Viewer...


How to Open Photos with Windows Photo Viewer:

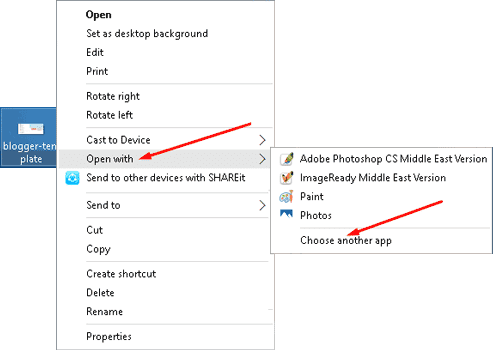
  • First click Right Mouse button on any Image.
  • Then click on Open with > Choose another app

Image Open With Option
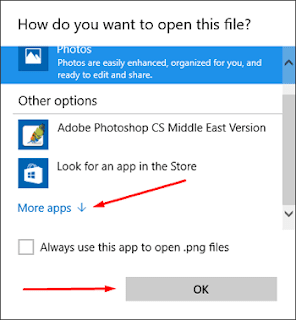
  • Then a new Window will open, Here click on More App > OK
Find Windows More App
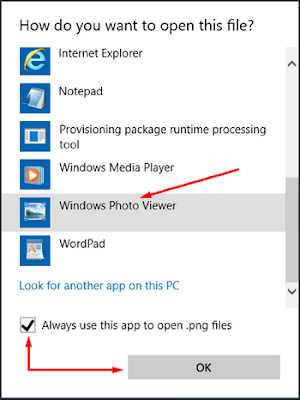
  • Now from the App List Select Windows Photo Viewer
  • Then Mark Always use this app option and click OK
Choose Windows Photo Viewer


In the above example I applied Windows Photo Viewer for the which are in .PNG format. As a result from now all the images in .PNG format will be opened with Windows Photo Viewer. But for the other image format like .JPG or .GIF you will have apply the same method shown in the above.

And if you have any question/quires regarding this post then don't hesitate to let me know by commenting below. :)


Download Link:

Please Share This Post or At-Least Press  G+1  on Every Post
Stay with www.iTTimesbd.com for more IT related post

Sunday, August 30, 2015

How to Customize the Windows 10 Start Menu!

Customize Windows 10 Start Menu
The all new windows era has begun the Windows 10 release. It is also liked by users very much. And why not? - Windows 10 is fully packed with new features and improvements. One of the most noticeable improvement done in the Start Menu. And Microsoft introduces all new Start Menu with Windows 10. It is combined with standard program, power settings and Apps. This new Start Menu is very much customizable and in this post I'm gonna show how to do it.


Related Post:


Actually the Application part of the Windows 10 is more customizable then the left part. But the left part is also can be customized is some extend. OK let's see how to Customize the Windows 10 Start Menu...


Changing Start Menu Color:

Actually you can't change the colors of any items in the Start Menu. All you can just to change the background color of it and which change the full atmosphere of the Start Menu. To change the Start Menu Color...

  • Go to the Settings from Start Menu.
  • Then click on Personalization.
  • Now in the left panel click on Color.

Customize Windows 10 Start Menu

Here if the Automatically Pick an Accent Color from My Background option is turned On, then Turned it Off to change Start Menu Color of your Choice. Then Scroll Down to the bottom of Accent Colors Box - Here Turn On the Show Color on Start, Taskbar and Action Center option. Now from the Above Select your color and the Start Menu color will be changed according to your Choice :)


Add/Remove or Uninstall App Tiles:

One thing to realize about the tiles is that they can be used for both modern and traditional Windows apps. You can find the Traditional Apps in the Left List panel, click on All Apps to see the full list. To add the Traditional apps to the right panel - Drag a App and Drop in the Right Panel.

Customize Windows 10 Start Menu

Sometime you may don't want an particular App on your Start Menu and want to remove that. And the good news is you can remove any App from the both part of the Start Menu if you want. Just Right click on the App and choose Unpin from Start. The App will be Removed from the Start Menu. If you want to Remove any App permanently, then choose Uninstall.


Turn Live Tile On/ Off:

Live tiles are the most attractive features of Windows 10. But to enjoy the live tiles, you have be connected to the Internet. But These Live times will decrease your Internet Speed. So, if you don't want to lose or decrease your data and data speed then you should Turn of the Windows 10 Live Times. To do so...

Customize Windows 10 Start Menu

To turn off a live tile, you have to click right mouse button over that item > Now choose Turn Live Tile Off. But if you see Turn Live Tile On, that means the item is already turned off.


Resize the Tile Area:

One of the most interesting customizing features of Windows 10 Start Menu is, you can Resize the right-side tile area of it. it's really easy to extend the right-side tile area of your Windows 10 Start menu. Just drag its right border out and in. You can also have the Start menu take up the full screen as like as Windows 8.

Customize Windows 10 Start Menu

If you want then you can also Remove the entire Right Tile Area. To do so you will have to individually remove every tile and then drag the right edge of the panel in. Then the Start Menu will show the traditional basic apps and features only.


Change What Appears:

By Default, the Start menu shows most-used and recently added apps in its top section—things I find quite helpful. But if you want then you can Determine What Should Appear and what not. I mean you can see an empty space in Start Menu in Place of most-used and recently added apps. To do so...


  • Go to the Settings from Start Menu.
  • Then click on Personalization.
  • Now in the left panel click on Start.

Customize Windows 10 Start Menu

Now here Turn Off the first two option Show Most Used Apps and Show Recently Added Apps. You can also pick standard folders you want to appear on the Start menu, including things like Documents, Downloads, Music, Pictures, and so on.


That's it, these are the necessary customization that you can do with the Windows 10 Start Menu. Now that you've got the Start menu looking how you want it. Ohh! it is very long post hope I have not bored you also hope that you have got your ans here. But still if you have any question/ query regarding this post, then don't hesitate to leave it by commenting below. :)


Please Share This Post or At-Least Press  G+1  on Every Post
Stay with www.iTTimesbd.com for more IT related post

Wednesday, August 12, 2015

How to Receive Android Phone's SMS on PC!

Android SMS on PC
You are a very busy man and you have to work on PC for a long time, that is why it is very difficult for you to pickup Android Phone's to read out every SMS  received on it. Mostly when you device is on charging and you working at distance from it. So, sometimes you may wish have an option, by which you can receive your Phone's messages directly on your PC.

If So, Then I've a good news for you. Because in this post I'm gonna show how you can receive your Android Phone's SMS/Messages directly on your PC. So that you can check your important SMS/Message without touching your phone.


Here in this post I'm gonna use Mighty Text Application for the Android device and Chrome Extension for the Browser. Using this same App you van not only Receive SMS but also do something more like Call Notifications, Schedule Messages, Phone Battery Alerts etc. But today I'm will only discuss about Receiving Phone's SMS/Messages on PC. Lets see..


  • Supported Platform: Android Phone and Windows PC only.

Requirement:
  • MightyText Android Apps.
  • MightyText Chrome Extension. (Install Chrome Browser, if not Installed)


Procedure of Receiving SMS to PC:

  • First download MightyText App from the Link given below.
  • Then Install the App on your Android Device.
  • Then in your Chrome Browser add the MightyText Extension. (Link Given Below)
  • Now Open the All, You will need an initial pair up with your PC as it will be done over WiFi network on which both the devices being connected.
  • When the setup is done, Then you will see your android name on the Icon when you click on it.

That's it, if everything is OK, then when you android receive any SMS it will transfer on your extension of PC and you can read it there. If you have any quires then don't hesitate to leave your valuable comment.


Please Share This Post or At Least press  g+1  on Every Post
Stay with www.iTTimesbd.com for more IT related post

Monday, August 10, 2015

How to Hide Specific Updates on Windows 10!

Windows 10 Auto Update
At the end of the previous year when the Technical Preview of Windows was released I had published a post on Disabling Windows 10 Automatic Update. And after the official release of windows 10, I have come to know that the previous trick is now working on windows 10 Pro and Enterprise only. Official Microsoft launched Windows 10 in Three Edition - Home, Pro and Enterprise. And my today's post is basically Related to Windows 10 Home Edition.


Actually Windows 10 Home edition is the only version that is required to perform updates automatically in the background. And in both Windows 10 and Enterprise you will have the option to disable Auto Update. If you’re running Windows 10 Home edition, updates flow down from Microsoft automatically and install. Though all the updates are necessary but if you want then some updates you can avoid.


The Tool that I'm gonna share today will allow you to hide specific Windows 10 updates. And windows will not install those updates that you will hide. Let's see how to do the trick...


Hiding Windows 10 Auto Update:

  • First Download Microsoft Update Hider Tool from the link given below.
  • Then double click on the Tool to Run and click Next.
Windows 10 Auto Update
  • Now it will ask You to Hide Updates or Show Hidden Updates.
Windows 10 Auto Update
  • Click Hide Updates and then select the update that you don’t want.
Windows 10 Auto Update
  • And finally click Next.

That's it. the update that you have selected it will not install on you PC next time. So, this will save your valuable data. If you want to Unhide the update then follow the same steps and withdraw the previous selection.


Please Share This Post or At Least press  g+1  on Every Post
Stay with www.iTTimesbd.com for more IT related post

Saturday, August 8, 2015

How to Change Bing to Google in Windows 10!

Windows 10 Cortana
Post Subject: Changing Cortana’s Bing Search to Google in Windows 10

Microsoft has already released their latest version of windows - Windows 10. And many old windows users have also upgraded their PCs using the free upgrade offer. I had also shared several post on Windows 10 Download and Upgrade. However Now people are busy with discussing the new feature of Windows 10. One of the Most Interesting is, it's new Search Feature.


Windows 10 comes with its very own digital assistant CORTANA that searches your queries and acts according to your voice commands and gives useful results. Though this feature is very interesting but if you are used to with Google then you will have problem with this. Because just the way you can’t change the default search provider in Google Now and Siri, Cortana resists change and provides Bing search results.


So, to change the default Cortana’s Bing Search to Google you need to use an Extension name Bing2Google. All you need, just to install the extension on you Google Chrome Browser. Let's see how to do it...


Changing Bing to Google:

  • First Of All, Download Google Chrome (If you don`t have it already).
  • Set Google Chrome as your default web browser.
  • Now go to the Bing2Google Extension Page from the link given Below.
  • And click on Add To Chrome and then Add Extension.


Page Link:

Please Share This Post or At Least press  g+1  on Every Post
Stay with www.iTTimesbd.com for more IT related post

Sunday, August 2, 2015

How to Upgrade Windows 7/8.1 to Windows 10!

Windows 10 Update
Finally the Windows 10 era has begun. After a long wait and with the huge expectation Microsoft has release there final and most upgraded Windows version on on 29th July, 2015. As the Microsoft promised earlier that they are groin to give the Windows 10 upgrade free to the current Windows 7 and 8.1 users. But you can't download Windows 10 instantly. Because Microsoft is slowly slowly rolling out the update in 190 countries, and it may take some time to reach your device.


 But Don't Worry, Have Smile on Your Face. Because in this post I'm gonna end of your Waiting. Today I'm gonna show how you can Upgrade your Windows 7 or 8.1 OS to latest Windows 10 manually.


Eligibility for Windows 10:

Not all devices will get the Free Windows 10 Upgrade. If you have registered for free Windows 10 Upgrade or if you are running on Windows 7 or 8.1 then most probably you are eligible for the Free Upgrade to Windows 10.


System Requirement:

  • Minimum 1 GHz Processor. (Dual Core or better)
  • Minimum 2 GB RAM.
  • Minimum 16 GB Free Space on a Partition.

There are two Methods by which you will be able to perform the Windows 10 Upgrade. Method 1 is universal for all PC users, and will commonly download the Windows 10, and Method 2 is specially made for your PC. Both are completely safe and verified, and of course both the ways are official methods to upgrade Windows 10.


Additional Requirement:

  • A Stable Internet Connection. Prefer unlimited connections, as the size may be up to 3 GB.
  • Sufficient Space on your internal/external storage where you are downloading it. [3 GB At Least]
  • A blank USB / DVD if you need to create backup media files. This is completely optional.

Before starting, Check for updates once. Go to Control Panel > System and Security > Windows Update and check once for any available updates.You may have gotten the Windows 10 to download right there, though, chances are very rare. Still, be sure of that.


Method - 1: (Force Download Windows 10 Manually)

In this Method you will have to use a tool to get Windows 10 Upgrade. Collect the Tool from the link given at the bottom of this post. This tool will help to back up the installation file and save the installation media into USB or DVD Disks, though it is optional. We will download the Update Tool and Run it on our PC. It will check for upgrades and download it.


  • Download the Windows 10 Upgrade tool from the links given below.
  • Then RUN this Tool.
  • It will ask you Upgrade this PC or Create Update Media for another PC. Choose the first option to upgrade your PC.
  • Click Next and Follow the onscreen instructions to upgrade your PC. It will start downloading your software for Windows 10.

Note: It may or may not need your Windows Registration Key. If this works then you are good to go. And, this should work. Still, if it does not work, try out the Method 2.


Method - 2: (Force Download Windows 10 Manually)

This method will follow official windows upgrade procedure, with a tweak. Microsoft recommends this by default and your scheduled upgrade would come via this method only, but we are just applying a simple tweak and speeding up the process making it available instantly. Let’s start.


  • Go to Control Panel > System and Security > Windows Update. Keep this window open.
Check Windows Update

  • Now open File Explorer > Windows (C:) > Windows > Software Distribution > Download. You will see some files and folders.
  • Backup all these files into some other drive and delete everything there. To do this step, create a new folder on another drive and copy everything from here and paste here. Next, delete all files and folders from here. Your backup will prevent you from accidental loss of files and help you restore it like previous.
  • Note: You may need administrator permissions for this. Grant it.
  • Now open Command Prompt in Administrator Mode. To do this, Right click on Command Prompt and Click Run as Administrator. You need Administrator permissions for this.
  • On command prompt type this text: wuauclt.exe /updatenow
  • Note: A space should be after wuauclt.exe
  • Press Enter. BOOM! You are almost done! Now check the Windows Update Window you opened in the First step on this Method - 2

If everything is OK You will find it either already started downloading Windows 10 or is ready to download it. Start Downloading and wait patiently to finish!


Please Share This Post or At Least press  g+1  on Every Post
Stay with www.iTTimesbd.com for more IT related post