Showing posts with label SmartPhone. Show all posts

Monday, August 9, 2021

How to Take a Screenshot on Android [Any PHONE]

How to Take a Screenshot on Android

May be you are laughing with the title of this post. If you are laughing then its normal as taking screenshot is one of the most common and easy activity done the smartphone and people having very little knowledge can easily take screenshot. 


But currently there are many smartphone manufacturer available in the mobile phone market and almost every single day these phone company's are launching different models with different features. As every android phone is different and taking screenshot with them is also different.

Although 4th version of Android, Ice Cream Sandwich had introduced simple screenshots for all android device with simple Power-and-Volume-Down-Key but with different manufacturer Smartphone's now having different new methods of taking screenshots. Here in this post I am gonna try to cover almost all the methods of taking screenshot. Lets check it below...

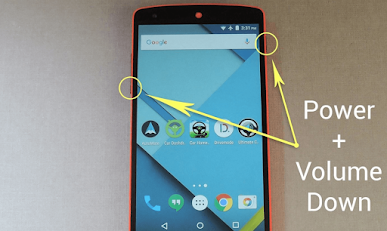
With Power & Volume Buttons:

This method of taking screenshot works on almost all the android smartphone brand and model available in the market.
  
  • Hold down the power and volume-down buttons at the same time for a couple of seconds.
    How to Take a Screenshot on Android

  • Pull down the notification panel to reach quick settings and tap the Screenshot icon or Go to your Phone's Gallery and here you will get your taken Screenshot.


With Home & Power/Volume Buttons:

In this screenshot taking method works with the phone having physical home buttons. You will have to use Home buttons along with the Power or Volume buttons.

  • HTC U12+: Press and hold the power button until your phone vibrates, and then tap the virtual home button on the navigation bar while still pressing the power button
  • HTC 10: Hold down the home and power buttons for a couple of seconds.
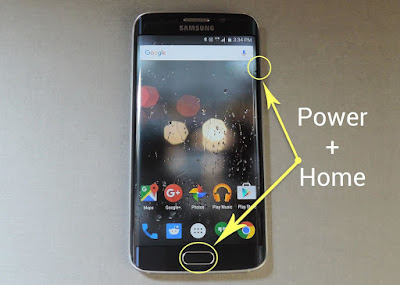
  • Galaxy S7 and earlier: Hold down the home and power buttons for a couple of seconds.

    How to Take a Screenshot on Android

  • Pull down the notification panel to reach quick settings and tap the Screenshot icon or Go to your Phone's Gallery and here you will get your taken Screenshot.

With Gesture on the Screen:

Taking screenshot on android phone using different on screen gesture is one of the latest and the easiest technique. You can also customize the gesture of taking screenshot. The most used and common screenshot are....

  • Three Finger Swipe: Swipe down with three fingers on the home screen.
  •  Palm Swipe: Over the Phone Screen Swipe your Palm from Right to Left or Left to Right direction. 
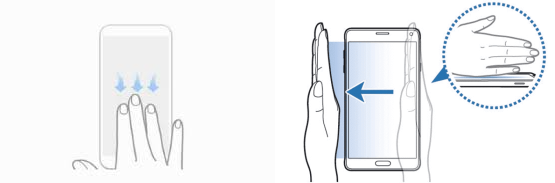

    How to Take a Screenshot on Android


  • Pull down the notification panel to reach quick settings and tap the Screenshot icon or Go to your Phone's Gallery and here you will get your taken Screenshot.
 
With Google Assistant:

If you want to take screenshot on your phone with your voice command than Google Assistant is there for you. If your Phone supported Google Assistant than one the desired screen just ask the Google Assistant to take screenshot. That's it now save your taken screenshot. 
how to take a screenshot on android how to screenshot on android how do i take a screenshot on my phone how do i screenshot on this phone how do you screenshot on a Samsung how to take screenshot on Samsung s20 how to take a screenshot on my phone how do i take a screenshot
 on this phone how do i screenshot on my phone how to do a screenshot on android how to take a screenshot on this phone how to screenshot on lg phone how to take a screenshot on a Samsung phone how to take a screenshot on Samsung galaxy how to screenshot on android phone how do you take a screenshot on a Samsung how to screenshot on Samsung phone how do i screenshot on Samsung how to make screenshot on android how do you screenshot on this phone how to take a screenshot on Samsung s10 how to take screenshot in Samsung j2 how to screenshot on android tablet how to screenshot on Samsung galaxy how to take a screenshot on android phone how do i do a screenshot on my phone how do you screenshot on an android how do you take a screenshot on an android phone how do i take a screenshot on my android phone how do i take a screenshot on my Samsung how to take a screenshot on lg phone

Stay with TecHie-ASiF for more IT related post

Sunday, June 5, 2016

Installing Google Play Store on Xiaomi Phone [FIXED]

Install Google Play Store on Xiaomi Phone
Hi guys Today I'm gonna discuss something different. Here in this post I'm gonna show you how to Install Google Play Store on Xiaomi Phones with MiUi 7. I have been using Redmi Note 2 for the last one year and recently I had sold the phone and reset it. As a result of that the Google Play Store was removed. But when I tried to install it by Google Installer, I failed :(

May be because of MiUi 7 update the previously used methods of installing Google Play Store are no more Working. And I searched on goggle and found on YouTube an update method for that. By which method I reinstalled Google Play Store on my sold Redmi Note 2. Lets have look at the Updated method of Installing Google Play Store on Xiaomi Phones with MiUi 7.


Installing Google Play Store on Xiaomi Phone:
  • Download the Zipped File from the Download Link given below.
  • *This Zipped File contains Four (4) files.
  • After completing the Download, Extract the Zipped File. You will get Four (4) files.
  • Then Transfer the Four (4) files to your Xiaomi Phone.
  • Now go to your Phone's File Explorer and find the location where you've transferred the Four (4) files.

    Install Google Play Store on MIUI 7

  • Then Install all the four (4) files one by one.
  • *Don't open anyone of this app, once they are installed. Wait all four to be installed before you open anything.
Install Google Play Store on Xiaomi

  • Once you have installed all four files (apps), Then Reboot your Xiaomi Phone.

After the Reboot is completed, Just open the Play Store on your Phone and Sign into it by using your Gmail Address. That's it, the Google Play Store will ready to download apps from play service on your Xiaomi Phone.


Download Links:

Please Share This Post 
Stay with techie-asif.blogspot.com for more IT related post

Wednesday, July 15, 2015

Root any Android Device without PC [Exclusive!]

root android
Rooting Android Devices are currently very common trend. But there is a misconception about Rooting is - Without PC Android Devices can't be Rooted.  Rooting Android Device using PC is one of the way but not the only way. Nowadays there are several Android apps available by which an Android Device can be Rooted very easily without any help of Computer. Today I'm gonna talk about some required apps for Rooting Android Device.

Although earlier I had shared a few post on Rooting Android Device, but still I want to say something about Rooting for the newbies. root access is often used to install custom recoveries, which then can be used to flash custom ROM, kernels, and other device modifications. Root access also enables users to install the powerful and versatile X-posed Framework, which itself acts as a gateway to easy, non-destructive device modification.


Must Install: After rooting be sure to install a Superuser app which allows root to only devices which you recognize and save you from harmful apps. There are several Superuser apps, but my personal choice is KingUser (To Unroot And Root). It is the best alternative to SuperSu..and that too with android L material Design.


KINGROOT – (One click Root Tool):

android apps free download

KingRoot is an amazing tool for “lazy people” who just want to get root access but don’t want to flash any third party Recovery into their lovely device. It is one of the most famous root tool in China and now we release English version here for everyone, totally free and without AD.


FRAMAROOT – (Root Almost All Devices):

android apps free download

Framaroot is another excellent apps which let you Root your Android Device without PC. This app including several exploits named as the heroes of the book “The Lord of the Rings” Gandalf, Boromir, Pippin, Legolas, Sam, Frodo, Aragorn and Gimli. You can install Superuser and su binary on phone or tablet from android version 2.x to 4.x.


TOWELROOT – (If nothing works ... This will):

android apps free

Created by Recognized Developer geohot, Towelroot is another root exploit app that is compatible with a large range of devices. The root exploit itself is built around Linux kernel CVE-2014-3153 discovered by hacker Pinkie Pie, and it involves an issue in the Futex subsystem that in turn allows for privilege escalation.So to sum it up.. It ROOTS your device.


iRoot:

android apps free download

iRoot has the advanced android root engine and secure android root technique make the success rate more than 90%. Now more than 150,000 devices from Android OS 2.2 to 4.4 are supported by iRoot. This number is still growing.


Z4Root:

android apps free download

Another app for rooting your device without a computer…supports many number of devices. I have got to know about this app recently, but hope You will be master of your android phone with just one click to root or unroot your android phone!


Installation and Rooting Guide (For All App):

  • Download the necessary App from the link given below.
  • Then Open the App on you Device and Do the Following...
  • KingRoot – Click root...Done.
  • Framaroot – Choose Supersu and any character below…Done.
  • Towelroot - Click Make it rain…Done.
  • iRoot – Click Root...Done.
  • Z4Root – Select any type of root.

After completing the Rooting process you will get your Android Device Ready for use. Enjoy.


Please Share This Post or At Least press  g+1  on Every Post
Stay with www.iTTimesbd.com for more IT related post

Friday, October 10, 2014

How to Factory Reset Android Phone/Tablet!

Factory Reset Android
Android operated smartphones and tablets are the most popular in the market. Android devices gets popularity because of its easy user manual. But it has some problems too and among them one of the most common problem is, Android device get slow gradually. We try to do several things to solve this problem. We uninstall unwanted application and use task killer app to speed up the device. Most of the time doing these tricks can improve the android device speed.


But after using these tricks if your device is still facing the slowness problem and it is not working properly then there is an option by which you can save your device. The option is to reset the device. It is called Factory Reset Android. As a result of Factory Reset the device will behave like a new device. In this post I will show how to Factory Reset Android Phone/Tablet.

Note: Before Factory Reset make sure that you have backed up your Messages, Contacts, Photos and full device. Because after resetting your android device all your data will be erased. The options name used in this post may varies from device to device and Android version to version.

Condition: To reset your android device your it should be in working condition. At least the Settings option must be working.


How to Factory Reset Android:
  • First go to your Device's Setting and Tap on Backup & reset option.
  • The from the bottom in Personal Data section Tap on Factory data reset.
    • You will see that what will be erased from your device. Like music, photos,other user data like Google accounts, installed games and everything that stored on your device.
  • Then tap on Reset device and the tap on Erase everything.
Android Factory data reset option


That's it. Now wait a few second and your will device factory reset will be completed.


Stay with www.iTTimesbd.com for more IT related Post

Wednesday, October 1, 2014

Advanced Task Killer - Best Task Killer for Android

Best Task Killer for Android
Android OS is the most popular mobile operating system in the current era, and day by day the popularity is increasing. People like Android Operated device most because of its user friendly manual and multitasking. But inspite of having many advantages android devices has some problems too. Quick consumption of battery charge and getting slower are very common problem. Earlier I have shared several posts on Android Battery Saver App. And today I am sharing a task killer app named Advanced Task Killer, which will help you to maintain your android device speed and battery charge longer.

As I said you can do multitasking on your Android phone and tablet, that means you can run multiple android apps simultaneously on our device. Normally after completing task we kill apps manually, but some of the default android apps that runs continuously in the background and thus it drains battery charge quickly. We need to stop these unwanted apps forcefully to enhance the device battery charge. Get it from below link...


In such cases Advanced Task Killer is the perfect solution. This is the best android app that easily kill android tasks running in the background. This will show you the background running app on your android device. From these apps select the apps that you want to kill and tap on to Kill Selected Apps. As a result the selected apps will be killed. You can also set your device on Automatically Kill apps mode and it will kill the background apps automatically.

Advanced Task Killer task killing

If you choose Automatic apps Kill mode then you will have to set Auto Kill Level for your device. There are three auto kill level available, these are safe, aggressive and crazy. Select any one of the available level and it will kill your device apps according to the selected level...

Advanced Task Killer auto kill level

  • Safe: This level will only kill the apps aren't running but still consuming memory.
  • Aggressive: This level will kill the apps running background and apps aren't running.
  • Crazy: This level will kill all apps except the apps that you are using with.

There are two versions of Advanced Task Killer is available, these are Free and Pro version. The only difference between them is the free version is ads enabled. If you don't like ads, then upgrade Advanced Task Killer app from Free to Pro version. It will cost $4.99 USD.


Stay with www.iTTimebd.com for more IT related Post

Monday, September 29, 2014

How to Backup & Restore Whatsapp Messages!!!

Backup Whatsapp Messages
Whatsapp is one most popular free mobile messaging application. Although using this app you can share images, video and audio media messages, but mostly people use Whatsapp for message sharing. Sometimes you may have wanted to backup your Whatsapp messages or you may have wanted to restore the mistakenly deleted messages, then this post is dedicated to you. In this post I am gonna show how to backup and restore Whatsapp message on Android device.

Earlier I had shared a post about recovering deleted files on android. And in this post I am sharing easy steps about how to backup and restore Whatsapp messages. First start by  Whatsapp Messages backing up process...

Backing up Whatsapp Messages


Backup Whatsapp Messages:
  • First Open Whatsapp on your Android device.
  • Then tap on Option button. Here you will see Setting option.
  • Now select Setting and you will see setting menu. The go to Chat Setting.
  • Then tap on Backup Conversations. And your whatsapp message will be backup on your whatsapp folder.

By default Whatsapp backup file location is \WhatsApp\Backups folder. If you have moved Whatsapp Messages on to your SD card then the backup file location will be SD card\WhatsApp\Backups folder. If you are using Android device that don't have the option to move installed apps to SD card then you can only find the Backed Up Whatsapp messages from this location device\WhatsApp\Backups folder. You can also send this backup file to your email address in order to store them in your email account.


Restore Whatsapp Messages:

Sometimes you may had deleted your Whatsapp Messages willingly or by mistake and now you want restore them, Then follow the below steps...
  • First Uninstall Whatsapp application from your Android device.
  • Now Install Whatsapp application again from Google Play Store.

Then during installation, the app will ask if you want to restore your conversations, You should choose Yes. As a result Whatsapp will automatically backup file from your device and restore it on your newly installed Whatsapp.


Stay with www.iTTimesbd.com for more IT related post 

Friday, September 26, 2014

DU Battery Saver - Best Battery Saver for Android!

android battery saver
After the introduction of Android Operation System to the mobile operation the meaning of mobile has upgraded to the next level. Now the mobile phones are used in smarter way and turned its name to Smartphone. Beside having lot of utilities there are many problems came in front of us about Android Smartphone. One of the most common problem is battery saving problem. Because of multitasking Android smartphones consume its battery charge very quickly. In this post I am gonna introduce you to the Best Battery Saver App for Android.

Today I am presenting DU Battery Saver & Widgets. The best battery saver for Android. From my personal experience this is the perfect Android saving solution. The details about this Android saver app is presented below. First Download the Du Battery Saver application from the below download link on your Android smartphone.


You can only download this Battery Saver app from your android smartphone. This 100 % free and safe Google Play Store download link. Follow the below steps for further instruction...

  • First click on the above Download Link (From Android Smartphone)
  • You will be taken to the Google Play Store.
  • Then Install this Battery Saver app on your Android Smartphone.

After installing this app, open it on your android smartphone. Then inside this Battery Saver app you will get the following interface.

screen of DU Battery Saver


Now let's know something more about this DU Battery Saver app. DU Battery Saver is the World leading, even I can say World No.1 Battery Saver App. It is not only Battery saver app but also android power doctor & manager. This free Battery saving apps can make your smartphone's battery last longer. You can get up to 50% more battery life for Android phones or tablets using the following features of this app...

  • Smart pre-set battery power management mode.
  • One-touch controls and healthy charge stage features.
  • Solve battery problems and extend your battery life.

DU Battery Saver is presented by DU Apps Studio. My personal using experience says that it is the simplest and easiest way to keep your Android phone working perfectly. Beside that you can protect your Android Smartphone against poor charging, battery hogging apps, and overlooked device settings that shorten your battery life. You can also upgrade to DU Battery Saver PRO, and get up to 70% battery power savings.


Highlights of DU Battery Saver App:
  • Simple Battery Saver: Use smart pre-set battery power management modes or create your own custom power management mode to get high performance and great energy savings.
  • Fast Battery Saver: Use Optimize button to Instantly find and solve battery problems.
  • Easy and Powerful Battery Saver: Extend your Android battery life by up to 50% without charging.
  • Effective Battery Saver: Protect your battery with healthy charging to extend your Android Smartphone's battery life.
  • Convenient Battery Saver: In the home screen Optimize button allows you to stop power consumptive background apps with one tap to boost battery life.


Features of DU Battery Saver:
  • Accurate Status: It will show exactly how much battery charge is left with detailed analysis.
  • One-Click Optimization: Instantly find and fix battery power consumption problems and unlock detailed settings to super-tune energy savings.
  • Smart Pre-Set Modes: Choose or customize a mode that fits your energy stage best.
  • Anytime Optimization: Manage background apps and phone hardware easily with the smart home screen widget.
  • Healthy Charge Stage Manager: Track and implement healthy charging practices in different stages to keep your Android Smartphone's battery working its best.
  • Better Battery Details: View your Smartphone’s battery power level by percentage or by time remaining.


Stay with www.iTTimesbd.com for more IT related Post

Monday, September 1, 2014

How to Install Android on PC using Virtualbox!!!


Android is familiar for smartphone operating system. And it is the most popular smartphone operating system in the current world. Android is only usable with smartphone device. And Android yet not released any version for PC like windows. So, Android OS can't be install and run on PC. But using a simple trick you can install Android on PC.


Very recently I have shared a post about installing Android KitKat on PC natively. And today I will show another method to install android on PC. In this method you will have to create virtualbox to install android on your PC. And in this installation process I will use the Latest Android version KitKat.

Install Android on PC using Virtualbox

Requirement
  • VirtualBox. Get it from here Download.
  • Android 4.4 ISO Image. Get it from here Download.

Installing Android on PC using Virtualbox:
  1. First Install and Run the Virtualbox on your PC.
  2. Then at the top right corner click on New button.
  3. Now in the next window type in the name as Android 4.4 KitKat, Select type as Linux and Version as Other Linux. And then click on Next.
  4. Then you will have to select Memory Size (RAM). Recommend size is 256mb. And then click on Next.
  5. Then here select Create a virtual hard drive now option and click on Create button.
  6. Then Select VDI (VirtualBox Disk Image) and click on Next.
  7. Then here Select Fixed Size and click on Next.
  8. Then you will have to set the storage space for Virtual Hard Drive on your PC and click on Create.
  9. Now you will find an Android 4.4 KitKat file in VirtualBox.
  10. Then at the right top corner click on Start button.
  11. Now a new window will open. Here select downloaded Android 4.4 ISO image and click on Start
  12. Then select Installation - Install Android-x86 to hard disk.
  13. Then select Create/Modify Partitions and click on OK.
  14. Then select New > Primary > Write one by one and Press Enter after every selection to proceed.
  15. Then type YES and press Enter.
  16. Then select Quit and press Enter.
  17. Now select Sda1 linux VBOX HARDDISK and then select OK and press Enter.
  18. Now again select ext3 filesystem and select OK and then press Enter.
  19. Then select Yes and press Enter.
  20. Then you will see a window asking you to install boot loader GRUB. Select Yes and press Enter.
  21. Then again select Yes in the next window and press Enter.
  22. Then select Reboot and select OK and then press Enter.
  23. Now from the top of this window click on Device and select CD/DVD Devices > Android-x86-4.4-RC1.iso.
  24. Then again from the top of this window click on Machine and select Close > Power off the machine and then click on OK.
  25. Now in the Virtualbox click on Start and a new window will open.
  26. Then here in this window select Android-x86 4.4-RC1 and press Enter.
That's it, now you will see a message saying Welcome. That means you have successfully installed Android. Then setup the Android as we do in the smartphone. And enjoy Android on your PC.

If you have any queries then don't forget to leave your valuable comment.


Stay with www.iTTimebd.com for more IT related Post

Saturday, August 16, 2014

Moborobo – All in One Android PC Suite

Android PC Suite is a very important tools which allow you to operate your Android smartphone and tablet from your PC. Without PC Suite you can only transfer data from your Android device to PC. But using PC suite you can do more important thing like Managing contents, Backup your Phone contents, messaging, installing apps from PC, connecting internet and much more.


To do these above things with your Android device and for the better management of your Android Phone's content from PC you need to install Android PC Suite on your PC. There are lot of Android PC Suite available on android market, among them today I am gonna discuss about Moborobo.

Moborobo android management tools

Moborobo is an all in one Android PC Suite. When other android pc suite provide only basic management features, Moborobo provides many advance features like full on control from installation to theme control feature of Mobo launcher, you can access web to download themes, wallpapers and apps etc. Lets download the Moborobo Android PC Suite.

  • Download From Official Website: Moborobo

You can download this Moborobo android device management tools both for your PC and Android phone/tablet. The size of this tools for PC users is 23.28 mb. After completing the download, Install the Android PC suite on your PC. Then connect your Android device to your PC. But before that you need to enable USB debugging mode in your Android device. When you connect your Android phone to PC then you will see the following interface.

Moborobo hompage

After connecting your Android device to PC successfully on Moborobo Android PC Suite, now you can easily manage your contact data, message, apps, images, music and videos and backup them too. You can make contact groups and import and export contact group between your PC and Android device. The most important thing is that you can sync contact, message, music, images and videos between PC and Android device with complete transparency. Not only that you can send and receive SMS directly from your PC if your device connected with Moborobo.

managing apps on Moborobo

Some Key Features Of Moborobo:
  • Manage Your Android or iPhone from PC Desktop.
  • Transfer Contacts Between Android & iPhone.
  • Download App, Wallpaper & Ringtone through PC to Android "0" 3G Data Usage.
  • Fast & Secure Data  Backup / Restore to PC.
  • Multimedia File Management - Access to Music, Images & Videos.
  • Send & Reply SMS from PC Desktop.

Stay with www.iTTimesbd.com for more IT related Post

Friday, August 15, 2014

APK Editor - How to Edit Apk Files on Android

Hello Android lover. If you're an Android application developer or learning android development. Then my todays post is dedicated to you. Editing APK files is one kind of android apps development. For editing APK files there are many android apps available in the android store. Among them in this post I am gonna share APK Editor app with you.


APK Editor is a powerful android tool by which you can edit or hack apk files to modify your android applications. It can help you to do many things with your android apps like background image replacement, string localization, layout re-architecting, and even ad eliminating, permission removing, etc. What it can do depends on how you use it.

Editing Apk Files

However, to use it well, you need have a little bit professional skill. Don't be afraid I will give an example on editing APK files using APK editor. First you need to download and install APK Editor app on your Android device.


Editing APK files using APK Editor:

After installing the APK Editor app on your device then run it. Now you will get four option in the homepage of the apps, there are Select an APK File, Select APK from App, Help and Exit. First two options are important. Help contains instructions about APK editing. Lets start APK file editing.

If you choose Select an APK File option then it will show apps folders from your android device memory. And if you choose Select APK from App option then it will apps of your android device. Choose a app that you want to edit.

APK Editor - Apk file edit

Then you will get three options named String, Resource and Manifest. Now depending on your requirement select any option and Edit the android app. After editing the app click Save option to apply the modification.

APK Editor - editing Apk file

Speciality of APK Editor:
  • Edit Android APK files from your Android phone.
  • Easily convert apk to source code.
  • Compile and Decompile Android APK from your Android phone.
  • No need to use any APK Editor Software in PC.

Stay with www.iTTimesbd.com for more IT related Post

Sunday, August 10, 2014

JuiceDefender - Perfect Android Battery Saver!!

Best Battery Saver App for Android
Android smartphone users always feel tension about their phone's battery. Because of multitasking Android smartphones consume its battery charge very quickly. On the other hand Android phone takes too long change. In the previous post I had shown How To Charge Android Phone Faster. Today I am sharing Android battery saver named JuiceDefender which will help you to increase your Android battery life.


The details discussion about JuiceDefender is presented below. You can download this apps from below.

JuiceDefender is a very powerful Battery Saver app yet easy ti use. It is specially designed to extend the battery life of your Android device. This App is also packed with smart functions so that it can automatically and transparently manages the most battery draining components. Juicedefender is the perfect app to increase your Android Battery life.

juicedefender options

The most important thing about this app is that it allows complete customization by a clean and intuitive users interface. Once you configure it then it will start improving the battery life in fully automated manner. And finally JuiceDefender integrates seamlessly with the power control widgets without interfering the device manual settings.

options of juicedefender

With JuiceDefender app you can easily manage your Mobile Data, Wifi and CPU speed. You can also keep the power consumption under control, enable and disable specific apps connectivity, schedule regular Synchronization events, auto-toggle WiFi depending on your location, and much more.

There are two version of JuiceDefender is available Free and Pro version. Personally I recommend you to use Free version. Letter you can upgrade it to the Pro version. It will cost around 4$ only. If you are using any other power saver in your phone then I will recommend you to use JuiceDefender with it. As a result your Android phone's battery draining time will be decreased.


Stay with www.iTTimesbd.com for more IT related Post

Thursday, August 7, 2014

How to Enable USB Debugging on Android

USB debugging is a nice Android feature for Android phone or device users. Mostly this feature is used to make it easier to connect your Android smartphone or tablet to your PC. Though developer use this android feature to create apps. But a normal user use this android feature to access his phone remotely.

Enable USB Debugging on Android

Using this android feature you can get images and other files from your phone instantly, root your Android phone and also help repair a bricked phone with ADB terminal commands. Today I will show how to enable USB debugging option on any android device and also show you what else you can once you enabled this feature on your android phone.

Enabling USB Debugging on Android:

First you need to install the correct drivers in your PC for your Android device. When you will connect your Android phone into your PC for the first time a drivers will automatically install in your PC for your Android phone.

After installing the driver now we are ready to enable USB debugging via your device's Developer options. If you don't able to find Developer options in the settings menu then you may need to activate it first.
  • First go to the Settings of your phone.
  • Then scroll down to About Phone option.
  • Then Tap on build version about 7 times until you see the message saying Developer options are activated.
  • Now hit Back and this time you will find Developer options at the bottom of the settings menu.
  • Then Tap on Developer options.
  • Now scroll down to find USB debugging and then check the USB debugging box to enable it.
    Activate Android Developer options

For Android 2.3 or Earlier Version: If you're using Android 2.3 or earlier version then follow the below steps.
  • First go to the Settings menu.
  • Then Tap on Applications (Apps or App Manager).
  • Then scroll down and find Developer options.
  • Now Tap on Developer options and enable USB debugging.

Various Use Of Android USB Debugging:

After enabling USB debugging on your Android phone now you can install advance programs in your Android device like Eclipse or One Click Root which allows you to root your device. You can also use your phone remotely if the screen of this phone is broken. There are many advantages and uses of the this Android USB debugging option.

Stay with www.iTTimesbd.com for more IT related Post

Wednesday, August 6, 2014

How To Charge Your Android Phone Faster

Lets consider a situation that you're rushing out of the door and you noticed that your phone battery has left 5% charge. And you don't have enough time to charge it. Then what will be your reaction? I think not so good. Because normally Android phone battery can't be charged quickly. Beside that the worse thing than a dead phone is when it takes too long to charge. Here are some tips on how you can charge your Android phone battery faster.

Charge Android Phone Faster

Right Plug and Charger:

First off, you should plug your phone charger into the wall socket. Don't use any third party electricity connection like multiplug. Always use the charger that come with your phone. Otherwise you may not get best charging speed. If you are in s hurry then don't plug the phone into your desktop or laptop pc. Because as a result the charging speed will slow down definitely.
plug android chager

Set the Phone into Airplane Mode:

Now to speed up the charging little bit more enable airplane mode on your phone. Normally Airplane mode option is available in the Power Off section. But airplane mode location may differs from device to device. In many device airplane mode located at the top swiping down menu. When you will enable airplane mode on your device it will close some features of it which can slow down the charging speed. And your phone can concentrate more on battery charging.
set android into airplane mode

Turn Off the Phone:

The best way to speed up your phone charging is turn off the device. So, turn off your phone if you don't have to use your phone at the moment. Obviously no one can contact you via phone and you won't get any alarm and notification. But when the most concerning matter is speed up your phone charging then the best idea is turn off the device.

Switch Off Unnecessary Features:

Switch Off all unnecessary features of your phone like Bluetooth, GPS, Wi-Fi, NFC etc. Close all your phone running apps and stop your phone from automatic background updating. Switching off these features can dramatically increase your phone charging speed. You are doing this because you're in rush. And you can switch on everything when you overcome this situation.
switch android phone apps

Don't touch!

Avoid touching your phone screen as much as possible if your are using touchscreen smartphone. Because phone screen is the biggest consumer of the charge of your phone. So, try to touch your phone screen as minimum as possible and it will help you to increase your charging speed.

That's it. If you follow these tips then your Android phone battery will get charge faster. Beside if you have any tips regarding this topic then don't forget to leave your valuable comment.

Stay with www.iTTimesbd.com for more IT related Post

Tuesday, August 5, 2014

All Android Secret Codes For Phone/Tablet

Most probably mobile phone is the most used and popular electronics device of the current world. And most of the smartphones/mobile phones are android operated. Because of the user friendly interface and features Android phones and tablets are ruling in the market. Today I am gonna share almost all important Android secret codes.


These Android secret codes are certain codes by which you can make some important changes in your Android phone/tablet which may not be possible through settings or menu. Sometimes these codes can repair settings related problems very easily. These codes are presented below.

mobile secret codes


Warning: These codes are very useful but sensitive too. So, use carefully.


Secret Codes Effect
  • *#*#4636#*#*
To get information about the phone.

  • *#*#7780#*#*
Restore Factory
  • *2767*3855#
Reinstall phones firmware
  • *#*#34971539#*#*
To get all information about camera.
  • *#*#7594#*#*
To change the power button behavior to enables direct power off.
  • *#*#273283*255*663282*#*#*
To backup media files
  • *#*#197328640#*#*
To enables test mode for service activity
  • *#*#232339#*#*
To test Wireless LAN
  • *#*#232338#*#*
 It display the Wi-Fi mac address
  • *#*#1472365#*#*
To Perform a quick GPS test
  • *#*#1575#*#*
For advanced GPS test
  • *#*#0283#*#*
To perform a packet loop-back test
  • *#*#0*#*#*
For LCD display test
  • *#*#0673#*#*
For Audio test
  • *#*#0842#*#*
To test Back-light/vibration
  • *#*#2663#*#*
To test the touch-screen
  • *#*#0588#*#*
To perform a proximity sensor test
  • *#*#232331#*#*
To test Bluetooth performance
  • *#*#7262626#*#*
To perform field test
  • *#*#232337#*#*
To Displays bluetooth device address
  • *#*#8255#*#*
To launch Google Talk service monitor
  • *#*#4986*2650468#*#*
To get pda, phone, H/W and RF Call Date
  • *#*#1234#*#*
To know about pda and firmware version
  • *#*#1111#*#*
For FTA Software version
  • *#*#2222#*#*
For FTA Hardware version
  • *#*#44336#*#*
To display build time and change list number
  • *#06#
To check the IMEI number of your device
  • *#*#8351#*#*
To enable voice dial mode
  • *#*#8350#*#*
To disable the voice dial mode
  • **05***#
Execute from emergency dial screen to unlock PUK code
  • *#0228#
To check battery status
  • *#9090# / *#1111# 
To make device in Service mode
  • *#12580*369#
To get software and hardware info
  • *#228#
For ADC Reading
  • #7353#
To hide test menu 2/Self Test Mode
  • ##7764726
To hide service menu for Motorola Droid
  • *#7465625#
To view status of lock-phone
  • *#*#3264#*#*
To show RAM version
  • *#*#2664#*#*
To test the touch-screen
  • *#*#0289#*#* 
For Audio test
  • *#9090#
To Diagnose configuration of device
  • *#872564#
To control U-S-B logging
  • *#9900#
System dump mode


Stay with www.iTTimesbd.com for more IT related Post

Thursday, May 15, 2014

Samsung Galaxy S5 Review and Specification

Samsung Galaxy S5 is the latest and the most updated smartphone of the Samsung Galaxy S series. It is also the most anticipated phone of the year. This model of the S series has plenty of upgrades then its earlier model S4. Which includes slightly better camera, improve screen and registered software.

Samsung Galaxy S5 Specification

However there are a few point that are really not satisfied the users. Among them the design of the phone not so impressive. Beside that another popular features is been added and that is Dust and Water Resistant. Above all this is a fully loaded phone with all necessary features. Its available in both black and white color.


Full Specification Is Presented Below:

Network

LTE Cat.4 (150/50 Mbps)

Processor

LTE: 2.5GHz Quad core application processor

Display

5.1” FHD Super AMOLED (1920 x 1080), 432 ppi
display of Samsung Galaxy S5

Platform

Android ™ 4.4.2 (Kitkat)
Samsung Galaxy S5 android kitkat


Camera

Main(Rear) : 16MP (1/2.6”, Phase Detection AF)
SSub (Front) : 2.0MP (1920 x 1080, Wide-angle lens )
Samsung Galaxy S5 16 mp

Sensor

Accelerometer, Gyro, Proximity, Compass, Barometer, Hall, RGB ambient light, Gesture, Fingerprint, Heart Rate Sensor

Dimension

142.0 x 72.5 x 8.1mm, 145g
dimension of Samsung Galaxy S5


Additional Features

IP67 certificated Dust & Water Resistant, Emergency Mode, Ultra Power Saving Mode, S Health, Quick Connect, Private Mode, Kids Mode
Samsung Galaxy S5 dust resistant

Video

UHD@30fps, HDR, video stabilization
Video Codec : H.263, H.264(AVC), MPEG4, VC-1, Sorenson Spark, MP43, WMV7, WMV8, VP8
Video Format : MP4, M4V, 3GP, 3G2, WMV, ASF, AVI, FLV, MKV, WEBM

Audio

Audio Codec : MP3, AMR-NB/WB, AAC/ AAC+/ eAAC+, WMA, Vorbis, FLAC
Audio Format : MP3, M4A, 3GA, AAC, OGG, OGA, WAV, WMA, AMR, AWB, FLAC, MID, MIDI, XMF, MXMF, IMY, RTTTL, RTX, OTA

Battery

2800mAh

Google Mobile Services

Chrome, Drive, Photos, Gmail, Google, Google+, Google Settings, Hangouts, Maps, Play Books, Play Games, Play Newsstand, Play Movie & TV, Play Music, Play Store, Voice Search, YouTube
Android, Google, Chrome, Drive, Photos, Gmail, Google+, Google Settings, Hangouts, Maps, Play Books, Play Games, Play Newsstand, Play Movie & TV, Play Music, Play Store, Voice Search, YouTube are trademarks of Google Inc.

Connectivity

WiFi : 802.11 a/b/g/n/ac VHT 80, MIMO(2x2)
Download Booster (LTE + WiFi simultaneous reception)
NFC, Bluetooth®: 4.0 BLE / ANT+
USB 3.0
Ir LED
This device supports a USB 3.0 interface as well as lower versions of USB, including USB 2.0. A USB 2.0 compatible cable is included in the package. A USB 3.0 compatible cable is not included in the package, and may be purchased separately


Memory

RAM : 2GB
16/32GB User Memory + microSD slot (up to 128GB)
Some places only provide 16GB depending on region/country.