Showing posts with label Windows. Show all posts

Saturday, September 5, 2015

How to Bring Photo Viewer Back in Windows 10!

Get Back Windows Photo Viewer
Recently while opening a Photo on my newly installed Windows 10 PC, I found that Photos are opening with newly added Windows Photo Application. Though this Photo App is very good, But to be honest I was very much used to with Windows Photo Viewer. And that is why I tried to find the Photo Viewer in Windows 10, but I didn't find it. But by Googling found a very easy solution. And today's post I'm gonna show you, how you can bring Windows Photo Viewer Back in Windows 10.

Related Post:


Actually Microsoft hasn't removed the Windows Photo Viewer from Windows 10, Microsoft only Disable the feature to forced the users to use the Photo App :(. But enabling the Windows Photo Viewer is very easy, All you need just to Download and Apply a very small Registry file on your PC. And most interestingly the Registry file is only 60 KB in size. So let's start the procedure...


Enabling Windows Photo Viewer:

  • First Download the Registry File from the link given below.
  • Then Extract the file in a Folder.
  • Now Double click on WPV.reg file and then Yes > Yes > OK

That's it, All Done :) Windows Photo Viewer will be enabled on you Windows 10 PC once the above steps are completed. Now Follow the steps below to open your Photos with Windows Photo Viewer...


How to Open Photos with Windows Photo Viewer:

  • First click Right Mouse button on any Image.
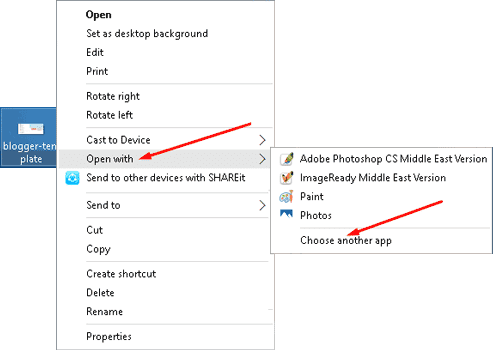
  • Then click on Open with > Choose another app

Image Open With Option
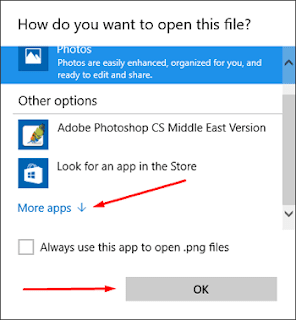
  • Then a new Window will open, Here click on More App > OK
Find Windows More App
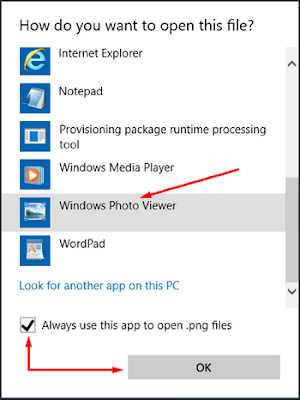
  • Now from the App List Select Windows Photo Viewer
  • Then Mark Always use this app option and click OK
Choose Windows Photo Viewer


In the above example I applied Windows Photo Viewer for the which are in .PNG format. As a result from now all the images in .PNG format will be opened with Windows Photo Viewer. But for the other image format like .JPG or .GIF you will have apply the same method shown in the above.

And if you have any question/quires regarding this post then don't hesitate to let me know by commenting below. :)


Download Link:

Please Share This Post or At-Least Press  G+1  on Every Post
Stay with www.iTTimesbd.com for more IT related post

Sunday, August 30, 2015

How to Customize the Windows 10 Start Menu!

Customize Windows 10 Start Menu
The all new windows era has begun the Windows 10 release. It is also liked by users very much. And why not? - Windows 10 is fully packed with new features and improvements. One of the most noticeable improvement done in the Start Menu. And Microsoft introduces all new Start Menu with Windows 10. It is combined with standard program, power settings and Apps. This new Start Menu is very much customizable and in this post I'm gonna show how to do it.


Related Post:


Actually the Application part of the Windows 10 is more customizable then the left part. But the left part is also can be customized is some extend. OK let's see how to Customize the Windows 10 Start Menu...


Changing Start Menu Color:

Actually you can't change the colors of any items in the Start Menu. All you can just to change the background color of it and which change the full atmosphere of the Start Menu. To change the Start Menu Color...

  • Go to the Settings from Start Menu.
  • Then click on Personalization.
  • Now in the left panel click on Color.

Customize Windows 10 Start Menu

Here if the Automatically Pick an Accent Color from My Background option is turned On, then Turned it Off to change Start Menu Color of your Choice. Then Scroll Down to the bottom of Accent Colors Box - Here Turn On the Show Color on Start, Taskbar and Action Center option. Now from the Above Select your color and the Start Menu color will be changed according to your Choice :)


Add/Remove or Uninstall App Tiles:

One thing to realize about the tiles is that they can be used for both modern and traditional Windows apps. You can find the Traditional Apps in the Left List panel, click on All Apps to see the full list. To add the Traditional apps to the right panel - Drag a App and Drop in the Right Panel.

Customize Windows 10 Start Menu

Sometime you may don't want an particular App on your Start Menu and want to remove that. And the good news is you can remove any App from the both part of the Start Menu if you want. Just Right click on the App and choose Unpin from Start. The App will be Removed from the Start Menu. If you want to Remove any App permanently, then choose Uninstall.


Turn Live Tile On/ Off:

Live tiles are the most attractive features of Windows 10. But to enjoy the live tiles, you have be connected to the Internet. But These Live times will decrease your Internet Speed. So, if you don't want to lose or decrease your data and data speed then you should Turn of the Windows 10 Live Times. To do so...

Customize Windows 10 Start Menu

To turn off a live tile, you have to click right mouse button over that item > Now choose Turn Live Tile Off. But if you see Turn Live Tile On, that means the item is already turned off.


Resize the Tile Area:

One of the most interesting customizing features of Windows 10 Start Menu is, you can Resize the right-side tile area of it. it's really easy to extend the right-side tile area of your Windows 10 Start menu. Just drag its right border out and in. You can also have the Start menu take up the full screen as like as Windows 8.

Customize Windows 10 Start Menu

If you want then you can also Remove the entire Right Tile Area. To do so you will have to individually remove every tile and then drag the right edge of the panel in. Then the Start Menu will show the traditional basic apps and features only.


Change What Appears:

By Default, the Start menu shows most-used and recently added apps in its top section—things I find quite helpful. But if you want then you can Determine What Should Appear and what not. I mean you can see an empty space in Start Menu in Place of most-used and recently added apps. To do so...


  • Go to the Settings from Start Menu.
  • Then click on Personalization.
  • Now in the left panel click on Start.

Customize Windows 10 Start Menu

Now here Turn Off the first two option Show Most Used Apps and Show Recently Added Apps. You can also pick standard folders you want to appear on the Start menu, including things like Documents, Downloads, Music, Pictures, and so on.


That's it, these are the necessary customization that you can do with the Windows 10 Start Menu. Now that you've got the Start menu looking how you want it. Ohh! it is very long post hope I have not bored you also hope that you have got your ans here. But still if you have any question/ query regarding this post, then don't hesitate to leave it by commenting below. :)


Please Share This Post or At-Least Press  G+1  on Every Post
Stay with www.iTTimesbd.com for more IT related post

Tuesday, August 25, 2015

What's New in Windows 10 [With Screenshot]

Windows 10 Feature
It is more than three weeks passed since the Microsoft launched their latest version - Windows 10. And people liked this new version of widows very much, because ​Windows 10 is full of new features and improvements. At very beginning I want say Sorry for being late with this post. Actually by this time, I have studying about the New Windows 10 Features and Testing them personally, so that I can write this post with proper information.

So, in this post you are gonna know about the New Windows 10 Features. Beside I will show discuss the improved features also. Let's have a look..


New Features of Windows 10:

Start Menu:

Start Menu

Previously with Windows 8 the removal of the long-standing Start menu left many users with a feeling of bemusement. But this time Microsoft understood the feeling of the users. And as they promised, they brought traditional Start Menu with new and improved look.

New Start Menu


This New Windows 10 Start Menu is the combination of old and new elements. The animation it takes from Windows 7  but sporting remnants of that Metro / Modern interface, and not only does this seem like a happy median, but Start menu tiles can also be re-sized.


Truly Unified Apps Store:

Apps Store

Windows 10 Microsoft introduced a new all in one Windows App Store. Windows New App Store Microsoft Allows consumers to source content for all devices running its software from one central point. Now you will have one store for all platform - Xbox, Windows Phone and Windows. And all the apps, music, video and other such effects will be plucked from the same portal.


Continuum Mode:

Windows 10 Continuum Mode


This is one of the most excellent feature. This is an one click feature which will turn you PC into Tablet. That is why it is mostly known as Tablet. But I don't know why it is named Continuum Mode. So, to experience Tablet atmosphere on your PC, just click on the Tablet Mode from Notification Menu, located at the right bottom corner of the PC's screen.


Cortana - Personal Search Assistance:

Cortana


This is one of the Most Advanced new feature of Windows 10. In Windows 10 you will have a new Personal Virtual Assistance to Search your PC. She will be right on your desktop. Ask her to set up a meeting or send an email to a friend. She can even find your files for you and tell you jokes. Select the search box and type what you want Cortana to do, or just select the microphone to talk with her instead.


Microsoft Edge - Browser:

Microsoft Edge


It is one of the fresh Inclusion. With the Windows 10 Microsoft introduced an all web browser in place of Internet Explorer. Microsoft Edge is the first browser that lets you take notes, write, doodle, and highlight directly on webpages. Use the reading list reading list icon to save your favorite articles for later, then read them in reading view Reading view icon. Plus, Cortana is built in to Microsoft Edge to help you do things faster and easier.


Enhanced Snap View:

Enhanced Snap View


The all-new Snap Assist UI allows “up to four apps to be snapped on the same screen”. This smart suggestions feature will indicate you that which open apps you should fill up empty desk space with, it’s a very intuitive all-round feature.


Task View:

Multitasking continues to be an integral aspect as we seek to perform numerous tasks concurrently, and with Windows 10, Microsoft has added a couple of new features to make multitasking even simpler and more fluid.

Task View


The all new Task View features will increase the experience of Multitasking on Windows 10. Task View button is located on the task bar. When you click on it, it will show all the Task running on your PC. You can add new Desktop here, you can also Add and Close the task from here.


My Experience with Windows 10:

Actually I'm the first person among my friends who started using Windows 10. And I have got Windows 10 upgrade on the second day after its official launched. My three weeks user experience is just amazing. In a Windows 10 is much more faster and smoother, and also the most user friendly Windows version.

So, you should keep yourself from this most advance Windows version. I'm leaving the download links of Windows 10 below. Get the Test of Windows 10, Hope you will like it. And Please Don't Forget to Share This Post With Your Friends :)


Related Links:

Please Share This Post or At-Least Press  G+1  on Every Post
Stay with www.iTTimesbd.com for more IT related post

Saturday, August 22, 2015

Best Windows 10 & Office 16 Activator [Latest]

Office 16 Activator
The latest launch of windows 10 is in a full swing and millions of users have liked it and already moved to it. But like the earlier versions of windows there are many users also complain about Windows 10 Activation problem. I have got those complain on some social platforms and forums. That is why I've decided to write this post. And in this post I'm gonna use the best and the latest version of KMS Activator. So, you are gonna get the activated Windows for sure.


Previous Post: My previous shared Windows 10 is working fine. If you want then you can try that Activator before trying this. If that tool worked for you then OK, Not working the proceed with this...


About KMS Activator: KMSPico is  the most successful, frequently updated and 100% clean tool to permanently activate any version of Windows and Microsoft office. So additionally you are gonna get activated office program also. It is also capable of activating the latest version of Microsoft office - Microsoft Office 2016.

Supported Products:
  • Windows 10 Home/Pro/Enterprise
  • Windows 8.1.x Core/Pro/Enterprise
  • Windows 8.1 Core/Pro/Enterprise
  • Windows 8 Core/Pro/Enterprise
  • Windows 7 Professional/Enterprise
  • Windows Vista Bussines/Enterprise
  • Office 2010, 2013 and 2016
What's New:
  • Support for Office 2016 Trial and Professional Edition.


Condition: In spite of being safe unfortunately KMS activators are treated as virus by Antivirus Program. So, before proceed to the activation process, Disable your Antivirus Program Temporarily.


Activation Procedure:

  • First Download the Activator file from the link given below.
  • Then Extract the file in Folder.
  • Now double click on KMSpico_setup and complete the installation normally.

Once the installation is completed this activator will activate your Windows and Office program silently. 
  • Now go to Start Menu and click on KMSpico to open it.
  • Then click KMSpico window click the RED Button to complete the activation process.
MS office activator


Here in this KMSpico window you can also check your Windows and Office Activation status. To do so, click on Tokens button --> Select Your Product --> Click on the Blue  i  button.


Checking Windows Activation Status: (Manually)

  • Press Start+Pause Break button on the PC's Keyboard.

That move to the bottom at the Windows activation section to Check the Windows Activation Status. If everything is OK, then here you will see Windows is Activated as shown in the image below...

download windows activator


I hope you will be able to activate your windows and office program with this tool. If any problem then don't forget to let me know by commenting below.


Please Share This Post
Stay with TecHie-ASiF for more IT related post

Monday, August 10, 2015

How to Hide Specific Updates on Windows 10!

Windows 10 Auto Update
At the end of the previous year when the Technical Preview of Windows was released I had published a post on Disabling Windows 10 Automatic Update. And after the official release of windows 10, I have come to know that the previous trick is now working on windows 10 Pro and Enterprise only. Official Microsoft launched Windows 10 in Three Edition - Home, Pro and Enterprise. And my today's post is basically Related to Windows 10 Home Edition.


Actually Windows 10 Home edition is the only version that is required to perform updates automatically in the background. And in both Windows 10 and Enterprise you will have the option to disable Auto Update. If you’re running Windows 10 Home edition, updates flow down from Microsoft automatically and install. Though all the updates are necessary but if you want then some updates you can avoid.


The Tool that I'm gonna share today will allow you to hide specific Windows 10 updates. And windows will not install those updates that you will hide. Let's see how to do the trick...


Hiding Windows 10 Auto Update:

  • First Download Microsoft Update Hider Tool from the link given below.
  • Then double click on the Tool to Run and click Next.
Windows 10 Auto Update
  • Now it will ask You to Hide Updates or Show Hidden Updates.
Windows 10 Auto Update
  • Click Hide Updates and then select the update that you don’t want.
Windows 10 Auto Update
  • And finally click Next.

That's it. the update that you have selected it will not install on you PC next time. So, this will save your valuable data. If you want to Unhide the update then follow the same steps and withdraw the previous selection.


Please Share This Post or At Least press  g+1  on Every Post
Stay with www.iTTimesbd.com for more IT related post

Saturday, August 8, 2015

How to Change Bing to Google in Windows 10!

Windows 10 Cortana
Post Subject: Changing Cortana’s Bing Search to Google in Windows 10

Microsoft has already released their latest version of windows - Windows 10. And many old windows users have also upgraded their PCs using the free upgrade offer. I had also shared several post on Windows 10 Download and Upgrade. However Now people are busy with discussing the new feature of Windows 10. One of the Most Interesting is, it's new Search Feature.


Windows 10 comes with its very own digital assistant CORTANA that searches your queries and acts according to your voice commands and gives useful results. Though this feature is very interesting but if you are used to with Google then you will have problem with this. Because just the way you can’t change the default search provider in Google Now and Siri, Cortana resists change and provides Bing search results.


So, to change the default Cortana’s Bing Search to Google you need to use an Extension name Bing2Google. All you need, just to install the extension on you Google Chrome Browser. Let's see how to do it...


Changing Bing to Google:

  • First Of All, Download Google Chrome (If you don`t have it already).
  • Set Google Chrome as your default web browser.
  • Now go to the Bing2Google Extension Page from the link given Below.
  • And click on Add To Chrome and then Add Extension.


Page Link:

Please Share This Post or At Least press  g+1  on Every Post
Stay with www.iTTimesbd.com for more IT related post

Friday, August 7, 2015

Start Menu X Pro for Windows [Pre-Activated]

Windows 8 Start Menu
With the release of Windows 8 Microsoft was excluded Start Menu. That change was hate by the users and many of them Started using third party software to add Start Menu. I had also shared Windows 8 Start Menu earlier. The Good news is Microsoft has added back Start Menu to its latest version - Windows 10. But there are many users, who are still not happy the new Windows 10 Start Menu, For those In this post I'm gonna share new Customized Start Menu.

About The Software: 
  • Name: Start Menu X
  • Version: Pro Version 5.5
  • Support: Any Windows Version [XP to 10]
  • File Type: Executable (.exe) File.
  • Condition: RaR/Zip File. 
  • File Size: 5.7 MB 

Start Menu X is the right solution for Windows 10. The new version of Windows forces you to use apps, which take up a huge part of the Start Menu. Beside that the truly necessary folders and applications are virtually inaccessible. On there other hand there is a complain about the bugs of this default Start Menu. But with the Start Menu X, surely you’ll be able to enjoy working with Windows 10.


Benefits of Pro Version:

  • Single-click launch!
  • Assign a primary program to any folder and start it simply by clicking this folder.
  • Change the structure and add tabs.
  • Manage the Virtual Groups
  • Sort files by name


Installation Procedure:

  • Download the File from the link given below.
  • Then Extract the file in a Folder.
  • Now Double click on .exe file and Install it as usual.

That wait to complete the installation. You are required no Serial Keys to activate, because this Pre-Activated. So, all you need just Download and Install Start Menu X.

Start Menu X Pro Activated


Download Links:

Please Share This Post or At Least press  g+1  on Every Post
Stay with www.iTTimesbd.com for more IT related post

Wednesday, August 5, 2015

Windows 10 All Edition Activator [100% Working]

How to Activate Windows 10
Hey Guys, It is almost one week passed, since the Windows 10 Official Launched. Hope your 1st week experience with the Windows is good. I have got many feedback about and almost all of them are very much positive. As you all know Microsoft is providing free Upgrade to Windows 10. But still some you are may facing Activation like Earlier Windows versions. If you're one of them, then this post is dedicated to you.


Like the other Previous versions of Windows, here we are also gonna use KMSpico tool. If you had KMSpico tool earlier then you may know that it is an excellent tool to activate Windows and Office. So, what can be the best alternative of it. This tool will Activate your Windows 10 turn it into a genuine copy. It also removes watermark of build number. Beside that it can activate the following product too..

  • Activate Windows 10 Home / Pro / Enterprise
  • Activate Windows 8 and Windows 8.1
  • Activate Windows 7 Professional / Enterprise
  • Activate Windows Vista Bussines / Enterprise
  • Windows Server 2 008 / 2008R2
  • Windows Server 2012 / 2012R2.
  • Office 2010 and 2013


How to Activate Windows 10:

  • First Download the Activator file from link given below.
  • Then Extract/Unzip the file in a Folder.
  • Now double click on KMSELDI.exe to run the tool.
  • It will start Activation process automatically. And after completing the Activation a voice will confirm it saying "Program Complete"
  • You can Also click on Red Round Button and then Close button to hear the Confirmation Message.
Windows Activation


Checking Activation Status: After completing the activation process, now check your PC's activation status manually to confirm it.

  • Click Right Mouse button on My Computer and Select Properties.

That's it, here look at the bottom of this window at Windows Activation section, if everything is OK then you will see Windows is Activated message.


Download Link:


Stay with TecHie-ASiF for more IT related post

Sunday, August 2, 2015

How to Upgrade Windows 7/8.1 to Windows 10!

Windows 10 Update
Finally the Windows 10 era has begun. After a long wait and with the huge expectation Microsoft has release there final and most upgraded Windows version on on 29th July, 2015. As the Microsoft promised earlier that they are groin to give the Windows 10 upgrade free to the current Windows 7 and 8.1 users. But you can't download Windows 10 instantly. Because Microsoft is slowly slowly rolling out the update in 190 countries, and it may take some time to reach your device.


 But Don't Worry, Have Smile on Your Face. Because in this post I'm gonna end of your Waiting. Today I'm gonna show how you can Upgrade your Windows 7 or 8.1 OS to latest Windows 10 manually.


Eligibility for Windows 10:

Not all devices will get the Free Windows 10 Upgrade. If you have registered for free Windows 10 Upgrade or if you are running on Windows 7 or 8.1 then most probably you are eligible for the Free Upgrade to Windows 10.


System Requirement:

  • Minimum 1 GHz Processor. (Dual Core or better)
  • Minimum 2 GB RAM.
  • Minimum 16 GB Free Space on a Partition.

There are two Methods by which you will be able to perform the Windows 10 Upgrade. Method 1 is universal for all PC users, and will commonly download the Windows 10, and Method 2 is specially made for your PC. Both are completely safe and verified, and of course both the ways are official methods to upgrade Windows 10.


Additional Requirement:

  • A Stable Internet Connection. Prefer unlimited connections, as the size may be up to 3 GB.
  • Sufficient Space on your internal/external storage where you are downloading it. [3 GB At Least]
  • A blank USB / DVD if you need to create backup media files. This is completely optional.

Before starting, Check for updates once. Go to Control Panel > System and Security > Windows Update and check once for any available updates.You may have gotten the Windows 10 to download right there, though, chances are very rare. Still, be sure of that.


Method - 1: (Force Download Windows 10 Manually)

In this Method you will have to use a tool to get Windows 10 Upgrade. Collect the Tool from the link given at the bottom of this post. This tool will help to back up the installation file and save the installation media into USB or DVD Disks, though it is optional. We will download the Update Tool and Run it on our PC. It will check for upgrades and download it.


  • Download the Windows 10 Upgrade tool from the links given below.
  • Then RUN this Tool.
  • It will ask you Upgrade this PC or Create Update Media for another PC. Choose the first option to upgrade your PC.
  • Click Next and Follow the onscreen instructions to upgrade your PC. It will start downloading your software for Windows 10.

Note: It may or may not need your Windows Registration Key. If this works then you are good to go. And, this should work. Still, if it does not work, try out the Method 2.


Method - 2: (Force Download Windows 10 Manually)

This method will follow official windows upgrade procedure, with a tweak. Microsoft recommends this by default and your scheduled upgrade would come via this method only, but we are just applying a simple tweak and speeding up the process making it available instantly. Let’s start.


  • Go to Control Panel > System and Security > Windows Update. Keep this window open.
Check Windows Update

  • Now open File Explorer > Windows (C:) > Windows > Software Distribution > Download. You will see some files and folders.
  • Backup all these files into some other drive and delete everything there. To do this step, create a new folder on another drive and copy everything from here and paste here. Next, delete all files and folders from here. Your backup will prevent you from accidental loss of files and help you restore it like previous.
  • Note: You may need administrator permissions for this. Grant it.
  • Now open Command Prompt in Administrator Mode. To do this, Right click on Command Prompt and Click Run as Administrator. You need Administrator permissions for this.
  • On command prompt type this text: wuauclt.exe /updatenow
  • Note: A space should be after wuauclt.exe
  • Press Enter. BOOM! You are almost done! Now check the Windows Update Window you opened in the First step on this Method - 2

If everything is OK You will find it either already started downloading Windows 10 or is ready to download it. Start Downloading and wait patiently to finish!


Please Share This Post or At Least press  g+1  on Every Post
Stay with www.iTTimesbd.com for more IT related post

Wednesday, July 22, 2015

Chicken Invaders 5 PC Game [Full Version]

Chicken Invaders 5 PC Game
Hello Gamer, Its been a long weekend in EID celebration. I hope you have enjoyed as much as I did. With keeping the celebration vibe in mind, today I'm gonna share this post related to gaming section. Yes today I'm sharing a very exiting games with you, it is - Chicken Invaders: Cluck of the Dark Side. If you like playing Lite Shooting game then you will definitely like to play this game.


Chicken Invaders 5: Cluck of the Dark Side puts you at the forefront of a battle against invading intergalactic chickens, bent on revenge against the human race for our oppression of Earth chickens.. In this episode, the chickens have hatched a devious plan to block out sunlight and freeze Earth to death. It’s up to you to travel around the galaxy in order to piece together an ancient artifact and (quite literally) save the day. Let's have look at the overview of this game.


About Chicken Invaders 5:

  • Name: Chicken Invaders: Cluck of the Dark Side
  • Developer: InterAction Studios
  • Game Type: Shooting, Science Fiction, Adventure
  • Game Condition: Full Version
  • Modes: Single Player
  • Platform: Microsoft Windows (PC)
  • File Type: Zipped File
  • File Size: 42 MB


System Requirement:

  • Windows: XP/Vista/7/8/8.1/8.1
  • Minimum 1GHz CPU
  • At-least 512MB of RAM
  • DirectX 8.0
  • 3D graphics card


How To Install:

  • Download the Game file from the link given below.
  • Then Unzip or Extract the Chicken Invaders 5 file in a folder.
  • Now double click on Setup file and complete the Installation normally.

Once you have completed the installation of the game, No you are ready to plat the game. To start playing it just double click on the ''Chicken Invaders 5 - Cluck of the Dark Side'' game icon on you PC desktop. That's it now Enjoy the game.


How to Play:

  • You can Play this game Both with Mouse and Keyboard.
  • Mouse: Press Left key to Fire and Move the Mouse to Move the Gun.
  • Keyboard: Press Space Bar to Fire and Right, Left, Up and Download Arrow keys to Move the Gun.

Though this game can be played with both Mouse and Keyboard, but I will recommend you to play it with the Mouse. Because plying Chicken Invaders 5 with the Mouse is much more easier.

free pc game


Download Link:

Please Share This Post or At Least press  g+1  on Every Post
Stay with www.iTTimesbd.com for more IT related post

Thursday, July 9, 2015

Ashampoo WinOptimizer 12.00.10 [Portable]

Portable Ashampoo WinOptimizer 12
Ashampoo WinOptimizer is one of the best PC tuning specialist software. And today in this post for the first I'm going to share any software from Ashampoo, it is Ashampoo WinOptimize. I'm sharing Ashampoo WinOptimize 12 which is the latest version. Ashampoo WinOptimizer frees space, fixes errors, guarantees steady performance, protects your privacy and customizes Windows. And as I'm sharing the portable version of it, So you don't even need to install it to use it.


To make sure a PC working well, it requires regular maintenance but this consumes a lot of time and requires expert knowledge. Ashampoo WinOptimizer 12 will do the task for you and give you maximum performance and security and save you precious time. Also you can protect your privacy and safeguard or remove sensitive data. So, you can rely on Ashampoo WinOptimizer to handle system complexity.


Highlights of Ashampoo WinOptimizer 12:

  • Optimum SSD support for increased lifespans.
  • Innovative hard disk benchmark with detailed results.
  • System analysis with support for the latest hardware.
  • New look for maximum clarity
  • Safely and securely encrypt and split up file with File Manipulator.
  • Updated search algorithms for all cleaner modules.
  • Newly developed Internet cleaner with multi-user support.
  • Optimum SSD support for increased lifespans.
  • More free memory resources with StartUp Tuner.


Modules of Ashampoo WinOptimizer 12:

  • Improved user handling through restructured start page with better program feedback.
  • Speed up any application launch with Live Tuner as background task.
  • Wizard-driven optimization with Tuning Assistant.
  • Manage system restore points comfortably with System Restore Manager.
  • Save and restore all changes with Backup Manager.
  • Automate optimization runs with Task Scheduler.
  • Manage system policies easily with User Rights Manager.
  • Excellent gaming performance at the click of a button with Game Booster.
  • Increased performance, more efficient memory usage.
  • Enhanced user experience.


How to Run Ashampoo WinOptimizer:
  • Download the file from the link given below.
  • Then Extract the File in a Folder.
  • Now Run the Ashampoo WinOptimizer.

That's it all done. As it is the portable software, you don't need to install it. After rurning the software you are straightaway ready to use it. So, start Clean Up, Optimize and Protect your PC now. Let's have a look below on the GIF screenshot of Ashampoo WinOptimizer 12.

Ashampoo WinOptimizer


Please Share This Post or At Least press  g+1  on Every Post
Stay with www.iTTimesbd.com for more IT related post