Showing posts with label Computer Tips and Tricks. Show all posts

Friday, August 6, 2021

Bijoy Bayanno FREE Download [2011 Portable Edition]

Bijoy Bayanno FREE Download

Bijoy Bayanno (52) is one of the most used Bengali typing keyboard tool, which proprietary layout of Mustafa Jabbar. Once Bijoy Bayanno was used by more than 90% users. But because of wrong strategy like delay update Bijoy Bayanno has lost its market to other Bengali Typing software like Avro, Ekushey and others. Comparing to other Bengali Typing software Bejoy Bayanno is the Premium one. You have to pay to use Bejoy Bayanno, but the other typing tools are free to use and that is why the users of Bijoy Bayanno is decreased rapidly.

Although with all these problems, still there are many users who are use to with the Bijoy Bayanno and in this post I am gonna share the Portable edition of Bijoy Bayanno of 2011 version. I am sharing Bijoy Bayanno software with Activation Key. So, you are gonna get Bijoy Bayanno 2011 protable edition for FREE!


Basic Information of Bijoy Bayanno:
  • Software Version: Bijoy Bayanno 2011 [PORTABLE]
  • Download Size: 458 KB 
  • System Requirement: Windows 7, 8, 8.1 & 10 
  • Keyboard Layouts: Bijoy Classic & Unicode

Dwnload the Bijoy Bayanno from the Link Below:


After Download Follow the Instruction:
  • Unzip the BijoyBayanno 2011 (Portable) folder.
  • Now Double click on BijoyBayanno file to run the Bijoy Bayanno software.
  • Now in the Activation with Enter the Activation Code from the Activation Code file.

That's it, now you will see the Bijoy Bayanno layout at the left top corner of your PC. Enjoy typing with fully activated Bijoy Bayanno. 

  • Press Ctrl+B to type in Classic Format. 
  • Press Ctrl+V to type in Unicode Format.
bijoy bayanno bijoy bayanno free download bijoy 52 bijoy bayanno download bijoy bayanno 2020 free download bijoy bayanno 2020 free download for windows 10 bijoy bayanno activation code bijoy bayanno 2019 free download for windows 10 64 bit bijoy 52 free download bijoy bayanno keyboard bijoy bayanno 2020 free download for windows 10 64 bit bijoy bayanno 2019 free download bijoy 52 download bijoy bayanno for windows 10
Stay with TecHie-ASiF for more IT related post

Sunday, July 25, 2021

Most Essential CMD Commands of Windows PC

Windows CMD Commands


The Command Prompt is your gateway to advanced Windows tools. Here are all the essential CMD commands in a cheat sheet. The Windows Command Prompt may seem daunting, with its simple interface that lacks the usual Windows help tips, but it's actually one of the most powerful instruments in the Windows arsenal.

The Command Prompt on Windows 10 is useful for everything from complex automation to network configuration. What it lacks in interface it more than makes up for in effectiveness. If you don't know where to start with command prompt proficiency, what better place than to start here!

While most seek the best and most useful commands immediately, it helps to gloss over what different parameters mean. Proficiency with your Command Prompt comes not only through having a lexicon of commands, but of understanding what each parameter means and how different parameters can be combined to achieve a desired effect as well. 

The following is a comprehensive list of the most essential Windows commands.

Essential Windows Command Prompt Commands

COMMANDRESULT
ASSOCDisplays or modifies file extension associations.
ATTRIBDisplays or changes file attributes.
BREAKSets or clears extended CTRL+C checking.
BCDBOOTUsed to copy critical files to the system partition and to create a new system BCD store.
BCDEDITSets properties in boot database to control boot loading.
CACLSShows or changes access control lists (ACLs) of files.
CALLCalls a batch program from another.
CDShows the name of or changes to a current directory.
CHCPDisplays or sets the active code page number.
CHDIRDisplays the name of or changes to the current directory.
CHKDSKChecks a disk and displays a status report.
CHKNTFSDisplays or modifies the checking of disk at boot time.
CHOICEBatch file command that allows users to select from a set of options.
CIPHERDisplays or alters the encryption of directories (files) on NTFS partitions.
CLIPRedirects output off another command to the Windows clipboard.
CLSClears the screen.
CMDStarts a new instance of the Windows command interpreter.
CMDKEYCreates, lists, and deletes stored usernames and passwords or credentials.
COLORSets the default console colors.
COMPCompares the contents of two files or sets of files byte by byte
COMPACTDisplays or alters the compression of files on NTSF partitions.
CONVERTConverts FAT volumes to NTFS. You cannot convert the current drive.
COPYCopies one of more files to another location.
DATEDisplays or sets the date.
DEFRAGDisk defragment accessory.
DELDeletes one or more files.
DIRDisplays a list of files and sub-directories in a directory.
DISKCOMPCompares the contents of two floppy disks.
DISKCOPYCopies the contents of one floppy disk to another.
DISKPARTDisplays or configures Disk Partition properties.
DOSKEYEdits command lines, recalls Windows commands, and creates macros.
DRIVERQUERYDisplays current device driver status and properties.
ECHODisplays messages, or turns commands echoing on or off.
ENDLOCALEnds localization of environment changes in a batch file.
ERASEDeletes one of more files.
EXITQuits and closes the command shell.
EXPANDExpands compressed files.
FCCompares two files or sets of files and displays the differences between them.
FINDSearches for a text string in a file or files.
FINDSTRSearches for strings in files.
FORRuns a specified command for each item in a set.
FORFILESSelects files in a folder for batch processing.
FORMATFormats a disc for use with Windows.
FSUTILDisplays or configures the file system properties.
FTYPEDisplays or modifies file types used in file extensions associations.
GOTODirects the Windows command interpreter to a labeled line in a batch program.
GPRESULTDisplays Group Policy Information for machine or user.
GRAFTABLEnables Windows to display an extended character set in graphics mode.
HELPProvides help information for Windows commands.
ICACLSDisplay, modify, backup, or restore ACLs for files and directories.
IFPerforms conditional processing in batch programs.
IPCONFIGDisplays all current TCP/IP network configuration values.
LABELCreates, changes, or deletes the volume label of a disk.
MDCreates a directory.
MKDIRCreates a directory.
MKLINKCreates Symbolic Links and Hard Links.
MODEConfigures a system device.
MOREDisplays output one screen at a time.
MOVEMoves one or more files from one directory to another directory.
OPENFILESQueries, displays, or disconnects open files or files opened by network users.
PATHDisplays or sets a search path for executable files.
PAUSESuspends processing of a batch file.
POPDRestores the previous value of the current directory saved by PUSHD.
PRINTPrints a text file.
PROMPTChanges the Windows command prompt.
PUSHDSaves the current directory then changes it.
RDRemoves a directory.
RECOVERRecovers readable information from a bad or defective disk.
REMDesignates comments (remarks) in batch files.
RENRenames a file or files.
RENAMERenames a file or files.
REPLACEReplaces files.
RMDIRRemoves a directory.
ROBOCOPYAdvanced utility to copy files and directory trees.
SETDisplays, sets, or removes environment variables for current session.
SETLOCALBegins localization of environment changes in a batch file.
SETXSets environment variables.
SCDisplays or configures services (background processes).
SCHTASKSSchedules commands and programs to run on a computer.
SHIFTShifts the position of replaceable parameters in batch files.
SHUTDOWNAllows proper local or remote shutdown of machine.
SORTSorts input.
STARTStarts a separate window to run a specified programs or command.
SUBSTAssociates a path with a drive letter.
SYSTEMINFODisplays machine specific properties and configuration.
TAKEOWNAllows an administrator to take ownership of a file.
TASKLISTDisplays all currently running tasks including services.
TASKKILLKill running process or applications.
TIMEDisplays or sets the system time.
TIMEOUTPauses the command processor for the specified number of seconds.
TITLESets the window title for a CMD.EXE session.
TREEGraphically displays the directory structure of a drove or path.
TYPEDisplays the contents of a text file.
VERDisplays the Windows version.
VERIFYTells Windows whether or verify that your files are written correctly to a disk.
VOLDisplays a disk volume label and serial number.
VSSADMINVolume Shadow Copy Service administration tool.
WHEREDisplays the locations of files that match a search pattern.
WMICDisplays WMI information inside interactive command shell.
XCOPYCopies files and directory trees.

Dive Deeper With the Windows Command Prompt:

You'll never be able to remember all the commands that you can use on the Windows Command Prompt, but keep this cheat sheet handy and you'll always have them at your fingertips. Of course, this only scratches the surface of the Command Prompt. There are other commands you can learn, or you can chain them together for ultimate efficiency. cmd commands command prompt windows 10 command prompt commands shutdown cmd windows command prompt windows 10 activator cmd command prompt codes windows shutdown command ms dos commands telnet cmd windows cmd windows command line command prompt change directory cmd commands windows 10 windows cmd commands net user administrator cmd delete file cmd windows 10 run cmd as administrator cmd list files windows 10 cmd activation diskpart create partition windows 10 activation cmd device manager cmd cmd admin cmd commands list windows commands windows command command prompt commands list cmd kill process copy cmd cmd dir list disk cmd cmd prompt cmd file cmd does not support unc paths as current directories command prompt windows 7 cmd diskpart cmd change disk cmd scannow windows command processor run cmd run command prompt as admin command prompt commands windows 10 cool cmd commands control panel cmd run cmd as admin
Stay with TecHie-ASiF for more IT related post

Friday, July 2, 2021

20 Most Important Computer Tricks

 Those of us who spend hours a day on the computer may think we know all the tricks there are to make our work easier. It seems you can teach an old dog new tricks, because there are countless shortcuts that even the most proficient PC users don’t realize they could be utilizing on a daily basis. computer tricks, computer shortcuts, pc tricks, pc shortcuts Otherwise, impress your friends with these easy computer tricks.

Tricks for Typing
Here are a few tips that will save you lots of time when typing documents:
  • Move the cursor quicker to the beginning of the previous word by pressing CTRL+Left Arrow, instead of doing it manually.
  • To get the cursor to the beginning of the next word, use CTRL+Right Arrow.
  • Recover a deleted item with ALT+Backspace.
  • Delete an entire word by pressing CTRL+Backspace.
  • Select a word you want to highlight quickly, without dragging the mouse, by double-clicking on it.
  • Highlight a whole paragraph by triple-clicking on it.
  • Make superscript and sub text by pressing CTRL + = for sub, and CTRL+ Shift for superscript.
  • Paste in plain text and not what was originally formatted, after copying, by pressing CTRL + Shift + V.

Efficiency and Space Saving Tricks

Have better luck with your PC running smoother with these tips:

  • When your PC takes a long time to boot up, you may have too many programs running when you get started. To eliminate unnecessary programs, press Windows key + R, then type “misconfig”. Select the Startup tab from the window that pops up, and you will be able to turn off any programs you want that are slowing your boot time.
  • Delete large space wasting files with WinDirStat, which is short for “Windows Directory Statistics”. It shows you which files are taking up the most space, and you can then delete them accordingly.

Tricks on the Keyboard

  • Close all your windows quickly if you’re in a hurry by pushing the Windows button +D, and they will all shut immediately.
  • Rename your highlighted files quickly by pressing F2.
  • Close the program running with ALT + F4.
  • To minimize all windows only, press Windows + D.
  • Re-open your last closed tab with Shift + CTRL + T on most browsers.
  • Instead of moving the cursor to the X in the corner, press CTRL + W to close the current window.
  • Take a screen shot with ALT + Print Screen.

General PC Tips

  • Adjust any setting on your PC with the Windows “God Mode” folder, which is a centralized Control Panel for all the OS settings. Access this by creating a new folder named: God Mode.{ED7BA470-8E54-465E-825C-99712043E01C}.
  • Backup beyond a local file with services like Google Drive, Drop Box or other reputable cloud storage solutions, as extra security.
  • Problem Step Recorder will record all mouse clicks and take screenshots. This tool is helpful to a tech when an issue with your PC needs to be diagnosed. Use this by pressing Windows + R then type the letters “psr”.
computer tricks computer tips and tricks pc tricks computer hacks and tricks pc tips and tricks computer tips and tricks in hindi computer tricks and secrets computer tricks in hindi computer tips and tricks 2020 cool computer tricks computer life hacks computer shortcuts and tricks computer shortcuts and tricks pdf computer tips and tricks pdf amazing computer tricks computer tricks with keyboard computer tricks pdf computer tricks and tips hacks pc tips and tricks windows 10 cool computer tricks to impress your friends cool pc tricks computer hacking tricks pc tricks and hacks desktop tricks hacking tricks for pc fun computer tricks computer secret tricks
Stay with TecHie-ASiF for more IT related post

Wednesday, March 30, 2016

Windows 10 Keyboard Shortcuts CheatSheet [PDF+JPG]

Windows 10 Shortcut Keys
In the middle part of the previous year Microsoft had released Widows 10, Beside bringing many new features this latest version also comes with a few new keyboard shortcuts to take advantage of new features like the virtual desktop and the action center. In today's post I'm sharing almost all the necessary Keyboard Shortcuts for Windows 10 including new keys.


For the convenience of yours I'm presenting all the shortcuts on a table in two format PDF and JPG. You’re probably familiar with some of these from previous versions of Windows, but even still I found this a good refresher and reference guide. From the Desktop of your Windows 10 PC apply the shortcuts.

Lets have a look at the sample of the Windows 10 Keyboard Shortcuts Cheat Sheet below.


  • Download Links of the Full Cheat Sheet are given Below.
  • Just Download the Zipped file and Unzip it you will get the Shortcuts Cheat Sheet in tow format PDF and JPG. 

Windows 10 Shortcut Keys


Download Links:

Please Share This Post 
Stay with techie-asif.blogspot.com for more IT related post

Tuesday, September 8, 2015

Best Free Alternative of Connectify PRO [Exclusive]

best wifi hotspot software
WiFi is one of the popular and easiest way to share internet between devices. But to share internet from your PC you have to depends on external WiFi router or Virtual WiFi HotSpot. For creating virtual WiFi HotSpot on PC, the most renown software is Connectify. Though Connectify is the best but not a Free software. That is why people always search for it's alternative.

If you're also searching for the Connectify Alternative, than Good News for you :). In this post I'm gonna share virtual WiFi HotSpot creator, which is the best alternative of Connectify and it is completely Free!


mHotspot: mHotspot is such an excellent software that can turn your PC and Phone into WiFi HotSpot. Here you can set your HotSpot Name and Password to avoid unnecessary users. No external hardware or setup is required and very easy to use. The brilliant feature of mHotspot doesn’t require too much of Requirement.


System Requirement: To download mHotspot and install it properly, I will recommend the following requirement for your PC.

  • Operating System: Windows 7 or higher
  • Processor: 1GHz or higher
  • RAM: 1 GB
  • HDD: 16 GB to download and install it properly
  • Must Have Builtin WiFi and Make sure it is Turned On. 


mHotspot Features:


  • Connect upto 10 devices to the hotspot
  • You can set your own HotSpot Name and Password
  • Share any type of Internet Connection(LAN, Ethernet,3G/4G,Wifi etc)
  • Android phones, ipads, PDAs, tablet-pcs and other devices can access internet
  • Stream videos and shares files to clients
  • See the details of the connected device and network usage
  • Secures your wireless hotspot with WPA2 PSK password security
  • Extends your Wifi range(Acts as a repeater)
  • In-app internet selection
  • Also available for Android (Turns your phone into WiFi Hotspot)

mHotspot Installation Procedure:

  • First Download mHotspot from the link given below.
  • Then Extract the folder and Double click on mHotspot_setup to start installation.
  • Then compolete the Intallation mHotspot normally.

How to Create WiFi Hotespot:
  • Enter your HotSpot Name in the Hotspot Name box.
  • Then enter a Password of minimum 8 chars in the Password box.
  • Then select the Internet Source from the drop-down list of connections.
  • Then Set the number of the device you want to connect.
  • Finally Click on Start Hotspot to start the wifi hotspot.
wifi hotspot for pc


How to Connect Device to WiFi HotSpot:
  • Now go to the device, which you want to connect to the WiFi HotSpot.
  • Turn on the WiFi connection and search for the HotSpot.
  • Then Select your created WiFi HotSpot.
  • Now Enter the Password you set and click on Connect.


That's it, within a few seconds you device will be connected to your WiFi HotSpot :). You can do the same steps vice-versa to Create WiFi Hotspot on you Phone and connect the other device to it. If you face any problem then don't hesitate to comment below, I will try to solve. Enjoy.


Download Links:

Please Share This Post or At Least Press  G+1  on Every Post
Stay with www.iTTimesbd.com for more IT related post

Saturday, September 5, 2015

How to Bring Photo Viewer Back in Windows 10!

Get Back Windows Photo Viewer
Recently while opening a Photo on my newly installed Windows 10 PC, I found that Photos are opening with newly added Windows Photo Application. Though this Photo App is very good, But to be honest I was very much used to with Windows Photo Viewer. And that is why I tried to find the Photo Viewer in Windows 10, but I didn't find it. But by Googling found a very easy solution. And today's post I'm gonna show you, how you can bring Windows Photo Viewer Back in Windows 10.

Related Post:


Actually Microsoft hasn't removed the Windows Photo Viewer from Windows 10, Microsoft only Disable the feature to forced the users to use the Photo App :(. But enabling the Windows Photo Viewer is very easy, All you need just to Download and Apply a very small Registry file on your PC. And most interestingly the Registry file is only 60 KB in size. So let's start the procedure...


Enabling Windows Photo Viewer:

  • First Download the Registry File from the link given below.
  • Then Extract the file in a Folder.
  • Now Double click on WPV.reg file and then Yes > Yes > OK

That's it, All Done :) Windows Photo Viewer will be enabled on you Windows 10 PC once the above steps are completed. Now Follow the steps below to open your Photos with Windows Photo Viewer...


How to Open Photos with Windows Photo Viewer:

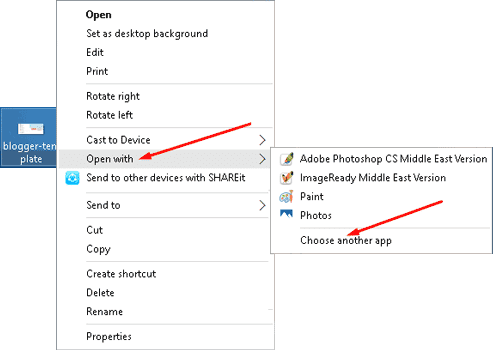
  • First click Right Mouse button on any Image.
  • Then click on Open with > Choose another app

Image Open With Option
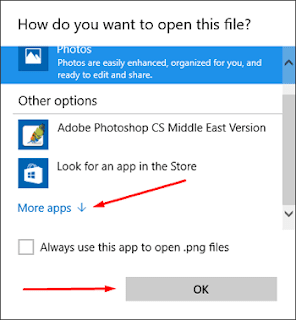
  • Then a new Window will open, Here click on More App > OK
Find Windows More App
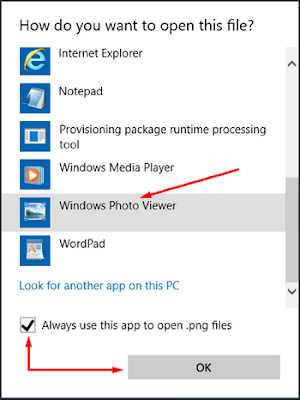
  • Now from the App List Select Windows Photo Viewer
  • Then Mark Always use this app option and click OK
Choose Windows Photo Viewer


In the above example I applied Windows Photo Viewer for the which are in .PNG format. As a result from now all the images in .PNG format will be opened with Windows Photo Viewer. But for the other image format like .JPG or .GIF you will have apply the same method shown in the above.

And if you have any question/quires regarding this post then don't hesitate to let me know by commenting below. :)


Download Link:

Please Share This Post or At-Least Press  G+1  on Every Post
Stay with www.iTTimesbd.com for more IT related post

Tuesday, September 1, 2015

Show My Computer Icon on Windows 10 Desktop!

show my computer on desktop

Hello Readers, It's been raining posts about Windows 10 on iTTimesbd.com since it launched. Today I'm gonna show you the steps of Showing My Computer Icon on Windows 10 Desktop. Previously I had shared another post for Windows 8. So, you might have a question that why this post again. Actually steps for Windows 10 and 8 are not same. And to Honest I have also faced problem while facing My Computer Icon on my Windows 10 PC.


Recently for unwanted reason I had to reinstall Windows 10 on my PC. And when the installation is completed I found that My Computer Icon is missing on the Desktop. Then I applied the steps I used on Windows 8 but it didn't worked. Actually Windows 10 is a combination on traditional and modern apps, that is why here steps for Showing My Computer Icon on Desktop is little bit different. Lets see the Procedure...

In Windows 10 My Computer Icon is shown in the name - This PC. Don't like the name ? No Problem. you can Rename This Icon :)


Showing My Computer on Windows 10 Desktop:

  • First got to your PC's Desktop. [Press Start Picture of the Start button+D]
  • Anywhere on Desktop click Right Mouse button and Choose Personalize.
PC Persinalise
  • Then on Personalize window click Theme on left panel.
  • Then here on the Right Panel click Desktop icon settings
Windows Theme option
  • Now a new window will open named Desktop Icon Settings.
  • Here Choose the Icons that you wanna Show on your PC's Desktop.
  • Finally click on Apply and then OK.
Desktop Icon Settings


That's it, All Done. Now go to your PC's Desktop, you will see that My Computer (This PC) icon is showing there :). Windows 10 is Full of new features and improvements. To Know More about the Windows 10 New Features Read the Complete Post from the link below...

Related Post:


And if you have any question/quires regarding this post then don't hesitate to let me know by commenting below. 


Please Share This Post or At-Least Press  G+1  on Every Post
Stay with www.iTTimesbd.com for more IT related post