Showing posts with label Blogger Tips and Tricks. Show all posts

Tuesday, October 11, 2016

Increase Adsense Earnings by Page-level Ads [Exclusive]

Adsense PAge-level Ads Earning
Newly introduced Page-level ads of Adsense are a ad formats that offer a new and innovative way for you to monetize your content on mobile platform. Adsense has made this Page-level for the blogger, blogging on Blogger.com and webmaster, that means now you can display Adsense Ads directly on your site's mobile template. All you need just to add a simple code to your site to make this Page-level ads enable.


I had enabled Page-level ads on https://techie-asif.blogspot.com/ immediately after Adsense launched it. However, for the shortage of time I was not able to write about it earlier. But today I'm gonna share details about this new Adsense ads and show you how to set it up in Blogger.com. So, Let's Started...


Why to Choose Page-level Ads:
  • Increase Revenue.
  • Designed to Improve Users Experience.
  • Site becomes Optimized for Mobile Platform.
  • Two New Ad Formats.
  • Don’t count towards your 3 ads per page limit.
  • Use the same ad code on all of your pages.

NOTE: Your site must be optimized for the mobile platform to enable this Adsense Page-level ads. If your site is mobile friendly then OK, if not then visit the like below to Test your Site's mobile friendliness.


Types of Page-level Ad Format:
  • Anchor/Overlay Ads: Anchor/Overlay ads that are appear at the bottom edge of the mobile screen. And this ads can easily be closed if the users wants.
  • Vignette Ads: This ads are mobile full-screen ads that appear between page loads on your site and can be skipped by users at any time.

How to Setup Page-level Ads in Blogger:
  • Sign in to your AdSense account.
  • Click on My ads >> Content >> Page-level ads.
  • Click on the Anchor and Vignette ads Toggle buttons to Turn them On.
Page-level Ads
  • Scroll down and click on Get Code button and Copy the code.
Increase Adsense Earnings
  • Now Sign into your Blogger.com account and go to Dashboard.
  • Click on Template >> Edit HTML
  • Note: Take a backup of the template, so that you can restore, if anything goes wrong. Template Backup Guide
  •  Inside the HTML code Paste the Page-level code above the </head> tag.
  • Note: You will also need to replace the attribute async with async="async" in order to help complete the process, otherwise Blogger will give you an error message.
  • Finally click on Save Template button.


Test Page-level Ads on Your Site: After completion of the setup of Page-level ads on your site, now time to check that they’re working correctly or not. You will have to use your Mobile Device to Test the Page-level ads. On a Mobile Device follow the steps below.

  • Visit your site's post/page by adding #googleads to the end of the URL.
  • Select the ad format from the tabbed box that will appear at the top.
  • Finally Check Out the ads. (For vignettes, click any of the highlighted links)

If everything is OK then you will see that both the Anchor/Overlay and Vignette Ads are working fine. But if the ads are not working or if you want to change something, then you will have to start the whole procedure over again.


Please Share This Post
Stay with https://techie-asif.blogspot.com for more IT related post

Wednesday, June 22, 2016

How to Fix Mixed Content Errors in Blogger Blogs !!!

Mixed Content Errors in Blogger
Few days ago I had published a post on Enabling HTTPS on Blogspot Domains. Beside bringing some advantage, Enabling HTTPS is also brings a problem named Mixed Content Error. But in the immediate update Blogger shows how to fix the Mixed Content Errors. If you haven't enabled HTTPS on your blog yet the first enable it, and then follow the rest of the post to fix the mixed content errors in your blog.


What are Mixed Content Errors?

When a web page becomes secured by SSL, but it contains both secure HTTPS and also the non-secure HTTP which is usually links, scripts, style sheets, video, and images. These browser errors will degrade both HTTPS security and the user experience of your blog. This means that source codes such as template, layout gadget, and post and paste may be causing the issues in the HTML side of the equation.


How to Find Mixed Contents:

Requirement: This method will only work on Google Chrome Browser. Use the latest version of Chrome.

  • Visit your Blog using HTTPS. fro example: https://livetechnologybd.blogspot.com
  • Then at the Right Top click on Chrome Menu and go to More Tools > Developer Tools > click on Console.
  • Or just press CTRL + SHIFT + J
  • Now look in the Console for mixed content errors which will look like show in the image below.
Find Blogger Mixed Content Errors

  • The types of Mixed Content Errors are also Include the following
  • Insecure Script Request
  • Insecure Image Request 
  • Insecure URL Request 
  • Make a list of all unsecured URLs and visit the other pages on your blog to check for other mixed content errors.

Fixing Mixed Content Errors in Posts/Pages:
  • First Sign into your Blogger Account and go to Dashboard.
  • Then click on Edit of the Posts/Pages that you Listed earlier
  • Once the Post/Page Editor opens, click on HTML tab.
Mixed Content Errors Blogger Post

  • Now press CTRL+F and Search for http:// inside the HTML tab.
  • Then Replace all http:// to https://
  • Verify all the URL after adding https:// to it by opening it in a new browser window. If the HTTP and HTTPS link give the same result, then everything is OK.
  • Finally click Update to save the post or page.


Fixing Mixed Content Errors in Template: This means that the Mixed Content Errors are may be found in the Template. Follow the steps below to fix them...
  • On your blog’s dashboard, click Template.
  • Then click one the Edit HTML to open the HTML Editor.
  • Now click inside the HTML Editor and Press CTRL+F to Search for htt://
  • Then Replace all http:// to https://
  • Verify all the URL after adding https:// to it by opening it in a new browser window. If the HTTP and HTTPS link give the same result, then everything is OK.
Mixed Content Errors Blogger Template

  • Finally click on Save Template button.

Fixing Mixed Content Errors in Layout:
  • From your Blog Dashboard click Layout and click Edit on All HTML/JavaScript
  • Find and Replace htt:// with https:// and save them.


Avoid Mixed Content Errors in Post/Page Editor:

To find and fix the mixed content errors automatically, blogger introduced a warning tool to alert about the possible mixed content inside the post. Let's see how to use this tool.
  • Open the Post/Page Editor by clicking Edit link.
  • Then click on HTML tab
  • Now click on the Publish/Update or Save button 
If the content has any errors, you’ll see them at the top of the editor along with the link to Fix or Dismiss them. 
  • Fix: This will fix the errors identified by the editor and save the post.
  • Dismiss: Dismiss will ignore the errors for this session.
  • Click on the Dismiss link to Fix the Errors and Update/Publish it .

Blogger Mixed Content Errors Fix


That's it, hope it will help you to fix the Mixed Content Errors of your Blog. However fixing this errors will help you to improve the performance of your blog, particularly when it come to pages which may have issue with mixed content generating errors.


Please Share This Post 
Stay with techie-asif.blogspot.com for more IT related post

Thursday, June 16, 2016

How to Enable HTTPS on ALL Blogspot Domain !!!

Recently when I had logged into my Blogger account I got a notification about the Turning on the HTTPS supports for the Blogger's all blogspot domain. I think most of you have also noticed that notification like me. Like most of you there are several question that had come across in my mind after seeing that notification, such as...
  • What is HTTPS ?
  • What are the benefits of enabling HTTPS ?

In this post I'm gonna try to share some information that will give us the answer of these question and also gonna show the procedure to enable HTTPS support.


HTTPS Notification:

Before start for searching for answer, first see actually what was in that HTTPS notification. In that notification Blogger.com notified the Blog admin that the visitors would be able to view their domain through encrypted connection, while having all the links and bookmarks working. But the HTTPS availability supports will be disappeared. Have a look at the Notification image below...

HTTPS Blogspot


Currently this HTTPS support is only available for the Blogspot domain. And custom domain user like me will have to wait for a while to have HTTPS support. Because till this post is published the HTTPS supports is not available for the Custom Domian users on Blogger platform.


What is HTTPS:

Hyper Text Transfer Protocol Secure (HTTPS) is the a secure version of HTTP. That means the data that transferred between the user and server is now encrypted and protected from access or hacking from unwanted third parties.


Benefits of Enabling HTTPS: There are three main benefits to using HTTPS instead of HTTP to access your blog:

  • It helps check that your visitors open the correct website and aren’t being redirected to a malicious site.
  • It helps detect if an attacker tries to change any data sent from Blogger to the visitor.
  • It adds security measures that make it harder for other people to listen to your visitors’ conversations, track their activities, or steal their information.
  • And most interesting thing is, you are getting this HTTPS support without any cost, it is completely FREE!!

HTTPS is fundamental to internet security; it protects the integrity and confidentiality of data sent between websites and visitors' browsers. HTTPS enabled blog will get free SSL certificate which means that the site that you are visiting is secured. Beside that it will leave positive impact on search engine optimization (SEO). Google always gives higher importance on HTTPS than HTTP. So it ensure the higher ratting for your site.

HTTPS Blogspot


Warning: Please be aware that mixed content may cause some of your blog's functionality not to work in the HTTPS version. Mixed content is often caused by incompatible templates, gadgets, or post content. While Blogger proactively fixing most of these errors, some of them can only be fixed by the blog authors.


How to Enable HTTPS on Blogger:
  • First Login to Your Blogger Account.
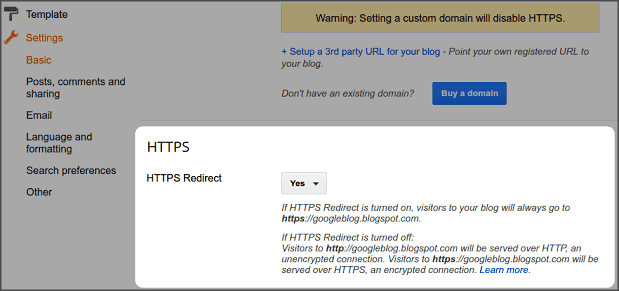
  • Then go to Settings > Basics > HTTPS Redirects 
  • Now from the HTTPS Redirects Dropdown, select Yes
  • Finally Save the settings.

HTTPS Blogspot


Later if you disable HTTPS redirect, visitors have two options for viewing your blog:
  • View the unencrypted version of your blog at http://techie-asif.blogspot.com
  • View the encrypted version of your blog at https://techie-asif.blogspot.com

Please Share This Post 
Stay with techie-asif.blogspot.com for more IT related post

Friday, March 25, 2016

Blogger's Official Featured Post Gadget [LATEST]

blogger featured post widget
Featured Post Gadgets is one of the most essential gadget for any website or blog. Unfortunately for a long there was no such Gadget in the Blogger.com platform. That's why we have to use third party templates or HTML/JavaScript code to display a featured post. But the good news is finally Blogger introduced their official Featured Post Gadget.


Featured Post Gadget:

I think most of you are very much familiar with the Featured Post Gadget. But there are many beginners who may be don't know about this gadget, that's why I want to writ about it briefly...

Featured Post gadget is a simple way to show off the content that matters most. This gadget is to help make it easier to showcase the posts you want your readers to see. With Featured Post Gadget, you can choose posts you’ve shared on your blog and highlight them wherever you’d like.


How to Add Featured Post Gadget:

After Signing into your Blogger account follow the steps below to add the Featured Post Gadget...
  • Now from the Blogger Dashboard click on Layout.
  • Then click on Add a Gadget link where you wanna place the gadget.
  • Then from the Popup Gadget list click on Feature Post.
blogger featured post widget

  • Now on the Configure Featured Post window First Select the Post that you want to Feature. You can Search the post by Labels or Post Title. After selecting the Post, configure the following points...
  • Gadget Title: You can set the Title as you wish or you can keep the default one.
  • Post Snippet: Here you will have the following option to Mark.
  • Show Post Title
  • Show Text Snippet
  • Show Image
  • Check the Preview available in this window to make sure that the gadget is OK according to your expectation.
blogger featured post widget

  • Finally click on the Save button.

That's it after saving the Gadget, just View your blog to see the added Featured Post Gadget on your blog. If you’d like to highlight something new, you can change the post you feature at any time. Happy blogging!


Please Share This Post 
Stay with techie-asif.blogspot.com for more IT related post

Tuesday, September 22, 2015

DailyUploads - Upload Files & Earn Extra Cash!

earn money uploading files
Blogger or Website owners have to share files or downloadable contents regularly. For that they need to depends on Online Cloud Storage. There are several sites that provide cloud storage. Some of them are free but not all of them. But choosing reliable one is a bit tough. Currently I'm using two best cloud storage for this site. And today I'm gonna discuss about one of them - Daily Uploads. And also show you how you can earn money by uploading files.


Daily Uploads: Daily Uploads is a file hosting provider, which offer online storage/remote backup capacity, sophisticated uploading and downloading tools. With Daily Uploads you can host files, images, videos, audio and flash on the same place.  It offers 256 GB free Storage for the Registered Users. It is also share the profit with their Registered users. Currently they are offering best rate for per download.


Daily Uploads Features:
  • 256 GB Free Storage (Unlimited for Premium Users)
  • Unlimited Downloads
  • Upload File Size 4 GB (Unlimited for Premium Users)
  • File Deleted after 120 days after last download. (Never for Premium Users)
  • Remote URL upload
  • Download-Accelerators support
  • Downloads resume
  • Unlimited Download Speed
  • No downloads delay
  • No downloads captcha
  • And Best Rate for Earn Per Download.
  • Reefer Others for Earn More.


If you want to earn from your Uploaded Files then you must be a registered users of Daily Uploaded. The above mentioned feature only available for registered users. Registering for Daily Uploads is very easy. Lets follow the steps below..


Daily Uploads


How to Signup for Daily Uploads:

That's your Daily Upload account will be created. Normally no required of Mail Verification. But if it ask then do the verification from your mail inbox. After creating your account Sign into you Daily Upload Account.

  • Upload: Click this menu and Upload your file. To upload files from other site, Click on Remote URL upload option. To Copy files from other Daily Upload link, Click on Copy Files Option.
  • My Account: Click this menu to view your Account. You can Also Update your account details from here.
  • My Files: Click this menu to view and edit your files and folder name.
  • Reports: Click this menu to view the download and earning reports.


Rates For Per 1,000 Downloads:
  • Group A: USA, UK = 16$
  • Group B: United Kingdom, France, Spain, Australia, Sweden, Switzerland, Italy, Nederlands = 5$
  • Group C: Japan, Poland, Russia, Romania, Hungary, Greece, UAE, Bulgaria, Singapore, Korea, New Zealand, Kuwait = 3$
  • Group D: Others Countries = 1$

Payment Method: Payments are made via PayPal, Payoneer.

Payout Amount and Time: Minimum payout is $25, and you will get paid 7 Days After a Cashout Request.


Important Information:
  • Don't cheat! Abusing the reward system will lead to permanent ban.
  • Don't host any pornography, nudity, sexual images and any kind offensive material, and, of course, copyrighted material to avoid unwanted file removal.
  • File size must be at least 1 MB in size to get paid for per download.


Signup Link:

Please Share This Post or At Least Press  G+1  on Every Post
Stay with www.iTTimesbd.com for more IT related post

Wednesday, July 29, 2015

6 Stylish Custom Search Box for Website/Blogger

Hello Blogger, Its been a long time last I had published any post on Blogger and Blogging section. Actually by this time I was working with other popular section of this site, like Gaming, Software and Android Apps. And I had published many Exciting Full Version Games for Free. However although I had taken too long, but finally from today I'm gonna start writing on Blogger and Website Widgets.


In today's post I'm gonna share 6 different stylish Search Box Widget for Website and Blogger. Search Box is an essential and necessary part of any Site for the convenience of the visitors to find the content from it. But sometime you may not find the right Search Box widget, which suite best with the design of your site. Or sometime the default search box may not attractive and efficient enough to bring effective result.


You can choose the Search Box for your site from the 6 search box I'm sharing today. These Search Box are very stylish and attractive. The code that I'm sharing will work on any HTML site. In this post will only show how you can add these Search box to your Blogger blog. Let's start...


How to Add Custom Search Box to Blogger:


  • First Log into your Blogger Account and go to Dashboard.
  • Then click on Layout Option.
  • Here click on Add a Gadget link where you want to place the search box.
  • The from the gadget list select HTML/JavaScript.
Blogger Gadget
  • Now inside the popup window Paste the any Search Box code from given below.
  • Finally click on Save Button 


Style > 1:
Search Box - 1

  <style>  
 #searchbox {  
   background: #d8d8d8;  
   border: 4px solid #e8e8e8;  
   padding: 20px 10px;  
   width: 250px;  
 }  
 input:focus::-webkit-input-placeholder {  
   color: transparent;  
 }  
 input:focus:-moz-placeholder {  
   color: transparent;  
 }  
 input:focus::-moz-placeholder {  
   color: transparent;  
 }  
 #searchbox input {  
   outline: none;  
 }  
 #searchbox input[type="text"] {  
   background: url(https://blogger.googleusercontent.com/img/b/R29vZ2xl/AVvXsEgVVmOdvTplHoSTx2oVGQU_xpc7O8R2mMCcUaaWNHdJ3TKXD45ZO647HkpqvqNQOuFP2TH8j69vQk_hFiOodxwBhAhBVCHKJ0roAbZyStxOCQynSBxJNIBuwyzvBwBttT_7CXQ6wq0PMWrM/s1600/search-dark.png) no-repeat 10px 6px #fff;  
   border-width: 1px;  
   border-style: solid;  
   border-color: #fff;  
   font: bold 12px Arial,Helvetica,Sans-serif;  
   color: #bebebe;  
   width: 55%;  
   padding: 8px 15px 8px 30px;  
 }  
 #button-submit {  
   background: #6A6F75;  
   border-width: 0px;  
   padding: 9px 0px;  
   width: 23%;  
   cursor: pointer;  
   font: bold 12px Arial, Helvetica;  
   color: #fff;  
   text-shadow: 0 1px 0 #555;  
 }  
 #button-submit:hover {  
   background: #4f5356;  
 }  
 #button-submit:active {  
   background: #5b5d60;  
   outline: none;  
 }  
 #button-submit::-moz-focus-inner {  
   border: 0;  
 }  
 </style>  
 <form id="searchbox" method="get" action="/search">  
 <input name="q" type="text" size="15" placeholder="Type here..." />  
 <input id="button-submit" type="submit" value="Search" />  
 </form>  


Style > 2:
Search Box - 2

 <style>  
 #searchbox {  
 width: 240px;  
 }  
 #searchbox input {  
   outline: none;  
 }  
 input:focus::-webkit-input-placeholder {  
   color: transparent;  
 }  
 input:focus:-moz-placeholder {  
   color: transparent;  
 }  
 input:focus::-moz-placeholder {  
   color: transparent;  
 }  
 #searchbox input[type="text"] {  
   background: url(https://blogger.googleusercontent.com/img/b/R29vZ2xl/AVvXsEgVVmOdvTplHoSTx2oVGQU_xpc7O8R2mMCcUaaWNHdJ3TKXD45ZO647HkpqvqNQOuFP2TH8j69vQk_hFiOodxwBhAhBVCHKJ0roAbZyStxOCQynSBxJNIBuwyzvBwBttT_7CXQ6wq0PMWrM/s1600/search-dark.png) no-repeat 10px 13px #f2f2f2;  
 border: 2px solid #f2f2f2;  
   font: bold 12px Arial,Helvetica,Sans-serif;  
   color: #6A6F75;  
   width: 160px;  
   padding: 14px 17px 12px 30px;  
   -webkit-border-radius: 5px 0px 0px 5px;  
   -moz-border-radius: 5px 0px 0px 5px;  
   border-radius: 5px 0px 0px 5px;  
   text-shadow: 0 2px 3px #fff;  
   -webkit-transition: all 0.7s ease 0s;  
   -moz-transition: all 0.7s ease 0s;  
   -o-transition: all 0.7s ease 0s;  
   transition: all 0.7s ease 0s;  
 }  
 #searchbox input[type="text"]:focus {  
 background: #f7f7f7;  
 border: 2px solid #f7f7f7;  
 width: 200px;  
 padding-left: 10px;  
 }  
 #button-submit{  
 background: url(https://blogger.googleusercontent.com/img/b/R29vZ2xl/AVvXsEhDy4jsVm_DKnbeL60Bc-bEogAsE_u-OJG-vR57cSn1dLOdWv-SKDA_5IcgMGxbRsFEtqB3DIIRkJ7AJX49ruM_-rRiLOnewJaeNaOQxUJwfKZhniM4FyOX2CZA7mdGLeRXA2mu-AECACfh/s1600/slider-arrow-right.png) no-repeat;  
 margin-left: -40px;  
 border-width: 0px;  
 width: 43px;  
 height: 45px;  
 }  
 </style>  
 <form id="searchbox" method="get" action="/search" autocomplete="off">  
 <input name="q" type="text" size="15" placeholder="Enter keywords here..." />  
 <input id="button-submit" type="submit" value=" "/>  
 </form>  


Style > 3:
Search Box - 3

  <style>  
 #searchbox {  
   background: url(https://blogger.googleusercontent.com/img/b/R29vZ2xl/AVvXsEigCvOquxTLfSB6ELjkD5b1MEpdE5il6ed7lYXhF7C0_rmjyXJ9EN7EKWlkjO6HGX5XbZz4XF4EIUjx5ub7u6Y7HLyfM1feFxenW_GRl_QM3Kt7XR68xbmyY7o1oAoZbkGoH9nkssiQLLm4/s1600/searchbar.png) no-repeat;  
   width: 208px;  
   height: 29px;  
 }  
 input:focus::-webkit-input-placeholder {  
   color: transparent;  
 }  
 input:focus:-moz-placeholder {  
   color: transparent;  
 }  
 input:focus::-moz-placeholder {  
   color: transparent;  
 }  
 #searchbox input {  
   outline: none;  
 }  
 #searchbox input[type="text"] {  
   background: transparent;  
   margin: 3px 0px 0px 20px;  
   padding: 5px 0px 5px 0px;  
   border-width: 0px;  
   font-family: "Arial Narrow", Arial, sans-serif;  
   font-size: 12px;  
   color: #828282;  
   width: 70%;  
   display: inline-table;  
   vertical-align: top;  
 }  
 #button-submit {  
   background: url(https://blogger.googleusercontent.com/img/b/R29vZ2xl/AVvXsEgDkqGaQV9tSLd5Eywuj59vnhKGAzl1YqUcO-NuzrDwQQ3qypP_CkNyxGOzRvjUMFm0Hbse_j_TbAYnm0QA0i-RNrlfAzBUugEX5Vr3BFunmjfMpDvdQRUNFFVYM2wH3q4wMhMQ2d4PqHbM/s1600/magnifier.png) no-repeat;  
   border-width: 0px;  
   cursor: pointer;  
   margin-left: 10px;  
   margin-top: 4px;  
   width: 21px;  
   height: 22px;  
 }  
 #button-submit:hover {  
   background: url(https://blogger.googleusercontent.com/img/b/R29vZ2xl/AVvXsEgTIiAh7qYH4vqVSm8Go7OjKS9SrdPkWRvEdoDcPmaueaIFc2CL32aRR_yvfxx1CIO6KtnVBr0vQfZy2bksolT9keFDsAKCZCMh-mfUHtha1r-Gh9EWsCQucReQJm1MkQeLpVicTb7ZUIQo/s1600/magnifier-hover.png) no-repeat;  
 }  
 #button-submit:active {  
   background: url(https://blogger.googleusercontent.com/img/b/R29vZ2xl/AVvXsEgTIiAh7qYH4vqVSm8Go7OjKS9SrdPkWRvEdoDcPmaueaIFc2CL32aRR_yvfxx1CIO6KtnVBr0vQfZy2bksolT9keFDsAKCZCMh-mfUHtha1r-Gh9EWsCQucReQJm1MkQeLpVicTb7ZUIQo/s1600/magnifier-hover.png) no-repeat;  
   outline: none;  
 }  
 #button-submit::-moz-focus-inner {  
   border: 0;  
 }  
 </style>  
 <form id="searchbox" method="get" action="/search" autocomplete="off">  
   <input name="q" type="text" size="15" placeholder="search..." />  
   <input id="button-submit" type="submit" value="" />  
 </form>  


Style > 4:
Search Box - 4

 <style>  
 #searchbox {  
   background: url(https://blogger.googleusercontent.com/img/b/R29vZ2xl/AVvXsEh0QgE8JiXe_zRjGnzRbD1sB_-eY78G7DgPcSnOb_d1xrcCl3mLgHyq5K30QudKNbenFgcKzFkq2EV258ZVuGB1OTs_Ei73HLLd0L8sHcyVSmGyjoAr1DglPB6oiwjB4_A0vRFxy_gKJfrr/s1600/search-box.png) no-repeat;  
   height: 27px;  
   width: 202px;  
 }  
 input:focus::-webkit-input-placeholder {  
   color: transparent;  
 }  
 input:focus:-moz-placeholder {  
   color: transparent;  
 }  
 input:focus::-moz-placeholder {  
   color: transparent;  
 }  
 #searchbox input {  
   outline: none;  
 }  
 #searchbox input[type="text"] {  
   background: transparent;  
   margin: 0px 0px 0px 12px;  
   padding: 5px 0px 5px 0px;  
   border-width: 0px;  
   font-family: "Arial Narrow", Arial, sans-serif;  
   font-size: 12px;  
   font-style: italic;  
   width: 77%;  
   color: #828282;  
   display: inline-table;  
   vertical-align: top;  
 }  
 #button-submit {  
   background: url(https://blogger.googleusercontent.com/img/b/R29vZ2xl/AVvXsEhOwhr_w6VouPju9-i2yhIqccdsOriiHWCR_N1Wx2OV2AJhbm0h0KRu7-A07jeV901nznVr9jBv3ELvEuoPVVm2OL5ZyRadYztzfG6W7z1i4IMTOT0YBYthZpvhi9J612G2QnZNAxZD2gcc/s1600/search-button.png) no-repeat;  
   border-width: 0px;  
   cursor: pointer;  
   width: 30px;  
   height: 25px;  
 }  
 #button-submit:hover {  
   background: url(https://blogger.googleusercontent.com/img/b/R29vZ2xl/AVvXsEiPRZps2uA9en5fqtfkaO-Ui4j86cRCTzsZ1XxzmhVuK8s57_eT_-dWgaq9thp013vEfZi1UtU6GxtEk8rR-D55-ZPpvHfIR_WRd_fyz4ymesXosrsU0ac2nmnUiSDejvhMUnH3webN69m7/s1600/search-button-hover.png) no-repeat;  
 }  
 #button-submit::-moz-focus-inner {  
   border: 0;  
 }  
 </style>  
 <form id="searchbox" method="get" action="/search" autocomplete="off">  
 <input name="q" type="text" size="15" placeholder="search..." />  
 <input id="button-submit" type="submit" value="" />  
 </form>  


Style > 5:
Search Box - 5

 <style>  
 #searchbox {  
   background: url(https://blogger.googleusercontent.com/img/b/R29vZ2xl/AVvXsEgiu7QhBPoeYNId_IRyT75BjuvlChpsaJqIvOs_mJVhrbWp_zahfnM5wKW6TrXKejx0QA_E50z2ClP6yiKW72VBX-A66t1cW7CVjKzM_wTHWquoqfw_oCO8aRcKiOD9Ala5SsUCJXAtrTIt/s1600/search-box1.png) no-repeat;  
   width: 250px;  
   height: 65px;  
 }  
 input:focus::-webkit-input-placeholder {  
 color: transparent;  
 }  
 input:focus:-moz-placeholder {  
 color: transparent;  
 }  
 input:focus::-moz-placeholder {  
 color: transparent;  
 }  
 #searchbox input {  
   outline: none;  
 }  
 #searchbox input[type="text"] {  
   background: transparent;  
   padding: 5px 0px 5px 20px;  
   margin: 10px 15px 0px 0px;  
   border-width: 0px;  
   font-family: "Brush Script MT", cursive;  
   font-size: 12px;  
   color: #595959;  
   width: 65%;  
   font-weight: bold;  
   display: inline-table;  
   vertical-align: top;  
 }  
 #button-submit {  
   background: url(https://blogger.googleusercontent.com/img/b/R29vZ2xl/AVvXsEh0K3Ld56ZoX7KdiQJBfQofl5Cq6WQz-mzkwzk25Pi6_dqQSpZznSOtutr_JduIxk-O5oFK47rYh7vS5ILOI34XtnWKequwbzjng239n33_BuVzXCiQpQPj1jUuqMcdtjDpiYR7P4nsOOcm/s1600/magnifier.png) no-repeat;  
   border-width: 0px;  
   cursor: pointer;  
   margin-top: 10px;  
   width: 19px;  
   height: 25px;  
 }  
 #button-submit:hover {  
   background: url(https://blogger.googleusercontent.com/img/b/R29vZ2xl/AVvXsEilS6XeBuPtHferKWhTeD8ZFK99Sgi3UnbVX0SRfZdBliE3b1CnEsu6cY5hmJL-gOwXKozkPKNExV21WIT1U3GZqGBeHP6Z2tMhyphenhyphen_MIHElpYZItFQmnIp79SBADdD28TKI63b8KvDZo6Zm4/s1600/magnifier-hover.png) no-repeat;  
 }  
 #button-submit:active {  
   background: url(https://blogger.googleusercontent.com/img/b/R29vZ2xl/AVvXsEilS6XeBuPtHferKWhTeD8ZFK99Sgi3UnbVX0SRfZdBliE3b1CnEsu6cY5hmJL-gOwXKozkPKNExV21WIT1U3GZqGBeHP6Z2tMhyphenhyphen_MIHElpYZItFQmnIp79SBADdD28TKI63b8KvDZo6Zm4/s1600/magnifier-hover.png) no-repeat;  
   outline: none;  
 }  
 #button-submit::-moz-focus-inner {  
   border: 0;  
 }  
 </style>  
 <form id="searchbox" method="get" action="/search" autocomplete="off">  
   <input class="textarea" name="q" type="text" size="15" placeholder="Search here..." />  
   <input id="button-submit" type="submit" value="" />  
 </form>  


Style > 6:
Search Box - 6

  <style>  
 #searchbox {  
 width: 280px;  
 background: url(https://blogger.googleusercontent.com/img/b/R29vZ2xl/AVvXsEiS_WfZA1JukoXPbJS_hQv2KVyiq-GH_CWBiMODo0bi0fMuqioQfMmnc2i6yyqG-495D8NqaXBD-IOMJ0tYlGis3vjLjE8_0tQyGxoGIqxTt8JzrTD2YFTvN_t9O5h7tApDcygMO1Mrs1nr/s1600/search-box.png) no-repeat;  
 }  
 #searchbox input {  
   outline: none;  
 }  
 input:focus::-webkit-input-placeholder {  
   color: transparent;  
 }  
 input:focus:-moz-placeholder {  
   color: transparent;  
 }  
 input:focus::-moz-placeholder {  
   color: transparent;  
 }  
 #searchbox input[type="text"] {  
 background: transparent;  
 border: 0px;  
 font-family: "Avant Garde", Avantgarde, "Century Gothic", CenturyGothic, "AppleGothic", sans-serif;  
 font-size: 14px;  
   color: #f2f2f2 !important;  
   padding: 10px 35px 10px 20px;  
   width: 220px;  
 }  
 #searchbox input[type="text"]:focus {  
 color: #fff;  
 }  
 #button-submit{  
 background: url(https://blogger.googleusercontent.com/img/b/R29vZ2xl/AVvXsEjadSx4PrjnxNU32xw5PeknevtSAyWmhg_eeTYp9_1Xr4HcDOOg-fEiqBQIXBbP41LceyeTxDEeL9rGOMUXFxNA8kL_keiUvLlRAgW8bgDuYVoeMb33b2wdGnyDrwkUo_IhOQnA2ie9Qbl1/s1600/search-icon.png) no-repeat;  
 margin-left: -40px;  
 border-width: 0px;  
 width: 40px;  
 height: 50px;  
 }  
 #button-submit:hover {  
 background: url(https://blogger.googleusercontent.com/img/b/R29vZ2xl/AVvXsEjI4Culo9UL19En-TBYQX9ockEXWznOzN5safyJ0pi4Sb5Z6LsMAKVVhugIETbUUVGoEpuQ9EFuuMgNbSq__X4-iXBGvSHnhkTvz2rOKAfYMbZ23MhQ1MtqgFxUFl1nnmRg0V204A21t2lT/s1600/search-icon-hover.png);  
 }  
 </style>  
 <form id="searchbox" method="get" action="/search" autocomplete="off">  
 <input name="q" type="text" size="15" placeholder="Enter keywords here..." />  
 <input id="button-submit" type="submit" value=" "/>  
 </form>  


That's it. After completing the addition of the new search box to your blog, now view you blog to check the Search Box. If everything is correct you will see that you blog has a new Search Box.


Please Share This Post
Stay with TecHieASiF for more IT related post

Monday, May 11, 2015

InFoLinks - Excellent Website Monetization Media!

InFoLinks
Previously I had published several post on website/blog monetization media. And all those media is very good alternative of AdSense. If you had missed those posts or if you'r site does not have AdSense and trying to find alternative of AdSense, then you can try them.

Monetize Your Site By...


Today I have come-up with another excellent website/blog monetization media. It is InFoLinks Media. InFoLinks is an excellent advertising media which is something different from the others. Because where the other site mostly monetize site by banner ads, but by InFoLinks you can monetize your site's Text also. And most of the other site doesn't have this special type of monetization format. Okay, let's integrate InFoLinks ads in a site.


Eligibility Criteria to Qualify for InFoLinks:

InFoLinks platform is open to any online publisher, big or small. And there no minimum requirements for page views or visitors. That means, if you have a website or blog with whatever visitors it has you're eligible to monetize your site with InFoLinks. So, what you are waiting for, join and start earning...


Monetizing  a Site by InFoLinks:

  • Then complete form with requires information like...
  • Your Website/Blog URL (ie. www.ittimesbd.com) 
  • Your Full Name.
  • Your Email Address.
  • Enter the Captcha code and click on Join.

That's it, Straight a way  you will get the option to integrate your site with InFoLinks. You will get 5 different option/platform to integrate - JavaScript, WordPress, Blogger, Drupal, and Joomla. I will  recommend you to choose JavaScript. Here you will get a code. Just Copy & paste the code right before the closing </body> tag of your site. You can also do this integration latter from Integration menu.


Integrate with Blogger Platform: If your are blogging on Blogger platform then follow the steps below to add the JavaScript to your blog...

  • First Sign Into Your Blogger Account and go to Dashboard.
  • Then go to Template >> Edit HTML and you will land on the HTML page of your blog.
  • Here find </body> tag and Paste the JavaScript code just before it.
  • Finally click on Save Template button.

The ads will not be shown on your site just after placing the code. Because after completing the signup and integration process then InFoLinks team will review your application within 48 hours. Once your application is approved, ads will start to show automatically and you will also be able to customize InFoLinks Ads.


Customizing InfoLinks Ads:

You can customize the available ad units of InFoLinks according to your site's design and color. Currently there are Five different ad format available in InFoLinks. Click on Customize menu and you will get these ad format. I'm writing brief description about these below...

  • InText Ads: This is the most popular ad format for what you will love to use InFoLinks ads on your site. InFoLinks algorithm scans your website pages to carefully select the most relevant keywords and show ads on them. You can show maximum 12 InText ads per page of your site. Choose the Link Style and Link color according to your site design.
  • InFold Ads: This is one of the most effective InFoLink Ad format. Actually it is a proven revenue booster. InFold shows ads at the bottom of the PC screen of your page. It only appear when needed, introducing itself to visitors with an unobtrusive overlay ad. A few seconds after it appears, it quietly shrinks down to a headline. But as this format disturbs the visitors you need to think twice before placing it. 
  • InTag Ads: This is one of the best ad format. Don't hesitate about placing this format, because it will never disturb your visitors. InTag recognizes the most valuable keywords within your content and display them line tag cloud. You can show one or two line ads and also choose the ad unit color.
  • InFrame Ads: Though this ad format will help you to increase earnings. But it will disturb your visitors very much also. It will display pop-out banner ads at the both side of your site, as result your visitors will definitely feel disturb buy this. On the other hand you can't customize the Ads behavior. So, it is better you should skip this ad format.
  • InScreen Ads: This is the most recent addition in the InFoLinks ad format. I don't have any idea about the result of this ad format. If you enable this ad format a full page layer ads will be shown. You can choose the Ad Trigger - Entrance,  Internal Pages and  Exit. And also can customize the color.

After customizing the ad formats make sure Turn On and Apply option is marked and finally click on Save button.

  • Payment Method: You will receive your payments via PayPal, Bank Wire, eCheck, Western Union, ACH (only for U.S. bank accounts) or Payoneer.

I can assure you that you will be very much satisfied of your earning with InFoLinks. In case of any problem don't hesitate to leave your valuable comment. 


Please Share This Post or At Least press g+1 on Every Post
Stay with www.iTTimesbd.com for more IT related post

Sunday, May 10, 2015

How to Create BackLinks by Commenting [->SEO<-]

create backlinks
If you're a regular Blogger, Webmaster or working on Search Engine Optimization then I am very sure that you're familiar with the name BackLink. But there are many beginners, who don't know much about BackLink and its Importance. My today's post is dedicated to them. In in this post I am gonna discuss about the importance of BackLinks and show you how to create BackLinks for Website and Blog is very simple and easy way.


BackLinks of a sites is one of the most essential part of Search Engine optimization, and it is one of the most important component considered by the Search Engines. The site having the higher BackLinks get the priority from the Search Engines in the search result. On the other hand BackLink is also help a site to get higher Alexa link. So, you can easily imagine that how important BackLinks for a site. By the way BackLinks is also effective trick to drive traffics to a site.


Backlinks, also known as incoming links, inbound links, in-links, and inward links, are incoming links to a website or web page. To define BackLink - The link of your site which is linked with another site is called BackKink. And creating BackLink is placing your site links on other site's - Comments, Guest Posting or Link Submit. There are several way you can create BackLinks. I have discussed 4 easy way below...

  • Commenting: This is the most common way to create BackLinks. Just comment on other website, blog, forum etc with your site's link. Make sure your comment is relevant, useful and attractive. Use anchor text HTML code to add your links to your comments.
  • Guest Posting: There are many website. blog and forum throughout the web where you can publish your post as Guest Author. And in your post you can place your site's related link. Which works as your site BackLinks.
  • Creating Accounts: There are many websites, blogs and forums let their users create an account with their own URL. So, create accounts on those sites using with your site URL to create BackLinks.
  • Like Submission: There are many free link submission sites available throughout the web. Submit your site link there. These submitted links will also be considered as BackLinks.


Commenting is the Easiest: Beside the above mentioned way there are many other way to create BackLinks. But my personal recommendation is Commenting. Because this is the easiest and successful way. All you need to write a relevant comment with anchor text.

If you want to create anchor text you will have to use specific code. There are two types of codes to create anchor text - HTML anchor text and BB code anchor text. HTML anchor text code used in HTML sites/blog and BB code anchor text is used in Forum comment.


Creating HTML Anchor Text:

  • Your Text: www.iTTimesbd.com - Your Ulrimate IT Partner
  • Your Link: http://www.ittimesbd.com
  • Anchor Text Code: <a rel="nofollow" href="http://www.ittimesbd.com"><b>www.iTTimesbd.com - Your Ultimate IT Partner</b></a>

Creating BB Code Anchor Text:

  • Your Text: www.iTTimesbd.com - Your Ulrimate IT Partner
  • Your Link: http://www.ittimesbd.com
  • BB Code Anchor Text: [url=http://www.ittimesbd.com]www.iTTimesbd.com - Your Ulrimate IT Partner[/url]

The result of these two code will be www.iTTimesbd.com - Your Ultimate IT Partner , and when someone will click on the link it will directed the visitors to your site. Before making commenting on any site include this code by changing text and link with yours.


Please Share This Post or At Least press g+1 on Every Post
Stay with www.iTTimesbd.com for more IT related post

Tuesday, May 5, 2015

Make Your Site Mobile-Friendly to Get Higher Rank!

Making Website Mobile Friendly
Very Recently Google has applied a new rules for website in their ranking system. From April 21, 2015 Google Search had started to consider mobile-friendliness of a site as a ranking signal. That means now the sites which is mobile friendly will get higher rank. As result of this new rule the following important changes is brought in the Google Search Result...

  • This change will affect mobile searches in all languages worldwide and will have a significant impact in Google Search results.
  • Users will find it easier to get relevant, high quality search results optimized for their devices.

I a have got to know about this new rule of Google Search Result a few days ago when I was signed in to my AdSense Account. I have got  a notification there saying - Your site's mobile-friendliness is now considered as a Google Search ranking signal. I have tested my site already and www.iTTimesbd.com have passed the Mobile-Friendliness test successfully - Result is below:

Testing Website Mobile Friendliness


Is your site Mobile-Friendly ? If you don't know then check it quickly. Google has an excellent Mobile-Friendly Test tool to check a site's mobile friendliness. This tool shows how Google Search sees your pages. Follow the steps below to check your site's Mobile-Friendliness...

  • Then Enter your site's URL in the box and click Analyze button

That's it within a few seconds you will get your site's Mobile-Friendliness test result. If the result is positive then nothing to worry about. But if the result is negative, then take sufficient steps as quick as possible to make your site Mobile Friendly.


Making a Site Mobile Friendly:

There is nothing that can be said to make a site mobile friendly. It is basically depends on the content management systems (CMS) that you are used to manage your websites or blogs. Webmasters use different website software packages like WordPress, Blogger, Joomla!, Drupal, Tumblr, Google Sites etc. to manage their sites.


As I'm not expert of these website software packages (CMS), that is why I can't suggest you any solution regarding these. And as a Blogger blogging on Blogger.com platform I can only provide solution for Blogger.com platform. But don't worry Google Developer guides on making sites mobile friendly will provide you complete solution. All you need just to select your website software package.


Useful Link to Make Mobile-Friendly Site:


Guide for Blogger.com Platform:

Sites/Blogs created on Blogger.com Platform, making them Mobile-Friendly is much easier. Because here Mobile Templates are privileged with Mobile-Friendliness by default. And there are some Mobile-Friendly templates available here. All you need just to Enable and choose your Mobile Template...

  • Sign Into your Blogger Account and go to Dashboard.
  • Then click on Template option.
  • Then click the Gear icon under Mobile.
  • Now select Yes. Show mobile template on mobile devices.

Mobile Friendly Templates of Blogger 

Choose Mobile Template: Here you can choose templates of you own choice from the different types of templates available here. All of them are Mobile-Friendly. You can also choose Custom, then your desktop template will be adapted for mobile devices. But I will recommend you to avoid the Custom option, because it may not work fine of mobile device.

  • Finally click on Save button to apply the template.

That's it, your site/blog is Mobile-Friendly now. But before come to any conclusion you must take a test of your site's / blog's Mobile-Friendliness Test.


Please Share This Post or At Least press g+1 on Every Post
Stay with www.iTTimesbd.com for more IT related post

Sunday, April 12, 2015

How to Setup Free Domain in Blogger [Exclusive]

Free domain for blogger
If you are regular reader of this site then you might have read the post that I had published after Adding Custom Domain in This Site. Actually adding custom domain is very important in a site/blog hosted on free platform like Blogger and WordPress. Earlier I had shown  how to add custom domain in Blogger from Godaddy. But today's post is something special, because in this post I am gonna show how you can add a Free domain to your Blogger blog.


The domain that I'm talking about is Dot TK domain. This domain is powered by FreeNom and it is completely free of cost for 1 to 12 months. Beside Dot TK domain FreeNom provide a few more free domain name. But Dot TK is most popular one. Below I'm presenting the list of free domain provided by FreeNom...
  • .TK
  • .ML
  • .GA
  • .CF
  • .GQ

It is always better to use a top level domain for a site. But as you all know to have a domain like .COM , .NET or .ORG you will have to pay yearly charge. I pay 16$ for the domain of this site - www.iTTimesbd.com yearly . So, if you want to add custom domain without spending money then why don't you try Free Domain. As using custom domain is very important - So, this Free Domain is like Something is Better then Nothing.


By the way don't worry about the domain quality. The domain provided by FreeNom is very good in quality like any other top level domain. Recently I have tested .TK domain on one of my Blog - FileBunker.Blogspot.com. And I have found this domain very convincing. 

Now Let's see how to Register a Free domain on FreeNom and Add it to Blogger Blog.

Note: The Registration and Setup procedure might be changed time to time. If you face any problem then don't hesitate to let me know.

Register A Free Domain:
  • Then Enter your desire name in the box and click on Check Availability.
  • Then click Get it now! on the domain you want to get and click on Checkout.
free domain Check Availability
  • Then in the next page at Period select 12 Months @ FREE
  • Then in the next page Enter your mail address and click on Verify My Email Address.
  • A verification like will be send to your mail address. Click on that link a new page will open.
  • Now in this page Enter the required information and click on Complete Order button by checking the Terms and Condition box.

That's it you will get your Order Confirmation Message. Now your Domain registration is completed - Let's see how you can add it to your Blogger blog.


Setup Custom Free Domain in Blogger:
  • Now Sign into your Blogger Account and go to Settings.
  • Here in Publishing >> Blog Address click on Set up a third-party URL for your blog.
blogger blog address
  • Then enter your Registered domain with www - like www.filebunker.tk
save free tk domain
  • Now click on Save button, you will get an Error and you will get two CNAMEs as shown in the image below. Keep these two CNAMEs, these will be required to verify the authority of your register domain.
free tk domain
  • Then from DOMAINS drop down click on My Domains.
my tk domain
  • Now in this page click on Manage Domain button of the domain which you are going to add to your blog.
  • Then in the next page click on Manage Freenom DNS and it will take you to the DNS MANAGEMENT page.
  • Here in the DNS MANAGEMENT page you will get one Record box. But as you have two CNAMEs So, click on More Records button to another record box.
  • Then Select CNAME in the both type, Then Enter both CNAME and Target Code you got on your Blog publishing section in the Name and Target box . Leave both TTL 14440. (Have a look at the image below , The codes shown in the below image will not work for you, because only your code will work for you)
  • Now gain click on More Records to add Four (4) more Record box and This time these four records type will A  and TTL will be 300. Now enter the following four IP address in the target box as it is shown in the image below.
tk domain setup in blogger
  • Then click on Save Changes button.

That's it the job is almost done. Now wait Wait around 5 to 10 minutes and then go to your Blogger Settings and try to save the domain as you have tried in the step above. This time the domain will be saved. Now view you blog and enjoy you Free Domain.


Stay with www.iTTimesbd.com for more IT related post

Tuesday, February 3, 2015

How to Customize Blogger Image Lightbox!

If you are blogging on Blogger platform then you can show your blog's images in light-box. There is an option in Blogger settings to showcase it's images in light-box. As a result of the image light-box, when you click any image on your blog that images will open in an overlay on top of your blog. If your post has multiple images, they will appear as thumbnails along the bottom.But sometimes you may have wanted to change the default design of blogger image light-box. If so, then you are in the wright post. In this post I am gonna show how to customize blogger image light box.

Blogger Image

Above image is the example of the default Blogger Image Light-box. If you don't like this design then you can customize it on your own taste. The CSS code that I am sharing, by adding it to your blog you will be able to change the entire look of the modal window: Background Color, Border of the Image, The Bar showing the thumbnail, Text within it, Close button and the transparency. All you have to do is to overwrite the default design and change it with yours. Lets see how to do the trick.

Warning: Before doing any kind of customization on your site's HTML page, I will recommend you to backup your site Template. To know more about Template backup Read This Post.

Customizing  Blogger Image Lightbox:
  • First Sign into your Blogger Account and go to Dashboard.
  • Then click on Template and then click on Edit HTML button. You will land on the HTML page.
  • Here in the HTML page find </head> tag and Paste the following code just Above it.
  <style>  
 /* Background Color */  
 .CSS_LIGHTBOX_BG_MASK {  
 background-color: #ffffff !important;  
 background-image: url(image-url-address) !important;  
 opacity: 0.8 !important;  
 filter: alpha(opacity=90) !important;  
 }  
 /* Images Border */  
 .CSS_LIGHTBOX_SCALED_IMAGE_IMG {  
 outline: 0px solid #fff !important;  
 -webkit-border-radius: 10px;  
 -moz-border-radius: 10px;  
 border-radius: 10px;  
 -webkit-box-shadow: 0px 0px 5px #000000;  
 -moz-box-shadow: 0px 0px 5px #000000;  
 box-shadow: 0px 0px 5px #000000;  
 }  
 /* Close Button */  
 .CSS_LIGHTBOX_BTN_CLOSE {  
 background: url(image-url-address) no-repeat !important;  
 width: 24px !important;  
 height: 24px !important;  
 }  
 /* Thumbnails Bar Color */  
 .CSS_LIGHTBOX_FILMSTRIP {  
 background-color: #eaeaea !important;  
 }  
 /* Text Color */  
 .CSS_LIGHTBOX_ATTRIBUTION_INFO, .CSS_LIGHTBOX_ATTRIBUTION_LINK {  
 color: #000 !important;  
 }  
 /* Index Info (number of images) */  
 .CSS_LIGHTBOX_INDEX_INFO {  
 color: #555555 !important;  
 }  
 </style>  

Customization: The blue Text explains to which Part the code belongs to. And you can modify the area of the lightbox from that part.
  • * Background Color * - You can change the Background color of the Lightbox and also can replace the background color with an image from here. To replace the background color with an image just Replace this line image-url-address with your Image URL. Below that if you decrease the opacity: 0.8 value the background will become more transparent.
  • * Close Button * - To change the icon for Close Button just Replace this line image-url-address with your icon Image URL.
  • * Index Info (number of images) * - To change the text color of image, just change the #555555 value.

  • Finally click on Save Template button to apply the design.

That's after customizing the image light-box, now view your blog and click on any image and see the result.


Stay with www.iTTimesbd.com for more IT related post