Showing posts with label Blogger Template Designer. Show all posts

Tuesday, February 3, 2015

How to Add a Widget Below First Post in Blogger!

Earlier I had shared two post important post on displaying Blogger Post on homepage - Show Blogger Posts in Gird Style and Adding Read More button to Blogger post. Now the question is why I am mentioning these posts. Actually the trick that I'm going to share in today's post very much goes with these two posts. If you are showing your Blog's posts in Gird Style or Automatic Summary then you will have to add a widget below first post to show any element like Adsense Ads. In this post I am gonna  show how to add a widget below first blogger post.


Normally you can add gadgets in your blog from the layout option, but you only can add the gadgets in that place where the design section allows you. So, if you want to add any widgets below the first blogger post then you need to add a gadget section in your Blogger Layout. By the way you can apply this gadget in any design, the above mentioned two design is not a requirement. And you can add such widget by using a simple HTML code that I'm sharing.
Blogger Widgets Placement
When you will add a gadgets section and show any widget below your first post then it will be look like the above image. If you are blogging on blogger platform then you can easily add a widget in your blog as show in that image. OK let's see how to do the trick.

Warning: Before doing any kind of customization on your site's HTML page, I will recommend you to backup your site Template. To know more about Template backup Read This Post.

Adding Widget Below First Blogger Post:
  • First Sign into your Blogger Account and go to Dashboard.
  • Then click on Template and then click on Edit HTML button. You will land on the HTML page.
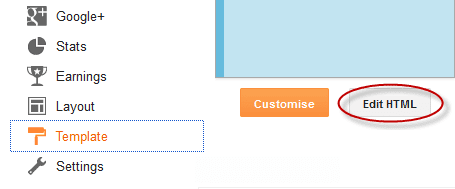
edit blogger template
  • Here in the HTML page find this line  <b:include data='post' name='post'/> and Just below it Paste the Following code.
  <b:if cond='data:post.isFirstPost'>  
 <div align="center" style="margin:10px auto;">  
 Here goes the code of the element you want to show  
 </div>  
 </b:if>  

  • Note: The Bold text indicates that where you will have to paste the code of the element. (eg. Adsense Ad Code)
  • Customization: The Red line in the above code is for Margin-Top and Margin-Bottom, this is in case if you want the element to move towards or away from the entire. You can also add any style like Background Color, Border etc.

  • Finally click on Save Template Button to apply it. (Preview to make sure Everything is OK)

That's it, Now view your blog and you will see that the added widget is appearing below the first post of your blog.


Stay with www.iTTimesbd.com for more IT related post

Monday, February 2, 2015

Show Blogger Post in Gird View with Thumbnail!

Recently I had shared a post on Adding Read More button with Thumbnails. And to day I am gonna show how you can Display your Blogger Blog post in Gird View Style with Thumbnail. Actually both of these Post displaying technique on Blog homepage are almost same. But the the design and the code that you will have to use for this Gird view style is different. When you apply the Gird View style in your blog the posts of your Blog will shown like the below example. Have a look at the Demo below.

Gird View Style with Thumbnail

If you are blogging on Blogger platform then you can apply this design on your Blog. As the result of the application of this Gird View style on your blog all the posts will be display as a thumbnail gird of image in homepage and archive pages. In the normal view style you can only afford to display a few posts on homepage. But in Gird view style you can display many post in a gallery with thumbnail and post title. If your blogging on Wallpaper or Photo then this style can give the maximum result. Let's see how to add this Gird view style on Blogger.


Warning: Before doing any kind of customization on your site's HTML page, I will recommend you to backup your site Template. To know more about Template backup Read This Post.

Adding Gird View Style to Blogger:
  • First Sign into your Blogger Account and go to Dashboard.
  • Then click on Template and then click on Edit HTML button. You will land on the HTML page.
edit blogger template
  • Here in the HTML page find </head> tag and Paste the following code just Above it.
 <script src="http://code.jquery.com/jquery-1.9.1.js"></script>  
 <script src="http://code.jquery.com/jquery-migrate-1.1.0.js"></script>  
 <b:if cond='data:blog.pageType == &quot;index&quot;'>  
 <script type='text/javascript'>//<![CDATA[  
 $(document).ready(function() {  
   var width = 200;  
   var height = 170;  
   var placeholder = 'https://blogger.googleusercontent.com/img/b/R29vZ2xl/AVvXsEiLtYbtwt3ER4nyweaoCEQO8yCaO02IZeH__KQeR5c9nAVH5LGodMLObauF2TZ_QFGGdfdtHXIb5z2e67nUCB_M5n8ArcTGx_Szhkj0kV4ogdqw2S3VzTIdbo5eoIYtCfeyu_-jsN-6hwY/s1600/no-thumb.png';  
   var margins = "0px 0px 10px 10px";  
   var fitThumb = 1;  
   var titleTopPadding = 5;  
   var titleBottomPadding = 8;  
   var titleLeftRightPadding = 5;  
   var titlePadding = titleTopPadding + 'px ' + titleLeftRightPadding + 'px ' + titleBottomPadding + 'px ' + titleLeftRightPadding + 'px';  
   $('.post-body').each(function(n, wrapper) {  
     var wrapper = $(wrapper);  
     var image = $(wrapper).find('img').first();  
     var link = wrapper.parent().find('h3 a');  
     var linkURL = link.attr('href');  
     var linkTitle = link.text();  
     $(link).remove();  
     wrapper.empty();  
     if (image.attr('src')) {  
       var thumbHeight = image.attr('height');  
       var thumbWidth = image.attr('width');  
       var thumbParent = $(image).parent();  
       wrapper.append(thumbParent);  
       if (fitThumb) {  
         image.attr({  
           src: image.attr('src').replace(/s\B\d{3,4}/, 's' + width + '-c')  
           });  
         image.attr('width', width).attr('height', height);  
       } else {  
         image.attr({  
           src: image.attr('src').replace(/s\B\d{3,4}/, 's' + width)  
           });  
         image.attr('width', width);  
         var changeHeight = (thumbHeight / thumbWidth * width).toFixed(0);  
         image.attr('height', changeHeight);  
       }  
     } else {  
       var image = $('<img>').attr('src', placeholder).attr('height', height).attr('width', width);  
       var thumbParent = $('<a>').append(image).appendTo(wrapper);  
     }  
     thumbParent.attr('href', linkURL).css('clear', 'none').css('margin-left', '0').css('margin-right', '0').addClass('postThumbnail');  
     var thumbTitle = $('<div>').prepend(linkTitle).css('padding', titlePadding).css('opacity', '0.9').css('filter', 'alpha(opacity=0.9)').css('width', width).appendTo(thumbParent);  
     var ptitleHeight = thumbTitle.height();  
     var summary = parseInt(ptitleHeight) + parseInt(titleTopPadding) + parseInt(titleBottomPadding);  
     thumbTitle.css('margin-top', '-' + summary + 'px');  
     wrapper.css('float', 'left').css('height', height).css('width', width).css('margin', margins).css('overflow', 'hidden');  
   });  
   $('#blog-pager').css('clear', 'both');  
 });  
 function hideLightbox() {  
   var images = document.getElementsByTagName('img');  
   for (var i = 0; i < images.length;++i) {  
     images[i].onmouseover = function() {  
       var html = this.parentNode.innerHTML;  
       this.parentNode.innerHTML = html;  
       this.onmouseover = null;  
     };  
   }  
 }  
 if (window.addEventListener) {  
   window.addEventListener('load', hideLightbox, undefined);  
 } else {  
   window.attachEvent('onload', hideLightbox);  
 }  
 //]]>  
 </script>  
 <style>  
 .post {  
   border-bottom: 0 dotted #E6E6E6;  
   margin-bottom: 0;  
   padding-bottom: 0;  
 }  
 h2,.post-footer {  
   display: none;  
 }  
 a.postThumbnail div {  
   text-decoration: none;  
   color: #fff;  
   font-size: 12px;  
   font-weight: bold;  
   text-transform: capitalize;  
   background: rgb(125,126,125);  
  /* Old browsers */  
   background: -moz-linear-gradient(top, rgba(125,126,125,1) 0%, rgba(14,14,14,1) 100%);  
   background: -webkit-gradient(linear, left top, left bottom, color-stop(0%,rgba(125,126,125,1)), color-stop(100%,rgba(14,14,14,1)));  
  /* Chrome,Safari4+ */  
   background: -webkit-linear-gradient(top, rgba(125,126,125,1) 0%,rgba(14,14,14,1) 100%);  
   background: -o-linear-gradient(top, rgba(125,126,125,1) 0%,rgba(14,14,14,1) 100%);  
   background: -ms-linear-gradient(top, rgba(125,126,125,1) 0%,rgba(14,14,14,1) 100%);  
   background: linear-gradient(to bottom, rgba(125,126,125,1) 0%,rgba(14,14,14,1) 100%);  
   filter: progid:DXImageTransform.Microsoft.gradient( startColorstr=&#39;  
   #7d7e7d&#39;, endColorstr=&#39;#0e0e0e&#39;,GradientType=0 );  
 }  
 a.postThumbnail:hover div {  
   display: block;  
 }  
 .post-body img {  
   background-color: transparent;  
   border: 1px solid transparent;  
   padding: 0px;  
   -webkit-border-radius: 12px;  
   -moz-border-radius: 12px;  
   border-radius: 12px;  
   opacity: 1;  
   transition: opacity .25s ease-in-out;  
   -moz-transition: opacity .25s ease-in-out;  
   -webkit-transition: opacity .25s ease-in-out;  
 }  
 .post-body img:hover {  
   -ms-filter: &quot;  
   progid: DXImageTransform.Microsoft.Alpha(Opacity=70)&quot;  
   ;  
 filter: alpha(opacity=70);  
   -moz-opacity: 0.7;  
   -khtml-opacity: 0.7;  
   opacity: 0.7;  
 }  
 </style>  
 </b:if>  

Customization:
  • To modify the Thumbnail size, change width = 200 and height = 170 value.
  •  Replace the image URL in Red with your own, to change the default thumbnail when there are no image.

  • Finally click on Save Template button to apply the Gird view style.

That's it, Now view your blog and you will see that your blog's posts are showing in nice Gird View style.


Stay with www.iTTimesbd.com for more IT related post

Friday, July 18, 2014

How To Remove Borders From Blogger Image


We blogger very often has to use images in the blog post to make it more understandable. The better use of these images can make a blog more successful. To ensure the better uses of these images you can customize these images in different points. I this post I am gonna show how to remove borders from blogger image.

Removing Borders From Blogger Image

Blogger user can can make image border color transparent from Blogger Template Designer. But in this way you can not remove image border completely. As an example you can look at the above two image. The border color of the left image is made transparent by Blogger Template Designer. As a result you can see this image still has shadow border.

But the right image has no border at all. And In this post I will show how you can remove the blogger image border completely. It is very easy task to do. You just have to add a simple CSS code in your Blogger Template. Lets see how to do it...

  1. First Log Into your Blogger Account and got to Dashboard.
  2. Then click on Template and then click Customize button.
  3. Then from the Left Panel select Advance option.
  4. Now from the Right Panel select Add CSS option. Then you will get a Add custom CSS box at the right side.
  5. Then Copy the below CSS code and Paste it into the Add custom CSS box.


  6. Now click on Apply to Blog button  to apply this code.
adding css code in blogger

That's it. Now view your blog and you will see that your blog image border is removed.


Stay with www.iTTimesbd.com for more IT related Post

Wednesday, June 4, 2014

Customize Blog Design by Blogger Template Designer

Hello blogger, If you are blogging on blogger.com platfor then you should be familler with the Blogger Template Besigner option. Blogger Template Designer is a built in option of blogger.com by which a blogger can easily customize their blog template. In this post I am going to discuss about customizing a blogger blog by Blogger Template Designer.


Customizing Blog Design


About Blogger Template Designer:

This is an excellent blogger option that let you to customize everything regarding your blog design. This is very easy to use. Only if you use blogger default templates then you can customize your blog design by Blogger Template Designer. Advantages of Blogger Template Designer are as follows.
  • You don't have to have any coding knowledge.
  • Very easy and User friendly interface.
  • You can easily get back to the earlier design.

Options Available In Template Designer:
  • Templates: Using this option you can change your blog template from available templates.
  • Background: Using this option you can change your blog template's background and it's color.
  • Adjust Widths: Using this option you can change the width of your entire blog and sidebar.
  • Layout: Using this option you can rearrange the layout of your blog.
  • Advance: Using this option you can customize a lot of thing like Font size, style, color, Gadgets, Tabs, Post Footer etc.

Customizing Your Blog Design: 
First you will have to sign in to your blogger account. Then follow the below path to get into the Blogger Template Designer location.

Blogger Dashboard>>> Template>>> Customize. Then you will be land on the following interface.

Customize Blogger Blog Design

I think if you have a minimum blogging experience then you can easily customize your blog design. But I want to write something about it.

  • Templates: There are Seven different types of templates available in this templates section. These are Simple, Dynamic views, Picture Windows, Awesome Inc. Watermark, Ethereal, Travel. You should a template which mostly fit with you blog category.
  • Background: Every blogger templates has a main and background theme. Here in this option you can customize the background theme and color. There are a lot of Background image available here. Use the background image which is related to your blog category.
  • Adjust Widths: Here you can customize the widths of your entire blog and its sidebar. Don't make your blog too wide that exceed 1024×768 resolution screen. I think the the entire blog should to within 1000px to 1100px and the sidebar should be 300px to 325px.
  • Layout: Here in this section you can customize the Body and Footer layout of your blog. There are eight types of body layout and three types of footer layout available. You can determine how many sidebar and where they will be placed and how many footer you will use in your blog. I prefer one sidebar at the right side and two footer.
  • Advance: This is the most important and critical section of the template designer. Using this option you can customize almost everything which will be displayed on your blog body. The most important thing you can customize here Page text and color, Blog title and description, Tab Text, Link color, Post Footer, Gadgets etc.

Tips: Before start editing you must let the preview load completely. Otherwise you will not be able to see the preview of the changes that you are making. After customizing anything you will have to click Apply to Blog button to apply the changes on your blog.

I hope now will be able to customize your blog design by yourself. Still you need to know any thing regarding this topic then don't forget to leave your valuable comment.


Stay with www.iTTimesbd.com for more IT related Post 

Wednesday, January 1, 2014

TechPlus - Highly Responsive Free Blogger Template!

This is for the first I'm sharing Templates for Blogger in this site. As you all know the importance of having proper templates according to the site contents. So, to make your effort much easier from today I will try to collect and share free Blogger templates with you. If your are blogging on Blogger platform and if your site is Technology or IT related then the template that I'm sharing can be proper choice for your site. The name of the Template is TechPlus. Let's have a look at the below image to get an idea about the design of this template.

blogger  template


Download | Live Demo

Features:
  • Three (3) column.
  • Two (2) Sidebar: Right and Left.
  • Ads Ready - At the right side of the site header.
  • Slideshow.
  • Social Bookmarking icon at the top.
  • Simple and cute custom search box.
  • Excellent layout design.
  • Compatible with: Chrome, Firefox, Internet Explorer and many more.
  • And above all very fast loading and SEO friendly. 


Installation Instruction: The template is stored in a zipped folder including Slider code. So, all you need to do is Download and Unzip the folder and upload the XML file to your blog. If you don't know how to install a Blogger template then read the post below....


How to Customize the Menu: Most templates have a menu that can only be edited from the HTML page of the blog (Dashboard → Design → Edit HTML or Dashboard → Template → Edit HTML). So, go to your blog HTML page then find the menu with their name and link and replace them with your name and URL.


Stay with www.iTTimesbd.com for more IT related post

Monday, December 30, 2013

How to Upload Template to Blogger (Exclusive!)

A website or blog template is a pre-designed webpage that is generally created web designing code like HTML and CSS. But that's not discussion point of this post, in this post I'm gonna discuss about how to upload and install template. If you are blogging on Blogger platform then you might know that it supports XML template. Though there are enough templates available in Blogger.com, but still if you want then you use custom template in your blog created by you or downloaded from the web.


Choosing a Blogger Template:

There are several website available on internet who are providing free templates for Blogger users. Among them btemplates.com is the most popular to the Blogger, as because this site has a huge collection of free Blogger templates. All the templates shared in this site are stored Zipped folder. So, all you need is Download and Unzip the Template folder and you will get XML file to upload to your blog. After collecting the Template, follow the below steps to upload or install it to your Blogger blog.

Warning: Before doing any kind of customization on your site's HTML page, I will recommend you to backup your site Template. To know more about Template backup Read This Post.

How to Install Blogger Template:
  • First Sign into your Blogger Account and go to Dashboard.
  • Then click on the Template option.
  • Now here click Backup / Restore button located at the right top.
  • Then a Template > Backup/Restore window will open.
  • Now here in this window click on the Browse button and choose the XML file of the template.
  • And finally click on Upload button.
blogger templates


Now wait for a few second and when the template is uploaded, view your blog to check it.


Alternative Way to Upload Blogger Template:

Sometimes it may happens that you can't upload Template to your blog. In such case you can try the following way to setup the template.

  • First Right click on the Template XML file and open it on Notepad.
  • Then Copy the full template code from the Notepad.
  • Now go to your Blogger account.
  • Then click on Template option and click Edit HTML button.
edit blogger template
  • Now here in the HTML page click anywhere and press Ctrl+A to select the full code.
  • Then Press Ctrl+V to paste the XML template code (copied from notepad) over the current code.
  • Finally click on the Save Template button.

That's it, this time also wait a few seconds to let the template to be saved. After that view your blog to check.


Stay with www.iTTimebd.com for more IT related Post

Saturday, September 14, 2013

How to Adjust Blogger Width by Template Designer!

How To Change Blogger Blog Width
Blogger or Website owner always want to modify and decorate their site. Basically the modification is needed to get the perfect look of a site. And adjusting blog or website width is one of the way to decorate your site. Suppose, you need to increase or decrease your blog width to fit your post and images with your blog homepage. In such case you have to adjust your blog width. In this post I am gonna show how to adjust blogger width.


If you are blogging on Blogger Platform then you can easily adjust your blog width very easily. By default Blogger has a Template designer by witch you can adjust your Enter blog width and sidebar width. Let's see hot to do it...


How to Change Blogger Blog Width:
  • First Sign into your Blogger Account and go to Dashboard.
  • Then click on Template option and click Customize button. Wait a bit to load the interface completely.
  • Then click on Adjust Width option from right panel.
    • Then you will get two options to adjust your Blog. One is for Entire Blog and the other one is for the Sidebar. If your blog has two sidebar then you will get adjusting option for both Sidebar.
Template Designe
  • Now move these option bar to adjust you Entire Blog and Blog's Sidebar width.

Extra Tips: Don't make your blog too wide that exceed 1024×768 resolution screen. I think the the entire blog should to within 1000px to 1100px and the sidebar should be 300px to 325px.


Stay with www.iTTimesbd.com for more IT related Post

Friday, September 13, 2013

How to Remove Blank Space Above Blog Header!

We all use blog to share our views and information and many other things. And Blogger is one of the most popular blogging platform. We want to design or decorate our blogger template as we want. But in default Blogger template you need to fix several thing to get a decent look. One of the most common issue is with blank space above the Blog Header. In the earlier post In had shown How To Off Navbar Of BogSpot.

After turning of the Navbar in your blog , if you have close look at the above of your blog you will see that there is an unnecessary space in place of navigation bar. In todays post I am gonna show how to remove blank space above blog header. Before that make sure that you have already off the navigation bar from your blog. To know more...How to Hide Blogger Navbar Manually

Demo:
Blank Space Above Blog Header


Without Blank Space Above Blog Header


Warning: Before doing any kind of customization on your site's HTML page, I will recommend you to backup your site Template. To know more about Template backup Read This Post.


Removing blank space above Blogger Header:
  • First Sign into your Blogger account and go to Dashboard.
  • Then click on Template option.
  • Then click on Edit HTML button. You will land on your Blog HTML page
    edit blogger template
  • Then here Find </head> tag and Paste the following code just Above it.
     <style type='text/css'>  
     .content-inner   
     {   
     margin-top: -40px !important;   
     }  
     </style>  
  • Finally click on Save Template button to apply the change.


Stay with www.iTTimesbd.com for more IT related Post