
The MultiColored Popular Post Widget will be as like as you can see in the image below.

As you can see in the above image that it is really an awesome MultiColored Popular Post widget. It is so attractive that it can easily attract the visitors and as a result you will able to get more page-views. But the most interesting thing is that you don't have to create or add any extra gadget to your blog to add this widget. All you need is just to add a simple CSS script to your blog. And as a result the popular post of your blog will be shown in different colorful display.
- Applies To: Blogger.com platform.
- Requirement: Make sure that the official popular post widget is already added to your blog. If you don't know how to add this widget then Read this Post
Warning: Before doing any kind of customization on your site's HTML page, I will recommend you to backup your site Template. To know more about Template backup Read This Post.
Stylize the Popular Post Widget to Multicolor:
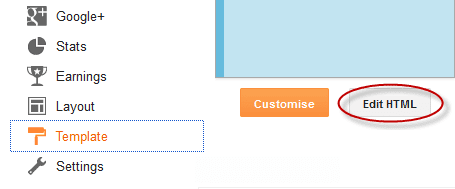
- First Sign into your Blogger Account and go to Dashboard.
- Then click on Template option and click on Edit HTML button. You will land on your blog HTML page.
- Here in the HTML page find ]]></b:skin> and Paste the following code just Above/Before it.
 #PopularPosts1 ul{margin:0;padding:5px 0;list-style-type:none}
 #PopularPosts1 ul li{position:relative;margin:5px 0;border:0;padding:10px}
 #PopularPosts1 ul li:first-child{background:#ff4c54;width:90%}
 #PopularPosts1 ul li:first-child:after{content:”1″}
 #PopularPosts1 ul li:first-child + li{background:#ff764c;width:87%}
 #PopularPosts1 ul li:first-child + li:after{content:”2″}
 #PopularPosts1 ul li:first-child + li + li{background:#ffde4c;width:84%}
 #PopularPosts1 ul li:first-child + li + li:after{content:”3″}
 #PopularPosts1 ul li:first-child + li + li + li{background:#c7f25f;width:81%}
 #PopularPosts1 ul li:first-child + li + li + li:after{content:”4″}
 #PopularPosts1 ul li:first-child + li + li + li + li{background:#33c9f7;width:78%}
 #PopularPosts1 ul li:first-child + li + li + li + li:after{content:”5″}
 #PopularPosts1 ul li:first-child + li + li + li + li +li{background:#7ee3c7;width:75%}
 #PopularPosts1 ul li:first-child + li + li + li + li + li:after{content:”6″}
 #PopularPosts1 ul li:first-child + li + li + li + li + li +li{background:#f6993d;width:72%}
 #PopularPosts1 ul li:first-child + li + li + li + li + li + li:after{content:”7″}
 #PopularPosts1 ul li:first-child + li + li + li + li + li + li +li{background:#f59095;width:69%}
 #PopularPosts1 ul li:first-child + li + li + li + li + li + li + li:after{content:”8″}
 #PopularPosts1 ul li:first-child + li + li + li + li + li + li + li +li{background:#c7f25f;width:66%}
 #PopularPosts1 ul li:first-child + li + li + li + li + li + li + li + li:after{content:”9″}
 #PopularPosts1 ul li:first-child:after,
 #PopularPosts1 ul li:first-child + li:after,
 #PopularPosts1 ul li:first-child + li + li:after,
 #PopularPosts1 ul li:first-child + li + li + li:after,
 #PopularPosts1 ul li:first-child + li + li + li + li:after,
 #PopularPosts1 ul li:first-child + li + li + li + li + li:after,
 #PopularPosts1 ul li:first-child + li + li + li + li + li + li:after,
 #PopularPosts1 ul li:first-child + li + li + li + li + li + li + li:after,
 #PopularPosts1 ul li:first-child + li + li + li + li + li + li + li + li:after{position:absolute;top:20px;right:-15px;border-radius:50%;background:#353535;width:30px;height:30px;line-height:1em;text-align:center;font-size:28px;color:#fff}
 #PopularPosts1 ul li .item-thumbnail{float:left;border:0;margin-right:10px;background:transparent;padding:0;width:70px;height:70px;}
 #PopularPosts1 ul li a{font-size:12px;color:#444;text-decoration:none}
 #PopularPosts1 ul li a:hover{color:#222;text-decoration:none}
 #PopularPosts3 img{
   -moz-border-radius: 130px;
   -webkit-border-radius: 130px;
   border-radius: 130px;
   -webkit-transition: all 0.3s ease;
   -moz-transition: all 0.3s ease;
   transition: all 0.3s ease;
 padding:4px;
   border:1px solid #fff !important;
   background: #F2F2F2;}#PopularPosts1 img:hover {
   -moz-transform: scale(1.2) rotate(-560deg) ;
   -webkit-transform: scale(1.2) rotate(-560deg) ;
   -o-transform: scale(1.2) rotate(-560deg) ;
   -ms-transform: scale(1.2) rotate(-560deg) ;
   transform: scale(1.2) rotate(-560deg) ;
 }
- Finally click on Save Template button to complete the process.
That's it, Now view your blog and you will be able to see that the widget is showing the popular post in multicolor. If any problems with this trick don't hesitate to ask.
Stay with www.iTTimesbd.com for more IT related post
No comments:
Post a Comment