
Toolbar is a widget or gadget on which various types of buttons, menus or icons are placed. Basically on a website's toolbar there are all kinds of social and important links are presented. The visitors of a website's can get all the necessary links of a website. In this post I am gonna show you the importance of a website's toolbar and how to create it for your website.

A custom toolbar is very important for a website because it helps the visitors to engage with a website very easily and it's also increase the locality of the visitors. If the visitors found your toolbar useful then they will use it in their browser. It also helps you to increase your site ranking.
There are a lot of way that you can create a custom toolbar for your website, But my personal choice is Alexa. The importance of creating custom toolbar for your website on Alexa is presented below.
Creating a Custom Toolbar:
That's it. Now your Toolbar is available for download. Place the download button on your page where visitors can easily find and download your website's toolbar.

Alexa toolbar is now working on Google Chrome, Firefox and Internet Explorer browser. Hope in future it will support in more browser. Don't forget to leave your valuable comment regarding this post.
A custom toolbar is very important for a website because it helps the visitors to engage with a website very easily and it's also increase the locality of the visitors. If the visitors found your toolbar useful then they will use it in their browser. It also helps you to increase your site ranking.
- Related Posts: How To Increase Website Rank In Alexa
There are a lot of way that you can create a custom toolbar for your website, But my personal choice is Alexa. The importance of creating custom toolbar for your website on Alexa is presented below.
- The first thing is that it completely free and easy to use.
- You can monitor the usages of your toolbar.
- The most important thing is that alexa is a well known website ranking site.
- Alexa give more importance to the site which use Toolbar and widgets of Alexa.
Creating a Custom Toolbar:
- At first go to Alexa and create an account. It's very easy to create. Or if you already have an alexa account then skip this step and follow from the below step.
- Then go to the alexa Toolbar Creator.
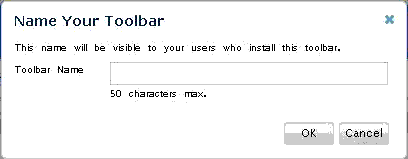
- Then in the popup window type the Toolbar Name. You can also skip the step, because you can type the name letter.
- In this page the first option is Build Your Toolbar By Adding Buttons. Here click Edit Name button to edit your Toolbar name and click Your Logo Here to add a logo in your toolbar.
- The next option is Add buttons that drive traffic to your website. Here you can add 4 buttons. Add only the important button. Due to the space limitation you can't add all buttons.
- The last option is Add social networking buttons. Here you can add Facebook and Twitter button. Add these buttons if have any Facebook and Twitter page of your website.
- After adding the above buttons click Next.
- Now in this page you will find Add buttons for things that your users do everyday. Here I recommend you to add your personal twitter and gmail button. After adding these buttons click Next.
- Then in this Toolbar Control page You can add a custom icon for your toolbar or use use the default icon. Then click Next.
- Here you will see Your Toolbar is Configured!, Then click Next.
- You are almost done. In this page type something describing you toolbar. Then click I'm Ready, Publish Now button to publish your toolbar.
Placing Toolbar Download Button on Your Site:
Go to here Toolbar Dashboard. Then click on your Toolbar. And here you will find your toolbar in different shape and color in step 1 and 2. Then from the step 3 copy HTML code and paste on your page from where visitors can easily find and download it.
iTTimesbd.com Toolbar:
At the time of writing this post I have also created a toolbar for this site www.iTTimesbd.com. Download my my site's toolbar by clicking the below image.
Alexa toolbar is now working on Google Chrome, Firefox and Internet Explorer browser. Hope in future it will support in more browser. Don't forget to leave your valuable comment regarding this post.
Stay with www.iTTimesbd.com for more IT related Post
No comments:
Post a Comment