Showing posts with label Facebook. Show all posts

Friday, June 17, 2016

Facebook Lite APK for Android [Latest & Updated]

Facebook Lite APK
Facebook has some official Apps for the Android mobile users. Facebook Lite is one of them. Though Regular Facebook App is the first choice of Android Mobile users, but if you're using limited data plan then Facebook Lite is the perfect choice for you. With Facebook Lite you can enjoy faster Facebook experience with all the regular Facebook features, but by using less Data consumption.


About Facebook Lite:
  • App Name: Facebook Lite
  • Category: Social App
  • Last Updated: June 6, 2016
  • Requires Android: 2.2 and up
  • File Type: APK File 
  • Offered By: Facebook

Features of Facebook Lite:
  • Installs Fast – the app is smaller, so it's quick to download and uses less storage space.
  • Uses Less Data - be more efficient with your mobile data. Save money by using less data.
  • Works on All Networks - it is designed for 2G networks and areas with slow or unstable internet connections.
  • Loads Quickly - it is our fastest app. Upload photos faster and see updates from friends.
  • Works on Old Android Phones - you can use it on older Android phones not supported by the regular Facebook app
 

Facebook Lite APK


Download > Install > Start Lite Facebooking:
  • Download the APK file from link given below.
  • Then Unzip the Facebook Lite zipped folder.
  • Now Move the APK file to your Phone Storage.
  • (If you have downloaded the APK file directly from your Phone then proceed from the next step)
  • Now Tap on the APK file to Install and complete the instillation normally. 
  • (If it ask then allow installation from unknown sources from Settings > Security > Device Administration > Unknown Sources > Allow it.
  • After completing the Installation Open the Facebook Lite App and Start Facebooking with less data consumption.


Download Links:

Please Share This Post 
Stay with techie-asif.blogspot.com for more IT related post

Thursday, May 5, 2016

Facebook Messenger for Windows PC [LATEST]

FB Messenger PC
Facebooking becomes very popular craze nowadays. Actually I should say it becomes very regular habit. And the Messenger is the most popular feature of Facebook. Basically Facebook Messenger is mostly used on Mobile platform. But the PC version of Facebook Messenger is also great fun to use. In this post I'm gonna share PC version of Facebook Messenger for Windows PC.


About Facebook Messenger for PC:

  • Name: Facebook  Messenger for PC
  • Version: v1.4.3 
  • File Type: EXE File.
  • Supports: Windows any Version
  • File Size: 28 MB

Features of Facebook Messenger (PC):

  • Sounds (can be disabled in settings)
  • Desktop notifications (enable them in settings)
  • Voice and video calls
  • Badge with the number of notifications in the dock/taskbar
  • Auto-launch on startup
  • Native notifications (all platforms)
  • System tray icon on Windows
  • 3 themes: Default, Dark and Mosaic
  • Auto-hide the left sidebar
  • Open links in browser or new window
  • Preferences in the right-click context menu (tray menu for Windows)

PC facebook messenger Features


Download > Install and Start Messaging:
  • Download the Setup file from the link given below.
  • Then Install the messenger normally.

Once the installation is completed, Run the messenger and Enter your Facebook Email and Password to Sign in. And after signing in, now you're re completely ready to communicate from your PC Facebook Messenger. So, start chatting, voice calling and video calling...Enjoy :)

PC facebook messenger Sign in


Download Links:


Please Share This Post 
Stay with techie-asif.blogspot.com for more IT related post

Wednesday, January 28, 2015

How to Block Someone on Facebook Group!

How to Block Someone on Facebook Group
Group is one of the popular feature of the most popular social networking site Facebook. Actually this feature of Facebook is one of my most favorite. Basically among the Facebook Page and Group feature I like Group feature more because here you don't have to collect member, you can add member directly from your friend list. Personally I am admin of a few Facebook group. Sometimes a Admin need to remove or block someone from the group. In today's post I am gonna show how to remove or block someone from a group.

There are several reasons for what a admin has to remove/block a member from his Facebook Group. Recently on our college Facebook Group one my friends started to share status that were not related to the topic of the topic. Though I had tell him but he didn't stop it. That is why I had to remove/block him from the Group. But when he requested me I had added him back, because at the end of the day he is my friend. Lets see how I had done this steps.

Only an Admin can Remove/Block a Member from a Facebook Group


Remove or Block Someone from Facebook Group:
  • First Log into your Facebook Account and go to your Facebook Group.
  • Then click on Members tab located at the top. And find the member you want to remove.
  • Then click on Setting icon  beneath the member's name and select Remove from Group.
  • Now to Block the member you're removing, check the box that says Block Permanently.
Facebook Group Members Area
Note: Removed members will have to request to join the group again if they wish to rejoin. Blocked members won't be able to find the group in search or see any of its content, and they can't be added to the group again by members.

Unblock the Blocked Member on Facebook Group:
  • Again go to your Facebook Group.
  • Then click on Members tab located at the top.
  • Then click on the All Members dropdown menu.
  • Then Select Blocked.
  • Now click on Remove Block under the person's name.
Facebook Group All Members area

That's is now the blocked member will be unblock and he will be able to use your Facebook Group as he did earlier.

I hope now you can easily manage your Facebook Group and easily can remove/block member from your Group. Also you can unblock the blocked member.


Stay with www.iTTimesbd.com for more IT related Post

Friday, January 16, 2015

How to Download Facebook Videos Online!

download facebook video
Facebook is world's no.1 social networking site. Status updating and sharing photos is very common activities of Facebook users. But nowadays video sharing tendency is getting popularity. And it becomes a great source of important videos. Sometimes you may had wanted download videos from Facebook. Though downloading videos from Facebook is very easy task, but it is not as common task as downloading videos from YouTube. In this post I'm gonna show how to download.

There are several way by which you can download videos from Facebook. Among them the easiest way to download Facebook Videos directly from online. There are several site available on internet that allow you to download Facebook videos online. SaveFrom.net is such an website by which you can download your favorite Facebook Videos. You ca also download YouTube videos from here. Lets see the download procedure...


Downloading Facebook Videos Online:
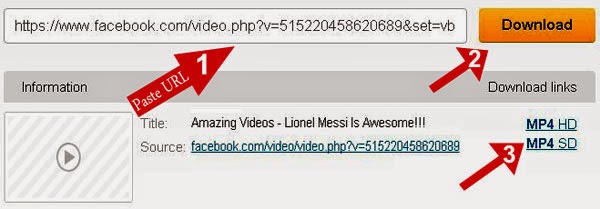
  • First go to this site SaveFrom
  • Then paste your Facebook Video URL in the Enter the URL box.
  • Then click on the Download button.
  • Then you will see link of that videos in different format and size at right.
  • Now click any one of these download link and the download will begin.
facebook video downloader

That's it now you can download your favorite Facebook Videos very easily. This site supports more than 30 popular sites. So, beside Facebook and YouTube you can download videos from those sites too.


Stay with www.iTTimesbd.com for more IT related Post

Saturday, October 18, 2014

Facebook Recommendation Feed Widget for Blogger!

Facebook has a huge numbers of active users. Which makes it as the great source of online traffics. That is why blog and website owners are connecting their sites to Facebook to get maximum visitors connectivity. Nowadays Facebook social plugin are most powerful for website or blog. These social plugin having great feature also increase site's traffic through Facebook. Facebook has several social plugin for website and blog. Earlier I had shared Facebook Activity Feed Plugin. Today I am sharing Facebook Recommendation Feed Plugin.

Facebook Recommendation Feed Widget is one of the popular Facebook widget for blogger. Actually it is one of the successful Facebook Plugin which produce a great number of traffics for sites. This Facebook Recommendation Feed widgets is a box in which it display the most recommended posts of your site, using actions (such as likes) by your friends and other people. Let's see how to add this widget in Blogger...

DEMO:--->
Facebook Recommendation bar


Adding Facebook Recommendation Feed Widget:

Create an Facebook APP:
  • First go to here to create an Facebook APP and click on Create New App button.
  • Then enter a Valid App name and Select App Category. And then click on Continue to create the app.
    create fb app
  • Your app is almost ready, Now go to App Setting and Enter your site URL.
    enter website url
  • Finally click on Save Changes and Note down your App ID.

Installing FB Recommendation Widget:
  • Sign into your Blogger Account and go to Dashboard.
  • Then click on Layout option and click Add a Gadget link.
  • Then from the Gadgets list choose HTML/JavaScript.
  • Now Paste the following code in the content box.
    • Replace APP- ID with your APP ID and http://www.ittimesbd.com with your site's URL.

    <div id='fb-root'/>
    <script>
    //Facebook Recommendation bar by www.mybloggerlab.com
    //<![CDATA[
    (function(d, s, id) {
      var js, fjs = d.getElementsByTagName(s)[0];
      if (d.getElementById(id)) return;
      js = d.createElement(s); js.id = id;
      js.src = "//connect.facebook.net/en_US/all.js#xfbml=1&appId=APP-ID";
      fjs.parentNode.insertBefore(js, fjs);
    }(document, 'script', 'facebook-jssdk'));
    //]]>
    </script>
    <b:if cond='data:blog.pageType == &quot;item&quot;'><b:if cond='data:blog.pageType != &quot;static_page&quot;'><div style='z-index:999999; position:absolute;'>
    <fb:recommendations-bar action='like' max_age='0' num_recommendations='3' read_time='10' side='right' site='http://www.ittimesbd.com' trigger='40%'/></div>
    </b:if></b:if>

  • And finally click Save button to complete the addition.

That's it. Now view your blog and you will see that a Facebook recommendation bar appearing at the right bottom corner of your site.


Stay with www.iTTimesbd.com for more IT related Post

How to Add Facebook Comment Box in Blogger!

I always say that commenting is the best way to increase the engagement of visitors with a site. If you are blogging on blogger platform then you know that blogger has a default commenting system. But limited users can/want to comment using blogger commenting option. To increase comment in your blog you use such platform by which you can inspire more user to comment. Facebook is such platform. There are several I have published on Blogger Commenting System. In this post I am gonna show How to Add Facebook Comment Box in Blogger.

Facebook developer always try to make user experience more better with its features. That is why they introduce several plugins like Facebook Like box, button for blogger and website. If you add Facebook comment box in your blog then the visitors can comment on your blog via Facebook account. Beside that when someone comment via his Facebook account then the commented post automatically comes in his news feed. Which increase chances for getting more visitors. Let's try the trick...


Adding Facebook Comment Box in Blogger:

Create an Facebook App:
  • First go to here to create an Facebook App.
  • Then enter a Valid App name, Namespace and Select App Category. And then click on Continue to create the app.
    Create FB App
  • Then click on Disabled button of Sandbox Mode.
    App ID
  • Now click on Save button and  Note down your App ID.

Installing Facebook Comment Box in Blogger
  • Sign into your Blogger Account and go to Dashboard.
  • Then click on Template option and then click on Edit HTML button. You will land on the HTML page.
  • Here in the HTML page find <html and Replace it with the below code.

  • <html xmlns:fb='http://www.facebook.com/2008/fbml'

  • Then find </body> tag and Paste below code just Above it.
    • Replace APP-ID with your Facebook APP ID.
      <div id='fb-root'/>
      <script>  
      window.fbAsyncInit = function() {    FB.init({      appId  : &#39;APP-ID&#39;,     
      status : true, // check login status
      cookie : true, // enable cookies to allow the server to access the session     
      xfbml  : true  // parse XFBML    });  };   
      (function() {    var e = document.createElement(&#39;script&#39;);     
      e.src = document.location.protocol +   &#39;//connect.facebook.net/en_US/all.js&#39;;   
      e.async = true;     
      document.getElementById(&#39;fb-root&#39;).appendChild(e);    }());
      </script>

  • Now find </head> tag and Paste below code just Above it. And Replace the following...
    • iTTimesbd - With your Blog Title Name
    • Blog-Logo-Image - With your Logo Image
    • APP-ID - With your Facebook App ID
    • iTTimesbd - With Facebook Page Username
      <meta expr:content='data:blog.pageTitle' property='og:title'/>
      <meta expr:content='data:blog.url' property='og:url'/>
      <meta content='iTTimesbd' property='og:site_name'/>
      <meta content='Blog-Logo-Image' property='og:image'/>
      <meta content='APP-ID' property='fb:app_id'/>
      <meta content='http://www.facebook.com/iTTimesbd' property='fb:admins'/>
      <meta content='article' property='og:type'/>

      This above code will give better appearance to blog in Facebook News Feed when someone comment on your blog.

Placing Facebook Comment Box in Blogger:
  • Now find <b:includable id='comment-form' var='post'> code and Paste the following code just Below it.
    • Note: In case if are not able to find above searched code or in case if comment box not appear then find <div class='post-footer'> (You will find this line for two times) and paste the following code just Below the second one.

    • <b:if cond='data:blog.pageType == &quot;item&quot;'>
      <div style='padding:0px 0px 0px 0px; margin:0px 0px 0px 0px;'><script
      src='http://connect.facebook.net/en_US/all.js#xfbml=1'/>
      <div>
      <fb:comments colorscheme='light' expr:href='data:post.url'
      expr:title='data:post.title' expr:xid='data:post.id'
      width='530'/></div>
      <div style='color:#fff;
      background-color:#3B5998;border: solid 1px #ddd; font-size:10px;
      padding:3px; width:520px;'>Facebook Blogger Plugin by <b><a
      alt='blogger templates' href='http://www.safetricks.com'
      style='text-decoration:underline; color:#fff;' target='_blank'
      title='blogger templates'>Safe
      Tricks</a></b></div></div>
      </b:if> 

    • Customization: Adjust the comment box width='530' and width:520px as you need.
  • Finally click on Save Template button to apply it.

Hiding the Blogger Comment Box: If you don''t want to use both the Blogger Comment box and Facebook Comment box together in your blog then follow the below steps to hide it.
  • Go to your Blogger Setting and choose Post and Comments option.
  • Then change Comment Location to Hide and then click on Save Settings button.

That's it. Now view your blog. If you have complete the whole procedure correctly then you will see Facebook comment box in your blog.


Stay with www.iTTimesbd.com for more IT related Post

Saturday, July 5, 2014

Add Facebook Activity Feed Plugin To Blogger

As we all know Faceboook is the social networking site with more than one billion registered users. That is is why Facebook is one of the best online traffics. There are several Facebook plugins for blogger by which you can increase and engage your site's traffics. Today I am sharing one of popular and effective Facebook plugin for blogger. It is Facebook Activity Feed Plugin.


This Facebook Activity Feed plugin displays post and also recommends new stories which are liked by your visitors friends. As a result it increase the social engagement of your visitor about your site, If you're using Facebook recomendation bar then it will also display recommendation along with the recent like.

Facebook Activity Feed for Blogger


Adding Facebook Activity Feed To Blogger:
  1. First Log Into your Blogger Account and got to Dashboard.
  2. Then click on Template.
  3. Then click on Edit HTML and you will land on your blog HTML page.
  4. Here in the HTML page Find <body Tag.
  5. Now Copy the below Code and Paste it just below the above mentioned body tag.

  6. <div id="fb-root"></div> 
    <script>(function(d, s, id) { 
      var js, fjs = d.getElementsByTagName(s)[0]; 
      if (d.getElementById(id)) return; 
      js = d.createElement(s); js.id = id; 
      js.src = "//connect.facebook.net/en_US/all.js#xfbml=1"; 
      fjs.parentNode.insertBefore(js, fjs); 
    }(document, 'script', 'facebook-jssdk'));</script> 

  7. Then click on Save Template button to save the template.
  8. Now click on Layout and click Add a Gadget where you want to place this gadget.
  9. Then from the gadgets list Select HTML/Javascript.
  10. Now Copy the below code and Paste it in the Content box.

  11. <div class="fb-activity" data-site="http://www.iTTimesbd.com" data-width="300" data-height="450" data-border-color="#ffffff" data-header="false" data-recommendations="true"></div> 

  12. Then click on Save button to save the gadget.

Customization:
  • Replace http://www.iTTimesbd.com with your website/blog URL.
  • The default width and height of this gadget is 300 and 450. You can customize it as you need. Just change the value of the Width and Height.
  • If you want this plugin not to display recommendation stories then just Replace true with false.

That's it. Now visit your site and you will see the plugin is displaying the Facebook activity.


Stay with www.iTTimesbd.com for more IT related Post

Friday, July 4, 2014

Touch Me - Social Sharing Widget for Blogger

There are a lot of social sharing tools and services are developing day by day because of the rapid advancement of social media and the growing interest of the people on social networking sites. Website owner and bloggers are using these tools on their sites because web traffic from social media have overtaken search traffic.

Touch Me Sharing Widget

A social sharing widget is more effective when it can attract the visitors. To help you to increase blog traffic by social media today I am sharing a attractive social sharing widgets from blogger named Touch Me. The name Touch Me is because as you can see in the above image that the social buttons are moving when the mouse cursor is moving over them. As a result it inspire the visitors to follow you site's social page.


Adding Touch Me Sharing Widget To Blogger:
  1. First Log Into your Blogger Account and go to Dashboard.
  2. Then click on Layout.
  3. Now click on Add a Gadget button where you want to place this widget.
  4. Then select HTML/Javascript.
  5. Then Copy the below code and Paste it in the Content box.
  6. Then click on Save button.
<style>
/*--------Touch Me Sharing Widget ------*/
.touchme a {
display:block;
height:50px;
width:50px;
padding:0 4px;
float:left;
background:transparent url(http://mybloggertricks.googlecode.com/files/Sharing%20Touch%20Me.png) no-repeat;
-webkit-transition: ease-in 0.2s all; 
-moz-transition: ease-in 0.2s all; 
-o-transition: ease-in 0.2s all; 
-ms-transition: ease-in 0.2s all; 
transition: ease-in 0.2s all;
cursor:pointer;
}
.touchme a.googleplus {
background-position: 0px -58px;
}
.touchme a.googleplus:hover {
background-position: 0px 0px;
}
.touchme a.twitter {
background-position: 0px -290px;
}
.touchme a.twitter:hover {
background-position: 0px -232px;
}
.touchme a.facebook {
background-position: 0px -406px;
}
.touchme a.facebook:hover {
background-position: 0px -348px;
}
.touchme a.rss {
background-position: 0px -174px;
}
.touchme a.rss:hover {
background-position: 0px -116px;
}
</style>
<div class='touchme'>
<!--RSS-->
<a class='rss' href="YOUR RSS LINK" rel='external nofollow' target='_blank'></a>
<!--Google Plus-->
<a class='googleplus' href="YOUR GOOGLE PROFILE LINK" rel='external nofollow' target='_blank'></a>
<!--Facebook-->
<a class='facebook' href="YOUR FACEBOOK LINK" rel='external nofollow' target='_blank'></a>
<!-- Twitter -->
<a class='twitter' href="YOUR TWITTER LINK" rel='external nofollow' target='_blank' ></a>
</div> 


Customization:
  • Replace YOUR RSS LINK with your Feedburner link.
  • Replace YOUR GOOGLE PROFILE LINK with your Google+ URL.
  • Replace YOUR FACEBOOK LINK with your Facebook URL.
  • Replace YOUR TWITTER LINK with your Twitter Profile URL.

That's it. Now visit your site and you will see the widget on your site. Move your mouse cursor over these icon.


Stay with www.iTTimesbd.com for more IT related Post

Thursday, July 3, 2014

Add Facebook Like Button Below Blogger Post Title

Currently social networking is the most popular thing people do online. And Facebook is the most popular of them. If you are a blogger then Facebook is the best way to engage your visitors with your blog. There are several Facebook gadget that you can place on your blog. I have published a few of them.


In this post I am sharing a simple but very much useful Facebook like widget for blogger. Today I will show how to add Facebook like button below of your blog post titles. As a result the visitors of your site can easily like your post and you can also come to know the popularity of a post.

Add FB Like Button Below Post Title


Placing Facebook Like Button Below Post Title:
  1. First Log Into your Blogger Account and go to Dashboard.
  2. Then click on Template and click Edit HTML. Then you will land on your blog HTML page.
  3. Here in the HTML page find the below Line.

  4. <div class='post-header-line-1'/> 
  1. You will find the above line for Two times on the HTML page. Now Place the below Facebook Like code After the both line.

    <iframe allowTransparency='true' expr:src='&quot;http://www.facebook.com/plugins/like.php?href=&quot; + data:post.url+ &quot;&amp;layout=standard&amp;show_faces=false&amp;width=100&amp;action=like&amp;font=arial&amp;colorscheme=light&quot;' frameborder='0' scrolling='no' style='border:none; overflow:hidden; width:450px; height:40px;'/>

  1. Now click Save Template button.

Customization: You can change the width and height of the button. To do this just change the value of the Width and Height of the code shown in the red letter.

That's it. Now view your site you will see Facebook Like button just below your Blog post titles. If still have any problem then don't forget to leave your valuable comment.


Stay with www.iTTimesbd.com for more IT related Post

Wednesday, July 2, 2014

How to Turn Off Facebook Email Notifications

Facebook send you email for every notification. So that you can get update of Facebook without entering your facebook account. You get email for all Facebook notification, As a result your email account get overload very quickly. Facebook has an option to turn off such email notifications.

The email id that you have used to open your Facebook account, It automatically get email for your every facebook notification. All your Facebook notification may not important. So, it is not necessary get email for all Facebook notification.

Stop Facebook Email Notification

When you open any social account, the first task is to turn off the unnecessary email notification. You should allow the mail notification which are related to your account security. In this post I am gonna show how to turn off unnecessary Facebook email notification and how to get only Facebook security related email notification.

  1. First Log into your Facebook account.
  2. Then Click  at the top right of your homepage and select Settings.

    Fb account settings
  3. Then in the left menu, click Notifications.
  4. Then go to Email and click Edit.
  5. Now here Choose the second option "Only Notification about your account, security and privacy".

    fb notification option

  6. Then a popup window will open. Here click Turn Off to confirm.
  7. At the end click Close button and exit.

That's it. From now you will only get email for your facebook account security and privacy notification.


Stay with www.iTTimesbd.com for more IT related Post

Sunday, June 8, 2014

How to Stop Showing Your Likes on Facebook News Feed

Facebook is the most popular and complete social networking site. It engage their users by matching their interest. You may have noticed that when your friend like a page or comment on a post then facebook show this like and comment on your news feed or notification as recommendation. In this post I am gonna  show how to stop this Facebook recommendation. Before this I want to discuss more about this.

Stop Showing Your Likes On News Feed

Why Facebook Show Your Likes:

Facebook is completely free to use. The main source of its earning is advertising and selling Likes. Facebook sales different like package to Facebook Page owner. And most likes facebook collect from Likes recommendation. When you like a page on Facebook than facebook try to attract your friend to like the same page.

Why You Should Stop This:

The advantage of this feature is almost zero. The only advantage is, Its only match your interest with your friends. The main and the most important disadvantage of this feature is that it create problem with your Facebook privacy. Because your friends will always get recommendation from Facebook what you're liking on Facebook. So, you should stop showing your likes on Facebook news feed to ensure your privacy on Facebook.

How To Stop Showing Your Likes On Facebook:
  • First Log Into your Facebook Account.
  • Now got to your Facebook Timeline and click on More and then click on Likes.

    FB timeline more option

  • Then click in this page click on Manage button and then click on Edit Privacy.

    Fb privacy manage option

  • Then Edit Privacy of Likes window will appear on your screen. Here select Only Me in both Other and Interest option.
Now no one will able to know about your Likes on Facebook 

Then you will have to change the settings to stop showing your profile on Facebook advertisement. To do this follow the below steps.
  • Go to Settings. And in the Settings page click on Ads from the left panel.
  • Now in the Facebook Ads page click Edit button of the Ads and Friends option.
  • Then here select No One and click Save Changes.

    FB settings option

That's it. Now the privacy about your Facebook likes will be completely secured. If you have any query then don't forget to left your valuable comment.


Stay with www.iTTimesbd.com for more IT related Post

Thursday, May 22, 2014

Facebook Popup Like Box For Blogger [With Timer]

We all know that Facebook is the largest social networking site and it is also best place to expand your online audience. If you are a blogger or website owner then you must have to have a Facebook page of your site. There are several post was published in this site regarding facebook fan page and Facebook like box. You will find these post in the Facebook section.

Facebook Popup Like Box Timer

Having a Facebook page and implementation of Facebook like box on your site is not enough. You need to have good amount of likes on your page. Sometimes it grows naturally and sometimes you need to collect them. There are several way of implementing Facebook like box on a site but I think Popup like box is the best of all.


About This Facebook Popup Like Box
Popup Facebook likebox can boost the like because it attract and force the visitors to like your Facebook page. This like box is different from the other like box because This box comes with Timer, fast loading, well shaped. This box will automatically close after 10 seconds. Most important thing is that you can customize this box as you need.


Adding Facebook Like Box With Timer To A Blogger Blog:
To add this Facebook Like box in your blogger blog you need to install JQuery plugins. If you have already installed then no need to install it again, just skip this steps. But if not then follow the below steps to install JQuery plugins in blog.
  1. First Sign In to your Blogger Dashboard.
  2. Then click on Template.
  3. Then click Edit HTML button and you will land on your blog HTML page.
  4. Then here find </Head>.
  5. Now Copy the below Script and Paste it just before the </Head> tag.
  6. Then click on Save Template.


After installing the JQuery plugins it is time to add the Facebook like box in your blog. Follow the below steps.
  1. Now click on Layout option.
  2. Then click on Add a Gadget.
  3. Then from the gadget list Select HTML/Javascript.
  4. Now Copy the below code and Paste it in the Content Box
  5. And click Save button to complete the process.


Customization:
  • Change Username: In the above code find FacebookPageUsername and replace this line with your facebook page username. 
  • Timer: By default this like box will appear for 10 seconds. To customize the time find var sec = 10 and change 10 to any other digit as you want.

That's it. After completing this above process correctly now view your blog and you will see the Facebook Popup Like Box.


Stay with www.iTTimesbd.com for more IT related Post.

Monday, March 17, 2014

How To Send Voice Messages On Facebook!

Facebook is the largest and most popular social networking. People basically use Facebook to make himself socially connected. Facebook has some exceptional features for their users like Share, Text messaging and Video calling. But still Facebook users are missing something, like voice messaging. Day by day voice messaging is getting popularity and there was always a demand from the Facebook users to have voice messaging.

Facebook Voice Message

Recently Facebook has added voice messaging feature. Earlier we can make text chat, text comment and we also can use emos and images. Beside that using Facebook voice messaging now we can send voice message and make voice comment too.

Facebook voice messaging option is automatically enabled in Android and Iphone Apps. But users of the Facebook from computer have to use a simple Extension to make voice chat and comment. Only the Google Chrome Browser users can use this Facebook voice chat and comment feature. Because this extensions is only available for Google Chrome users. Let's see how to do it.


Follow the below steps to Use Facebook Voice Message:
  • For Computer Users:
  1. You need to have Headphone with Microphone from voice recording.
  2. At first go to here Talk & Comment.
  3. Then Install this Extensions in your Google Chrome Browser. After installing the extensions correctly then Restart your Browser
  4. Then Log in to your Facebook account. If everything is Ok then you will see Voice Messaging Button in your Facebook Comment and Chat option like below image.

    Voice Messages On Facebook

  5. Now when you want to make Voice Chat or Voice Comment just Hold Down the Voice Messaging Button to Record and Release when Done.
NB: After releasing button Voice Message will automatically be send from the Chat box. But at Facebook comment a link will automatically be generated after recording is done, Then just Press Enter to send the voice comment.

  • For Android and Iphone Users:
  1. At first go to a conversation and Tap this  button next to the box where you write a message.
  2. Then Tap Record Voice.
  3. Then Touch and Hold the Red Record Button and then Start Speaking.
  4. Then Release the Record button and your voice message will sent immediately.
  5. If you want to Cancel the recording then just Slide your finger from the record button before releasing.


Stay with www.iTTimebd.com for more IT related Post

Sunday, February 23, 2014

How To Delete Facebook Account Permanently!

Though Facebook is the best social communication media, but sometimes we need to leave the Facebook forever. In that case you have to delete your Facebook account. In my earlier post I had shown How To Deactivate Facebook Account Very Easily.

delete my facebook account

Normally a person deactivated his Facebook account when the condition is not very serious. But the person need to delete his Facebook when the condition gets worse and no other option is left. So, in this post I will show How To Delete your Facebook Account.


Follow the below steps to Delete Facebook Account:
  1. At first Login to your Facebook Account.
  2. Then go to this link Delete Facebook Account.
  3. Then click on Delete My Account option.

    Delete My fb account

  4. Then a window will open and you will have to Enter the Captcha code and Password.
  5. Now click Okey.

    permanently delete my facebook account

That's it. Now you are out of Facebook and your Facebook Account will be Deleted.


Stay with www.iTTimebd.com for more IT related Post