Showing posts with label Pen Drive. Show all posts

Saturday, December 27, 2014

How to Make a Bootable USB Drive by WiNToBootic!

Make a Bootable USB Drive
There are several way, by which you can make Bootable Windows USB drive but the best and easiest way is to use software. As we all know that without Bootable windows disk or drive, it is not possible to install windows in a PC. Earlier I had share NeroInfra-Recorder and Rufus. In this post I am gonna share WiNToBootic. And today I am gonna show how to make Bootable USB drive by WiNToBootic.

WiNToBootic is a freeware that allows you an easy creation of bootable Windows USB hard or flash disk from an ISO image, CD/DVD or Folder. This software is focused on creation of boot disks based on several versions of Microsoft Windows. WiNToBootic will help you to make Bootable USB drive from Window ISO Image file. You need to have the following requirement to make USB drive by WiNToBootic.


Requirement:
  • A USB Flash/Pen Drive. (8 GB Recommended)
  • Windows ISO Image File. (Read this post ISO Creator for Help)
  • WiNToBootic software. (Bootable USB Windows Drive Creator)

Create Windows ISO Image File: If you have your Windows ISO Image file then skip this step and proceeds from the next step. If you don't have your Windows ISO Image file then you will have to create it. If you don't know how to Create a Windows ISO Image File then Read this post on Creating Window ISO Image File.
Download Now


Download WiNToBootic software from the above download link. The software is only 874 KB. I am sharing the software is in a zipped folder. I am also sharing the portable version of this software. So, you don't need to install it. You just have to Download and Unzip the software folder. Then double click on WiNToBootic.exe to run it. Now follow the following steps to make Bootable USB drive by WiNToBootic.


Making Bootable USB Drive by WiNToBootic:
  • First Insert the Flash/Pen Drive into your PC.
  • Then Run the WiNToBootic software.
  • Your Pen/Flash Drive will automatically be selected. Now Mark the Quick Format option, If you want to format your Pen/Flash drive.
  • Then at the right site click on Drop Source option and Select the Windows ISO Image file, or simply drag and drop the ISO file.
    WiNToBootic Do It option
  • Then click on Do it! , a message will appear asking if you are sure? , click Yes, and another message with formatting warning will appear, click OK.
  • The software will start to Format the drive and make the drive bootable. 
WiNToBootic Making Bootable USB
  • Finally the when the process is completed, click on Thanks!

Now you can use this Bootable USB drive to install windows in any PC. If you don't know how to install windows from USB drive then read last part of this post on How to Install Windows from USB Drive.


Stay with www.iTTimesbd.com for more IT related Post

Tuesday, October 14, 2014

How to Install Windows from USB Drive!

Install Windows from USB
Most of us used to installing windows in PC from windows disk. But I think installing windows from pen drive or flash drive is seems to me very easy. And recently I have installed windows 10 in my PC. I will write about windows 10 installation letter. There are a few simple steps you need to complete to install windows in your PC from USB drive. In this post I am gonna show hot to install Window in PC from USB drive.

Related Post:

If you have a Laptop, Notebook or Desktop which don't have DVD drive, if your PC's DVD drive is not working properly, then you can use your Pen/Flash drive to install windows in that PC. As you know that without Bootable Windows Disk you can't install windows in your PC, like that you can't also install windows in your PC from USB drive without making it bootable. So, you required to have a Bootable Windows USB drive.


Required Tools:
  • A USB Flash/Pen Drive. (8 GB Recommended)
  • Windows ISO Image File. (Read this post ISO Creator for Help)
  • Rufus Software. (Bootable USB Windows Drive Creator)

Create Windows ISO Image File: If you have your Windows ISO Image file then skip this step and proceeds from the next step. If you don't have your Windows ISO Image file then you will have to create it. If you don't know how to Create a Windows ISO Image File then Read this post on Creating Window ISO Image File.

Create Bootable USB Drive:
  • First Insert the Flash/Pen Drive into your PC.
  • Then Run RuFus. (Download Rufus if you don't have)
  • Then Select the following...
    • Device - Your Flash/Pen Drive.
    • Partition Scheme - for BIOS or UEFI computers.
    • File System - NTFS.
    • Cluster Size - Default.
    • New Volume Label - Type your Windows Name.
    • Select Quick Format.
    • Select Create a Bootable Disk using ISO Image and click on CD icon and Select your Windows ISO Image File.
    • Select Create Extended Labels and Icon Files.
      Rufust - Creates bootable usb disk
  • Finally click on Start button to start the operation.

This operation will take a few minutes to complete. When it will complete you will get a confirmation message. Done!


Install Windows From USB Drive: There are two way you can Install Windows in your PC from USB drive. One is from BIOS setting and other one is directly from the Booted USB Windows Drive. Lets see the both procedure. Make sure that your Bootable USB Windows Drive is connected to your PC.

From BIOS Setting:
  • First Restart your PC to access to the BIOS settings. You need to press F1, Del or Esc key to access the BIOS settings. This Key can be different from Mainboard to Mainboard.
  • Then you need to find The Boot Priority or The Boot Order option. This option also can be different depending on the BIOS version .
  • Then you have select - Boot from USB Drive to install windows from your USB drive. Now Save and Exit from BIOS. And your PC will take Restart, you will see the following message...

    Press any key to boot from USB...
  • Finally press Enter to start the windows installation.

Directly From Bootable USB Drive:
  • Open you Bootable USB windows drive and Double click on Setup. It will take a few seconds for preparing the windows for installation.
  • Then Complete the further steps to complete the Windows Installation.

At the times of installation your PC will take restart for several time, Don't worry it is the part of installation process. If you face any problem, please don't hesitate to leave a comment . . .


Stay with www.iTTimesbd.com fore more IT related Post

Sunday, March 23, 2014

How to Use Pendrive as RAM ! SpeedUp Your PC

use pendrive as ram
RAM stands for Random Access Memory. Basically the processing speed of a computer depends on it's RAM size. There are many programs that requires lots of memory during operation. It is a nightmare for the low RAM computer.


To solve this you can add additional RAM to your computer. If your computer does not have the option to add additional RAM then what to do? In such case you can solve the low RAM problem by using your Pendrive or USB drive as your computer RAM.

If you use your Pendrive or flash drive as your computer RAM then your computer system will be faster and as a result your computer performance will be increased. Today I will show How To Use Pendrive As RAM.

Follow the below steps to Use Pendrive As RAM
Requirement: A Pendrive with minimum 2GB storage capacity. Make sure that your Pen Drive is Empty. If not then Format your Pen Drive.
  1. At first insert your Pen Drive into your computer.
  2. Then click Right Mouse button on My Computer and go to Properties.
  3. Then here in the System Properties click Advanced Tab.
  4. Then click on Settings option of performance.

    system properties option

  5. Then here in the Performance Option click Advanced Tab.
  6. Then click Change option of virtual memory.

    System performance option

  7. Then here Select your Pen Drive.
  8. Then click on Custom Size radio button. (Here you will see Initial and Maximum size. This size basically depends on your Pendrive memory capacity. So, change this limit according to your Pen Drive limit).

    visual memory option

  9. Then click the Set button and then click OK button.

That's it. Now restart your computer and your computer speed will increase.

how to use pendrive as ram how to use pendrive as ram in windows 10 how to make pendrive as ram how to convert pendrive into ram how to increase ram using pendrive how to use pendrive as ram in windows 7 how to use pendrive as ram for gaming how to convert pendrive to ram in windows 10 how to use a pendrive as ram how to increase ram in laptop using pendrive how to increase ram with pendrive how to make pendrive as ram in windows 10
Stay with TecHie-ASiF for more IT related post

Tuesday, January 21, 2014

How to Format a Virus Affected USB Drive!

Earlier I had shared a complete post on formatting USB drive. There are several reasons for what you need to format your USB drives. Sometime it may happen that you are trying to format your USB drive, but you can't. The most common reason for what a USB drive can't be formatted is, if it is affected with virus. In this post I am gonna show how you can format your virus affected USB drive like Pen Drive and Flash Drive very easily.


Generally when you need to format an USB drive we open My Computer >> Right click on the Drive >> and Choose Format. But if your USB drive is affected with virus then this regular process of format will not work for this USB drive. In such case there is another option named Disk Management Tool to format virus affected USB drive. But make make sure that your computer is secured with a strong and reliable security software.

Note: Make sure that your USB drive (Pen Drive or Flash Drive) is connected to your PC.

Formatting USB Drive by Disk Management:
  • First right click on My Computer from the desktop and select  Manage option.
  • Then here in this window at the right panel click on Disk Management.
Disk Management Tools
  • Now the drive that you want to format, Right click on it and choose Format.
Disk Management List of Drive

That's it. In this method you will definitely be able to format any kinds of USB drive.


Stay with www.iTTimesbd.com for more IT related post

Wednesday, December 4, 2013

How to Create a Password Reset Disk (W-7,8)

password reset disk
Most of the users of the windows PC use password on their desktop to laptop computer. And personally I also like to use password in my PC and also support using password on PC. Because this not only ensure privacy but also ensure ensure your PC's security. But problem create when you forget or loose the password. But don't worry the trick that I am gonna share in this post will help you to easily reset your windows password without having much trouble.


Normally when you forget or loose your windows password, then either you can get access by breaking password or by re-installing the windows. But there is another method by which you can easily get access to your windows when you loose or forget the password. The method is creating password reset disk. If you are using windows 7 or 8 then you can easily create password reset disk here. And today I am gonna show how to create a password reset disk in Windows 7 and 8.


Applies:
  • Windows 7
  • Windows 8

Requirement:
  • A Pen Drive or USB Drive.


Make sure your USB Drive is connected to your PC


Creating a Windows Password Reset Disk:
  • First go to Control Panel > All Control Panel Items > Users Accounts
  • Then click Create a Password reset disk.
windows 8 password reset
  • Then in the Forgotten Password Wizard click Next.
  • Now Select your Pen Drive Name and click Next.
  • Then in the Current User Password section enter the current password if any. Otherwise leave it blank.
  • Then wait to complete processing and click Next and then click Finish.

That's it your USB drive is created as Password reset disk. Now open your USB drive and look for a 2 KB file named userkey.psw. This is the file that can help you to reset the password. Don't delete it.

How to Reset Password by Reset Disk:

Now restart your PC and try to access it by entering a wrong password. You'll see the Reset Password option. Click on it and type a new password. And from now you can use this password. You can change the windows password as many time as you wish by the same password reset disk.


Stay with www.iTTimesbd.com for more IT related post

Friday, November 29, 2013

Unable to Format Pen Drive? (Format Guaranteed)

Unable to Format Pen Drive
If you are trying to format your pen drive or other removable storage devices like memory cards, flash drives, or external HDD, but your are not able to format it, then you are in the wright post. There are several reasons for what sometimes you may not be able to format your USB drives. Reason can be anything but sometimes the problem can be very irritating. And I hope and I can also say sure that the solution that I am gonna show in this post will definitely help you to get rid of this USB drive format problem.

There are several way by which you can format your pen drive or other removable storage devices like memory cards, flash drives, or external HDD on your windows PC. As I said before sometimes you can not format these drives by using Quick Format option of your PC. But still before formatting your USB drives by any other format method you should Quick Format option at least once. Then you can use the following methods. If the first one is not working then try the next one.


Quick Format: Insert your pen drive into your PC. Then from My Computer click Right button on the USB drive and select Format. Now mark the Quick Format box and click on Start button.

Note: Make sure that your USB drive is connected to your PC.


Methods to Format USB Drives:
Using Command Prompt:
  • First open the RUN option. (Press Windows Key+R to open RUN). 
  • Then here type CMD and press Enter. Command prompt dialog box will open. 
  • Then in the command prompt box type format and give an <space> then type your pen drive letter after : and press Enter. Suppose your pen drive letter is P, then type format :P and press Enter. 
  • Then will have to press Enter again to start the format process.
The format process will take a few minutes to complete depending on the data that the drive has. So, be patience, it will format your pen drive completely. 

In case this method is not working then your should try the following software to unlock your USB drive. Because you can't format your USB drive until your unlock it. This software will unlock your USB drive so that you can format it. Beside that you will get confirmation that your USB drive is locked or not.


Using Unlocker Software:
  • First get the software from here Unlocker (It's only 394 KB) 
  •  Then install the software in your PC.
  • Now click right mouse button on  the Pen Drive and select Unlocker. 
  • Then click Yes in the next step. A new window will open to Unlock your pen drive. 
  • If your pen drive is locked then from No action select Delete and click Ok or Unlock it. If your pen drive is not locked then you will  have a confirmation message.

After unlocking your pen drive click right mouse button on your pen drive and click Format to format your pen drive.


Stay with www.iTTimesbd.com for more IT related Post

Tuesday, November 19, 2013

How to Remove Shortcut Virus from PenDrive (CMD)

pendrive shortcut virus

Shortcut virus is one of the most problem that PC, flash drive or pen drive users face. It is very hard to find a PC or Pen-drive user who don't have faced shortcut virus problem. Basically shortcut virus spread from PC to PC via pen drive. Sometimes when you share your pen drive with your friends or when you use others pen drive in your PC, then shortcut virus may catch your pen drive. In this post I'm gonna show to how to remove shortcut virus from pen drive.

There are several way you can remove shortcut virus from your pen drive or flash drive. But one of the most success way to to remove shortcut virus from pen drive, it to use CMD command. I have also shred USB Fix shortcut virus remover in this site. Today's post I am gonna show how to remove shortcut virus from pen drive using CMD command.


Remove Shortcut Virus from Pendrive:
  • First insert the Pendrive into your PC that affected with shortcut virus.
  • Then open the Run option (Press Windows Key+R).
  • Then type CMD in Run and press Enter. A command prompted will open. 
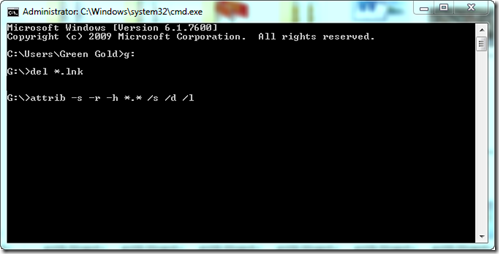
  • In the opened command prompt, Type your Pendrive Drive's letter as shown in the below image.
  • For Example: If your Pendrive Drive's letter is G. Then type G: and press Enter. (To find the Pendrive Drive's letter just go to My Computer and check your drive icon) 
 shortcut virus removal
  • Then type del *.lnk and press Enter.
  • Finally type attrib -h -r -s /s /d g:\*.* and press Enter. (Replace g with your Pendrive drive's letter)

That's it. Now wait a few seconds, Then open and check your drive. Your folders will be retrieved.

Other Post Related To PC-Solution

Stay with www.iTTimesbd.com for more IT related post

Wednesday, October 30, 2013

How to Partition a USB Drive (EaseUS Partition Master)

EaseUS Partition Master
USB flash drive and memory card are the common types of the removable storage device. They are used for the storage of the data. The main reason for using the removable storage device is the ease of portability. That is the ease with which the data can be transferred. The data is of importance and is necessary for the movement in some cases. In another post I had introduced Easeus Data Recovery Wizard Pro. And in this post I am introducing EaseUS Partition Master, by which you can make partition in your USB drive.

EaseUS Partition Master works with removable storage device. You can enjoy the partition management on the removable storage device as the same as the hard disk, such as resize/move partition, copy partition, create partition, delete or wipe partition for USB flash drive, memory card, SD card, etc.

The Windows built-in Disk Management provides limited features for USB flash drive management. It is not possible to resize USB flash drive with Windows Disk Management freely. A third party partition manager software like EaseUS Partition Master is necessary to resize USB flash drive.


Resize Partition On USB Drive:
  • Download EaseUS Partition Master and install it. Click on the below download link to download the trial version of this software.
 Download EaseUS Partition Master
  • After completing the installation, launch EaseUS Partition Master.
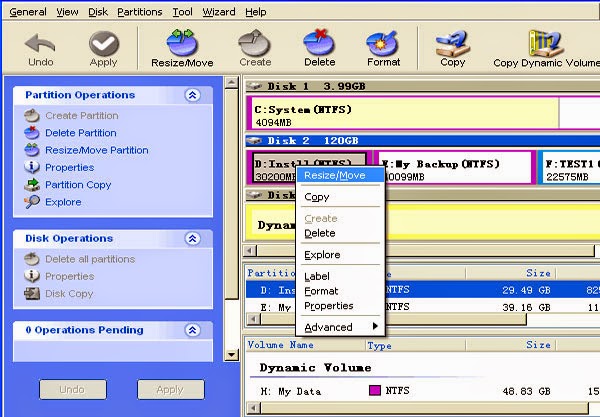
  • Then Select the partition on the USB flash drive.
  • Then Right click the selected partition and select Resize/Move partition.
  • Then Drag the boundary of the partition to any size you want.
  • Finally click on Apply and You will have a smaller partition.
USB Partition Move

You can not only resize your USB drive but also can format, create, delete, wipe partition, etc on the removable storage device using the EaseUS Partition Master.


Stay with www.iTTimesbd.com for more IT related Post

Friday, October 18, 2013

How to Make a Bootable USB Drive (Without Software)

make a bootable usb drive
Generally windows is installed in a PC using DVD drive. But if your computer do not have DVD drive or if your DVD drive is not working then there is only way to install windows in your computer is bootable USB Drive. It is very easy to to install windows in your computer using your bootable USB Drive. You can install any version of windows from a bootable USB drive. In this post Ina gonna share how to create Bootable USB drive and how to Install windows from it.


There are several software available like RuFus and Nero by which you can create bootable USB drive. But if you don't have any bootable USB drive creator then don't worry. Because the method that I am showing in this post does not require any software. That means you will be able to make a bootable USB drive using your PC CMD. But you need to have a PC with DVD drive to transfer windows file to bootable USB drive. Once you have created Bootable Windows USB drive then you will be able to install windows in any PC using this USB drive.


Requirement:
  • A PC having DVD drive.
  • A USB Flash/Pen Drive. (8 GB Recommended)
  • Windows DVD.

Making A Pendrive Bootable:
  • First Insert your USB drive to yous PC. (Pendrive)
  • Then click on Start button Windows Start button and type CMD in the search box. 
  • Then Right click on the Command Prompt and click Run as administrator.
  • Then the Command Prompt window will open.
  • Here in the Command Prompt type diskpart and press Enter.
  • Then type list disk and press Enter. It will show all drive of your system and their size. 
    • Note: Here your PC hard disk will be shown with the name Disk 0 and size will show in Gigabytes. Below you will get your USB drive with the name Disk 1 and size will show in Megabytes. You need to select your USB drive correctly.
  • If your USB drive is Disk 1 Then type Disk 1 and press Enter
  • Then type clean and press Enter.
  • Then type create partition primary and press Enter. It will create partition. 
  • Then type format fs=ntfs quick and press Enter to Format the USB drive. It will take some time to format.
  • Then type active and press Enter.
  • Finally type exit and press Enter to close the Command prompt window.

That's it your bootable USB drive is ready. Now insert the Bootable USB drive and Windows DVD into the PC which has DVD drive. Then copy the files from the Windows file and save it into your bootable Pendrive.


Install Windows From USB Drive: There are two way you can Install Windows in your PC from USB drive. One is from BIOS setting and other one is directly from the Booted USB Windows Drive. Lets see the both procedure. Make sure that your Bootable USB Windows Drive is connected to your PC.

From BIOS Setting:
  • First Restart your PC to access to the BIOS settings. You need to press F1, Del or Esc key to access the BIOS settings. This Key can be different from Mainboard to Mainboard.
  • Then you need to find The Boot Priority or The Boot Order option. This option also can be different depending on the BIOS version .
  • Then you have select - Boot from USB Drive to install windows from your USB drive. Now Save and Exit from BIOS. And your PC will take Restart, you will see the following message...


    Press any key to boot from USB...


  • Finally press Enter to start the windows installation.


Directly From Bootable USB Drive:
  • Open you Bootable USB windows drive and Double click on Setup. It will take a few seconds for preparing the windows for installation.
  • Then Complete the further steps to complete the Windows Installation.

At the times of installation your PC will take restart for several time, Don't worry it is the part of installation process. If you face any problem, please don't hesitate to leave a comment . . .


Stay with www.iTTimesbd.com for more IT related Post

Wednesday, March 13, 2013

How To Add & Remove Write Protection from Pen Drive

PenDrive Write Protection tricks
Pen or Flash drives are the most popular and handy gadget that has made easy to carry important content. Though Pen/Flash drive has many advantages, but there are some disadvantages too. And one of the most concerning problem is Security problem. Anyone can access into it and modify the content if they have it.

To present a solution for this problem I have decided to share this post. Using a simple Notepad trick we can easily enable and disable write protection whenever we want. Lets see how to do it.


Note: While doing these process you need to connect your Pen/Flash drive to your PC.


Enabling Pen/Flash Drive Write Protection:
  1. At first open your Notepad and write or paste the code given below.

    Windows Registry Editor Version 5.00 [HKEY_LOCAL_MACHINE\SYSTEM\CurrentControlSet\Control\StorageDevicePolicies] “WriteProtect”=dword:00000001
  1. Then save with the name of romel_soft.reg .
  2. Now double click this and click Yes then press OK.
That's it now your Pen/Flash drive is write protected and no one will modify your content

Disabling Pen/Flash Drive Write Protection:
  1. Again open the Notepad and write or paste the code given below.

    Windows Registry Editor Version 5.00 [HKEY_LOCAL_MACHINE\SYSTEM\CurrentControlSet\Control\StorageDevicePolicies] “WriteProtect”=dword:00000000
  1. Then save the name of romel_soft2.reg.
  2. Now double click this and click Yes then press OK.
Now release your  pen drive and connect it again. You will see that your Pen/Flash drive's write protection is disabled.
remove write protection from pen drive disk is write protected usb usb drive write protected the disk is write protected pendrive write protected pen drive the disk is write protected usb fix flash drive write protected write protection removal disk write protected usb fix unable to remove write protection from usb drive format write protected usb windows 10 the disk is write protected usb format disk is write protected pendrive
Stay with TecHie-ASiF for more IT related post

Thursday, March 7, 2013

Two Common Pendrive Problem Solution

Hello everyone, I hope that you are all fine. Today I am going to tell you a little tips, Hope that will helpful for you all. We all use pen drive who have computer. Sometimes we face the following common problem.

The two common problem of pen drive are as follows:
  1. Sometimes we want to format your Pen drive but it shows (windows was unable to complete the format).
  2. Sometimes we lost our file because of virus attack.

Follow the below step to solve pen drive problem:
  • We can solve the problem in Two Way:

Solution for Problem (1):
  1. At first right click on My Computer>>>click on Manage>>>click on Disk Management
  2. Then click on your Pen Drive Window>>>then Right Click>>>then choose Format.
                                                   It Will Work
pendrive problem solution


Solution for Problem (1)
  1. Start>>>Run>>>cmd>>>and format your pen drive, or Windows-key+R.
Example:
If your Pen-drive's Drive latter is ( J ) then type J:
C:\>format J:/q Enter.

Solution for Problem (2):
  1. Start>>>Run>>>cmd
  2. Then write your Pen-drive's Drive latter.
Example:
If your Pen-Drive's Drive later is ( J ) then type J:
Then type ATTRIB-S-H*.*/S/D  and then press Enter.
Wait sometimes and then insert your Pen Drive you will see you'r all file.


Stay with TecHie-ASiF for more IT related post

Tuesday, March 5, 2013

How To Increase Your Pendrive Speed

Hello everyone I hope that you are fine. Today I am going to tell you a little tips but I hope that will helpful for you. The tips is about how to increase your pen drive speed.  We all use pen drive everyday or sometimes. Sometimes we use software to make fast copy and paste from pen drive. But which work can be done without software so, why we need to use software for this work. I will show you how to increase your pen drive speed without software.

Follow the step below and increase your pen drive speed:
  1. At first click the right mouse button on My Computer and go to Properties option.
  2. Then select Hardware and go to Device Manager.
  3. After that from  Port ( Com & LPT ) double click on Communication Port ( COM 1 ).
  4. Then from Port Setting go to Bit Per Second and select maximum bit 128000.
  5. After from Follow Control select Hardware and then click OK.

pen drive speed

That's it you will see that pen drive speed is increased.


Stay with TecHie-ASiF for more IT related post